Table of Contents
Advertisement
Quick Links
Advertisement
Table of Contents

Related Manuals for Hanna Instruments HI5421


Summary of Contents for Hanna Instruments HI5421
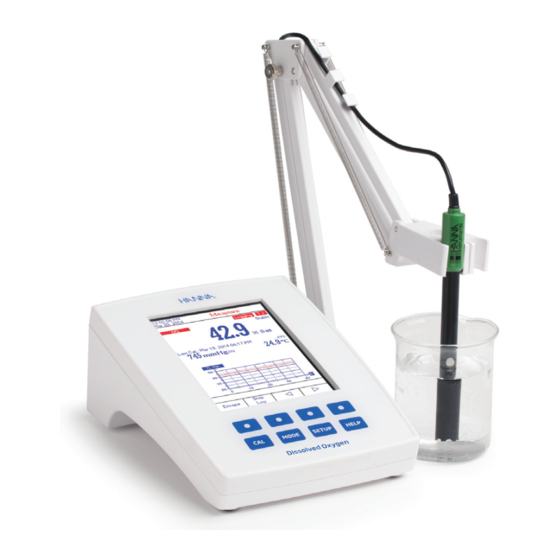
- Page 1 HI5421 DO/BOD/OUR/SOUR/Temperature Bench Meter...
- Page 2 If you need additional technical information, do not hesitate to e-mail us at tech@hannainst.com or view our worldwide contact list for a Hanna Instruments representative near you at www.hannainst.com. All rights are reserved. Reproduction in whole or in part is prohibited without the written consent of the...
- Page 3 PRELIMINARY EXAMINATION ....................GENERAL DESCRIPTION ....................... FUNCTIONAL DESCRIPTION ....................SPECIFICATIONS ......................... OPERATIONAL GUIDE ......................DISPLAYING MODES......................SYSTEM SETUP ........................DO SETUP .......................... BOD SETUP......................... OUR SETUP......................... SOUR SETUP ........................DO CALIBRATION ........................ PRESSURE CALIBRATION....................... DO MEASUREMENT......................BOD MEASUREMENT......................OUR MEASUREMENT ......................SOUR MEASUREMENT......................
- Page 4 • 12 Vdc Power Adapter • Electrode protective cap • Instruction Manual and Quick Reference Guide • Certificate HI5421-01 is supplied with 12 Vdc/120 Vac adapter. HI5421-02 is supplied with 12 Vdc/230 Vac adapter. Note: Save all packing material until you are sure that the instrument works properly. Any...
- Page 5 HI5421 is a professional bench meter with color graphic LCD for DO, BOD, OUR, SOUR and temperature measurements. The display viewing modes are: Basic information only, GLP information, Graph and Log History mode. The main features of the instruments are: •...
-
Page 6: Front Panel
HI5421 DESCRIPTION FRONT PANEL REAR PANEL 1) Liquid Crystal Display (LCD) 2) Capacitive touch keypad 3) ON/OFF button 4) Power adapter socket 5) DO probe input 6) USB connector... -
Page 7: Keyboard Description
KEYBOARD DESCRIPTION FUNCTION KEYS To enter / exit calibration mode. To select the desired measurement mode: DO, BOD, OUR, SOUR. To enter Setup (System Setup, DO Setup, BOD Setup , OUR Setup or SOUR Setup) and to access Log Recall function. To obtain general informations about the selected option / operation. - Page 8 Range 0.00 to 90.00 ppm (mg/L) / 0.0 to 600.0 % saturation Resolution 0.01 ppm (mg/L) / 0.1 % saturation Accuracy ±1.5% of reading ±1 least significant digit Measurement range -20.0 to 120.0 °C / -4.0 to 248.0 °F / 253.2 to 393.2 K DO compensation range 0.0 to 50.0 °C / 32.0 to 122.0 °F / 237.1 to 323.1 K Resolution...
-
Page 9: Power Connection
• Please wait until the instrument finishes the initialization process. Note: It is normal for the loading process to take a few seconds. If the instrument doesn’t display the next screen, restart the meter using the power button. If the problem persists, contact your local Hanna Instruments Office. - Page 10 For each measurement mode (DO, BOD, OUR or SOUR) the following display configurations are available: Basic, Graph and Log History. GLP is available for DO measurements. Basic Accessing this option, the measured value and its units are displayed on the LCD, along with the temperature value, temperature compensation mode, pressure value, pressure compensation mode and minimal GLP data.
- Page 11 Graph The online graph with real time logging (DO, BOD, OUR or SOUR vs. Seconds) will be displayed when this option is selected. If there is no active log, the previously logged data for the selected parameter will be shown. Notes: If no data is being logged, the graph will be empty.
- Page 12 Log History The measurement, along with Log History, will be visible when this option is selected: 1) The last stored logged data (Not actively logging) or 2) The last data logged from an active logging lot or 3) An empty display - NO LOTS saved, Not currently log- ging the log history list also contains the main measured value, the temperature, as well as a record time stamp.
- Page 13 The System Setup menu allows the user to customize the user interface, view meter information, set the external serial communication interface and to restore the manufacturer settings. Accessing System Setup • Press while in Measure mode. • Press . The system setup options will be displayed on the LCD.
- Page 14 Saving Confirmation Enable this option to force verification of a change made to a “GLP Data Option field” or a Sample ID name. If Saving Confirmation is enabled, the user will have to accept the change with a key stroke. If Saving Confirmation is disa- bled, the changes made to these fields change automatically without verification.
- Page 15 Date & Time Set the current date & time and the format in which they appear. These parameters will be displayed on the Measure screens and also when storing measured data. Set Date and Time This option allows the user to set the current date (year/month/day) and time (hour/minute/second). Notes: Only years starting with 2000 are accepted.
- Page 16 Note: If the time is changed with more than one hour before last calibration, a pop-up warning will appear on the LCD, notifying the user that a date/time conflict has occured and some time-dependent modes could work improperly (e.g. Measure, GLP, Log). LCD Setup This option allows the user to set the Contrast, the Backlight of the LCD and the Backlight Saver.
- Page 17 Color 1 White background blue text Color 2 Blue background white text Color 3 White background black text Color 4 Black background white text Language This option allows the user to choose the desired language in which all informations will be displayed. To select the Language: •...
-
Page 18: Meter Information
“Factory Calibration Expired” will be displayed when powering up the instrument. The instrument will still function, however, it should be taken to the nearest Hanna Instruments Customer Service for factory calibration. To view the Meter Information: •... - Page 19 Restore Factory Settings This option allows the user to erase all user settings and reset the instrument to the default factory settings. To restore the Factory Settings: • Press while in Measure mode. • Press • Use to select the Restore Factory Settings option.
- Page 20 The DO Setup menu allows the user to set the parameters related to the DO measurement and calibration. Accessing DO Setup • Press while in Measure mode and then to select the DO measure mode. • Press and then to access DO Setup menu.
- Page 21 Save Profile To save a profile: • Press while in DO mode. • Press • Use to highlight Profile option. • Press and then use highlight Save Profile. • Press . The existing configuration will be saved in current profile. Save Profile As...
-
Page 22: Delete Profile
. A list with all customized profiles will be displayed on the screen. • Press • Use to select the desired profile and press to confirm or exit without selecting. Delete Profile To delete one of the existing profiles: • Use to highlight the Profile option. - Page 23 Temperature Unit The user can choose from Celsius, Fahrenheit or Kelvin temperature units. To set the Temperature Unit: • Press while in DO mode. • Press • Press and then use highlight the Temperature Unit option. • Press and then use select Celsius, Fahrenheit or Kelvin unit.
-
Page 24: Calibration Reminder
Calibration Reminder This option allows the user to set the calibration reminder as Daily, Periodic or Disabled. To set the calibration reminder: • Press while in DO mode. • Press • Use to highlight the Calibration option. • Use to highlight the Calibration reminder option. - Page 25 Clear Calibration Accessing this option, the existent DO calibration can be cleared. If the calibration is cleared a default meter calibration is used. Another sensor calibration should be performed. To clear calibration: • Press while in DO mode. • Press •...
- Page 26 Barometer This parameter allows configuration of parameters related to barometric pressure. This parameter is only needed when measuring in concentration units of mg/L or ppm. From the Barometer menu the user can choose the pressure source and units, as well as the pressure. To access a Barometer option: •...
- Page 27 Pressure Units The user can choose from six pressure units: mmHg, mbar, kPa, inHg, psi or atm. To set the Pressure Unit: • Press while in DO mode. • Press • Use to highlight the Barometer option from the DO Setup menu. •...
- Page 28 • Use to highlight the Salinity Unit option. • Press and then use to select the desired units. • Press to confirm your selection or press to cancel operation. Sample ID This option allows the user to assign an identification number/name to sample logs. Two Sample ID parameters are available: ID Increment mode and Edit Sample ID.
-
Page 29: Stability Criteria
Note: ID increment is None. • Press and use to highlight the Edit Sample ID option. • Press . The Text Editor appears. • For text editing use to highlight the desired character and then press to add it to the text bar. - Page 30 Note: See Logging section for available types of logging. This option allows the user to edit the log settings: Logging Type, Logging Data Configuration, Sampling Period and New Lot. Logging Type Three logging types are available: Automatic, Manual and Auto Hold. Automatic - the measurement data is logged automatically at constant time intervals.
- Page 31 To set the Logging Data Configuration: • Press while in DO mode. • Press • Use to highlight the Log option. • Press and use to highlight the Logging Data Configuration option. • Press and use to highlight the desired parameter to be logged in file. •...
- Page 32 New Lot This option is used to create a new lot when manual log- ging is used. Note: If New Lot option is accessed and the Logging Type is Automatic, a warning message appears on the LCD informing the user that a new lot can be created only if the Logging Type is set as Manual.
-
Page 33: Alarm Limits
To set the Alarm State: • Press while in DO mode. • Press • Use to select the Alarm option. • Press and use highlight the Alarm State option. • Press and use to highlight the desired option. • Press to confirm your selection or press to cancel operation. -
Page 34: Measurement Unit
The BOD Setup menu allows the user to set the parameters related to the BOD measurements. Accessing BOD Setup A pop-up message appears to remind user to set method configuration. Press to continue. • Press while in Measure mode and then to select BOD mode. - Page 35 The OUR Setup menu allows the user to set the parameters related to the OUR measurement. Accessing OUR Setup • Press while in Measure mode and then to select OUR mode. • A pop-up message will appear to remind user to configure the method configuration.
- Page 36 The SOUR Setup menu allows the user to set the parameters related to SOUR measurement. Accessing SOUR Setup • Press while in Measure mode and then to select SOUR mode. • A pop up message appears to remind user to set method configuration.
-
Page 37: Initial Preparation
It is recommended to calibrate the probe frequently, especially if high accuracy is required. The DO probe should be recalibrated: • Whenever the DO probe is replaced. • At least once a week. • Before BOD, OUR, SOUR measurements. • When calibration reminder is activated (“DO Cal Expired”). •... - Page 38 Note: When not in use and during polarization, use the protective transparent cap. To calibrate the DO probe with meter: When the automatic standard recognition is selected: • Use HI7040 Zero Oxygen solution for 0% calibration (freshly prepared). • Rinse polarized DO probe with clean water. Dry tip and allow measurement to stabilize on meter.
- Page 39 When the user standard is selected: • The calibration can be performed at one value. • Edit the desired standard value by using then • Press again to finish the calibration or to exit calibration. If Automatic pressure source is chosen from the Pressure Source menu (see DO Setup), a pressure calibration at one point can be performed.
-
Page 40: Direct Measurement
Make sure the instrument has been calibrated before taking DO measurements. DIRECT MEASUREMENT To measure the DO of a sample using the Direct reading mode: • Press and then to select DO measure mode. • Select the Direct reading mode (see DO Setup). •... -
Page 41: Salinity Compensation
SALINITY COMPENSATION If the sample contains significant concentration of salinity, the read out values must be corrected, taking into account the lower degree of oxygen solubility in this situation. Before taking any DO measurements remember to set the salinity value from the DO setup menu. The salinity affects the DO concentration, decreasing its value. -
Page 42: Barometric Pressure Compensation
BAROMETRIC PRESSURE COMPENSATION The dissolved oxygen saturation value varies with pressure, so it is important to compensate the effect that pressure has on DO measurements. Altitude, Meters above Sea Level °C °F 300 m 600 m 900 m 1200 m 1500 m 1800 m 2100 m 2400 m 2700 m 3000 m 3300 m 3600 m 3900 m 4000 m 14.6 14.1 13.6 13.1 12.6 12.1 11.7 11.2 10.8 10.4 10.0 32.0 13.8 13.3 12.8 12.4 11.9 11.5 11.0 10.6 10.2... - Page 43 The meter contains a built-in barometer, and it is able to automatically compensate for changes in barometric pressure. If another pressure value than the barometer’s reading is to be used, then the manual pressure feature must be enabled (See DO Setup). The table below contains a conversion altitude (m) to pressure (mmHg) for the altitude values from the previous table.
- Page 44 Biochemical oxygen demand (BOD) is an indicator for the concentration of biodegradable organic matter present in a sample of water. It can be used to determine the general quality of the water and its degree of pollution. BOD measures the rate of oxygen uptake by microorganisms in a sample of water at a fixed temperature and over a given period of time.
- Page 45 • With the probe measuring the sample press The initial DO measurement will be saved. • Remove probe from sample and fill and cover to prepare bottle for incubation. • Rinse probe off with purified water. If desired, move probe to next sample. Press and repeat this procedure on additional samples and Seed samples.
- Page 46 (see SEED CORRECTION section). To print a copy of the BOD analysis of the sample: • Use HI92000 software to connect the HI5421 meter. • Select BOD sample from available BOD samples. • Press to have a paper copy of analysis.
- Page 47 SEED CORRECTION To apply seed corrections to the sample data follow the following procedure: • Press then to select BOD mode. • Press to view samples. Note: This list contains bottles with initial data, with 5 day BOD determinations and 5 day BOD determina- tions with seed corrections.
- Page 48 To print a copy of the BOD analysis with seed correction: • Use HI92000 software and connect the HI5421 meter. • Select the BOD sample from the available BOD reports. • Press to print a paper copy of the analysis.
- Page 49 The OUR is used to determine the oxygen consumption or respiration rate. It is defined as the mg/L of oxygen consumed per hour. The following equation is used for OUR determination: where: = Dissolved oxygen level at start of test START = Dissolved oxygen level at end of test = Elapsed time of test in seconds...
- Page 50 The Specific Oxygen Uptake Rate (SOUR), also known as the oxygen consumption or respiration rate, is defined as the milligram of oxygen consumed per gram of volatile suspended solids (VSS) per hour. This quick measurement has many advantages: rapid measure of influent organic load and biodegradability, indication of the presence of toxic or inhibitory wastes, degree of stability and condition of a sample, and calculation of oxygen demand rates at various points in the aeration basin.
- Page 51 There are 5 ways the Reading Mode and Log may be configured together. The table below shows the combinations and indicates where the completed log will be stored. Reading Mode log Recall Automatic (1) Automatic Log Direct Manual (2) Manual Log Auto Hold (NA) Not Applicable Automatic (3)
-
Page 52: Log Recall
3) Direct/AutoHold Reading Mode and Automatic Log Press and then keys must be pressed on front display to initiate this function. Real time continuous measurements are on display with “AutoHold” flashing and real time continuous logging into meter memory, until the meter reaches the stability criteria to go into Auto Hold mode. - Page 53 • Press to select the desired Log Report type. All logged lots for the selected Log Report type will be displayed on the LCD. • To filter the displayed lots, press and then the desired parameter. Only the selected measurement parameter lots will be displayed on the LCD.
- Page 54 To delete lots: • Press while in Log Recall mode. • Press to access delete or delete all mode. Otherwise, press to return to Log Recall view mode. • After selecting one of the Delete keys, use to select one lot and then press to delete the selected lot or all lots.
- Page 55 The PC software may also be used for real time logging. To allow our users access to the latest version of Hanna Instruments PC compatible software, we made the products available for download at http://software.hannainst.com. Select the product code...
- Page 56 The DO probe body is made of PEI. Use the protective cap provided when the probe is not in use. To inspect or replace the membrane proceed as follows: Inspection: Inspect membrane surface to ensure it is in perfect condition. The semipermeable membrane isolates the sensor elements from the environment but allows oxygen to enter.
- Page 57 If the error persists, contact your local Hanna Instruments Office. “Error Detected” pop-up at start Initialization error. Visualize the error (by pressing Yes key). Contact your local Hanna Instruments Office if a critical error occurs.
-
Page 58: Other Accessories
USB cable CERTIFICATION All Hanna Instruments conform to the CE European Directives. Disposal of Electrical & Electronic Equipment. The product should not be treated as household waste. Instead hand it over to the appropriate collection point for the recycling of electrical and electronic equipment which will conserve natural resources. -
Page 59: Warranty
If the repair is not covered by the warranty, you will be notified of the charges incurred. If the instrument is to be returned to Hanna Instruments, first obtain a Returned Goods Authorization (RGA) number from the Technical Service department and then send it with shipping costs prepaid. - Page 60 World Headquarters Hanna Instruments Inc. Highland Industrial Park 584 Park East Drive Woonsocket, RI 02895 USA www.hannainst.com MAN5421 Printed in ROMANIA...
Need help?
Do you have a question about the HI5421 and is the answer not in the manual?
Questions and answers