Table of Contents
Advertisement
Quick Links
http://www.narda-sts.it
PMM CA0010
Including description of:
- PMM Click Analysis software
- PMM Click Generation software
SERIAL NUMBER OF THE INSTRUMENT
You can find the Serial Number on the rear panel of the instrument.
Serial Number is in the form: 0000X00000.
The first four digits and the letter are the Serial Number prefix, the last five digits are the
Serial Number suffix. The prefix is the same for identical instruments, it changes only
when a configuration change is made to the instrument.
The suffix is different for each instrument.
Document CA0010EN-80502-1.01 - Copyright © NARDA 2018
Sales & Support:
NARDA
Via Leonardo da Vinci, 21/23
Safety
20090 Segrate (MI) -
Test
Tel.: +39 02 2699871
Solutions
Fax: +39 02 26998700
S.r.l. Socio Unico
User's Manual
CLICK ANALYZER
150 kHz ÷ 30 MHz
Manufacturing Plant:
Via Benessea, 29/B
17035 Cisano sul Neva (SV)
ITALY
Tel.: +39 0182 58641
Fax: +39 0182 586400
Advertisement
Table of Contents

Related Manuals for NARDA PMM CA0010


Summary of Contents for NARDA PMM CA0010
- Page 1 The first four digits and the letter are the Serial Number prefix, the last five digits are the Serial Number suffix. The prefix is the same for identical instruments, it changes only when a configuration change is made to the instrument. The suffix is different for each instrument. Document CA0010EN-80502-1.01 - Copyright © NARDA 2018...
-
Page 2: Explanation Of Electrical And Safety Symbols
NOTE: ® Names and Logo are registered trademarks of Narda Safety Test Solutions GmbH and L3 Communications Holdings, Inc. – Trade names are trademarks of the owners. If the instrument is used in any other way than as described in this User’s Manual, it may become unsafe. -
Page 3: Table Of Contents
Contents Page Explanation of electrical and safety symbols……..………………………… General safety considerations and instructions.………..…………………. PMM CA0010 EC Declaration of Conformity .....………………………... Page 1. General Information 1.1 Documentation………………………………………………………………….. 1.2 Operating Manual changes……………………………………………………. 1.3 Introduction to PMM CA0010 ………………………………………………… 1.4 Return for service ………………………………………………………………. - Page 4 3.8.8 Max Time ……………………………………….…………………………….. 3-17 3.8.9 Idle Frequency ……………………………………………………………….. 3-17 3.8.10 Idle Level ……………………………………………………………………. 3-17 3.8.11 Single Run ………………………………………………………………….. 3-17 3.9 Test Set up ……………………………………………………………………… 3-18 3.10 Diagnostic …………………………………………………………………….. 3-19 3.11 Click reports with PMM Emission Suite or PMM Click Analysis software 3-20 3.12 Autocal ………………………………………………………………………….
- Page 5 Figures Figure Page Front Panel CA0010 ………………………………………………... Rear Panel CA0010 ………………………………………………..PMM CA0010 Functional Diagram ……………………………….. PMM CA0010 click analysis setup ………………………………... PMM CA0010 + 9010F Click Mode ………………………………. Click ……………………………………………………….…………. Start ………………………………………………………………..… 3-10 Click Setup ………………………………………………………….. 3-12 Limit …………………………………………………………………..
- Page 6 • The protective earth ground conductor shall not be interrupted intentionally. • To avoid electrical shock do not remove protections or covers of the unit , refer to qualified NARDA Servicing Center for maintenance of the unit.
- Page 7 Descrizione CLICK ANALYZER Description Modello PMM CA0010 Model è conforme ai requisiti essenziali delle seguenti Direttive: conforms with the essential requirements of the following Directives: Bassa Tensione 2014/35/EU Low Voltage Compatibiltà...
- Page 8 This page has been left blank intentionally VIII Safety considerations...
-
Page 9: General Information Page
1 – General Information 1.1 Documentation Enclosed with this manual are: • a service questionnaire to send back to NARDA in case an equipment service is needed • an accessories checklist to verify all accessories enclosed in the packaging. Instruments manufactured after the printing of this manual may have a 1.2 Operating... - Page 10 1.4 Return for If the instrument should be returned to NARDA for service, please complete the service questionnaire enclosed with the Operating Manual Service and attach it to the instrument. To minimize the repair time, be as specific as possible when describing the failure. If the failure only occurs under certain conditions, explain how to duplicate the failure.
-
Page 11: Instrument Items
Antennas) • LISN Service Kit (AC-BNC adapter for LISNs verification and calibration) 1.7 Other accessories Of course, the PMM CA0010 can be used with other accessories available on the market, like: • LISNs, any type; • Click analyzers, any type;... -
Page 12: Main Specifications
1.8 Main Specifications Table 1-1 lists the PMM CA0010 performance specifications. The following conditions apply to all specifications: • The ambient temperature shall be -5°C to 45°C TABLE 1-1 Main Specifications 150 kHz; 500 kHz; 1,4 MHz; 30 MHz Frequency range RF input 50 Ω, Internal switch from LISN or BNC fem. - Page 13 Autocalibration Embedded generator for autocalibration and system test CISPR 14-1, CISPR 16-1-1, CISPR 16-1-2 CISPR conformity I/O interface RS-232, USB Application software PCA - PMM Click Analysis software. Four channels IF and QP time diagram, with click detection and analysis. Measurement log and report.
-
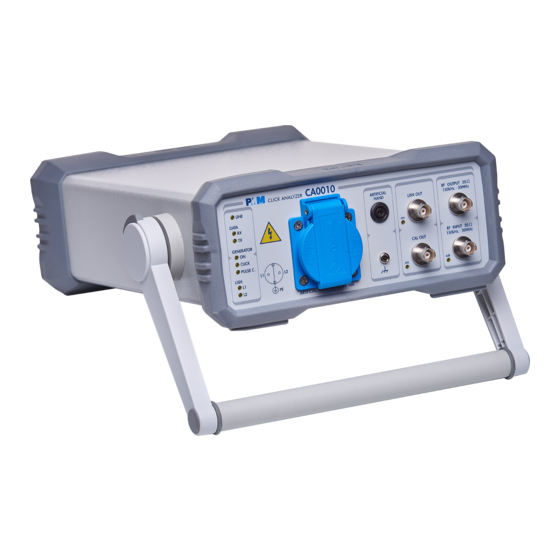
Page 14: Front Panel
1.9 Front Panel Fig. 1-1 Front Panel Legend from left to right: - LED indications Line, power on; Data RX and TX show the serial communication flux Generator: ON, shows stand-by status, CLICK shows when OOK is ON, PULSE C. when CISPR pulses are being generated. LISN L1 and L2 to show which one of the internal LISN lines is selected - Artificial Mains Network 16A It is the mains socket where the supply of the EUT must be connected to for measuring its conducted emissions. -
Page 15: Rear Panel
1.10 Rear Panel Fig. 1-2 Rear Panel Legend from left to right: - Mains socket IEC 60320 C20 to supply the EUT through the internal LISN. - RS232 9 pin, DB9 connector - USB Fully functional USB 2.0 Port - Earth ground connector 4 mm socket - Power Supply 12 V Power Supply connector. - Page 16 The PMM CA0010 features a useful, versatile architecture, which puts 1.11 Functional together three instruments in one, as shown in the diagram below. Description The PMM CA0010 diagram is shown in Fig. 1-4 Fig. 1-3 PMM CA0010 Functional BLOCK Diagram...
- Page 17 EMC characteristics, which must be within well defined limits. The design approach adopted for the PMM CA0010 is that the instrument shall be full compliant with all the relevant standards and at the same time simple and reliable to use, to be the best ancillary for the 9010F Emi Receiver and to allow the evaluation of any possible other click meter.
- Page 18 This page has been left blank intentionally 1-10 General Information...
-
Page 19: Introduction
2.3 Packing and check list enclosed with the Operating Manual. Unpacking Notify any damage to the forwarder personnel as well as to your NARDA Representative. To avoid further damage, do not turn on the instrument when there are signs of shipping damage to any portion of it. -
Page 20: Indication Of The Line Led
When the AC/DC wall adapter is connected to the PMM CA0010, and the 2.5.2 Indication of the LINE Led rear switch is turned on, the front panel LINE Led lights up. Almost immediately after being switched on, the instrument is ready to operate. -
Page 21: Return For Service
To allow correct equipment ventilation ensure that the vent grids on the bottom of the analyzer are free by any obstructing object. 2.10 Hardware PMM CA0010 is delivered ready to use from factory. Remove the instrument Installation from its cardboard shipping box, connect the AC/DC power supply properly and shift the back toggle switch to the “ON”... -
Page 22: Using An Artificial Mains Network (Amn Or Lisn)
Shift the back power switch to the OFF position to switch the unit OFF. Fig. 2-1 PMM CA0010 click analysis setup. 2.11 Using an Artificial When the PMM CA0010 analyzer is connected to an external LISN to perform conducted interference measurements of the EUT, the RF output of Mains Network the LISN shall be connected to the RF input of the analyzer. - Page 23 Be sure not to overload PMM 9010/Click4E: the input signal should not exceed the maximum level indicated in the main specifications. Also do not apply any signal to RF generator output connector. To get the system working properly it is necessary the PMM 9010F runs a firmware revision 1.64 or following.
- Page 24 This page has been left blank intentionally Installation...
-
Page 25: Stand Alone Usage Page
The RS232 port connectors are located on the rear panels of the two instruments. Connect also the RF Output of the PMM CA0010 to the RF Input of the PMM 9010F, through the supplied short BNC coaxial cable. Then, switch ON the PMM CA0010, and after a short time switch ON also the PMM 9010F. - Page 26 • SETUP: to set the measurement parameters Always use Esc button to return to the previous view/condition. To increase test productivity the PMM CA0010 and 9010F system has some very unique features: it allows collecting measurements of the four standard channels simultaneously, and skipping the second step, as it may predict how many clicks would overcome the Lq limit and may also advice the User if the next step would fail.
-
Page 27: Introduction To The Discontinuous Disturbance (Click) Measurement
3.5 Introduction Mechanical or electronic switching procedures - e.g. those due to thermostats or program controls – may unintentionally generate broadband to the discontinuous discontinuous disturbances with a repetition rate lower than 1 Hz. disturbance (click) Indeed, CISPR 16-1-1 and CISPR 14-1 define a discontinuous measurement disturbance, also called “click”, as a disturbance the amplitude of which exceeds the quasi-peak limit of continuous disturbance, the duration of... -
Page 28: Determination Of The Click Rate
The click rate shall be determined at two frequencies: 150 kHz (CH1) and 500 kHz (CH2). The system with the PMM CA0010 Click Analyzer is able to carry out the test simultaneously at these two, or even all the four, frequencies. -
Page 29: E4 Exception In 9010F Click Analyzer
The PMM 9010F can now produce an extensive report with all the relevant data. The system with PMM CA0010 is able to perform the measurements of the four channels at the same time, thus saving a lot of time for the job, and reducing EUT stress. -
Page 30: Start
As soon as the Setup has been done (see § 3.7), it is possible to start the test. First of all the PMM CA0010 and 9010F will determine the click rate N, and – if all the conditions apply – after that the analyzer will immediately... - Page 31 (140 dBμV), and that a click test may result in a potentially dangerous condition for the input stage of the receiver. Before to apply an unknown signal to the PMM CA0010 and 9010F receiver, use an oscilloscope or a wide band RF voltmeter to measure If needed, add a coaxial attenuator to the input signal line.
-
Page 32: Stop And Pause
3.6.1 Stop and Pause If Stop has been selected during a measurement, the test can then be aborted or it is possible to go immediately to the next step. If Paused, the test can be resumed at any convenient time. 3.7 Report After a Click test the PMM 9010F reports all the relevant data. -
Page 33: Report After A Successful Test At 4 Frequencies
All the relevant information is provided. test at 4 frequencies The system composed of PMM CA0010, PMM 9010F and any PMM LISN 3.7.4 PMM LISN line can automatically select the mains line to be investigated, controlling the remote selection LISN through the User Port. - Page 34 3.8 Setup Due to the complexity of the discontinuous disturbance test, this panel is rather complex, as many parameters shall be defined. However, the PMM 9010F has been designed to be extremely user-friendly and to take care in a fully automatic way of all the necessary steps of the test.
-
Page 35: External Attenuator
3.8.1 External In case an external attenuator is used to protect the input of the analyzer, the value of this attenuator can be entered, in order to have the attenuator PMM 9010F taking into account the value in all calculations of measured levels. -
Page 36: Limit
3.8.2 Limit Fig. 3-5 Limit Three most used limits are built-in into the analyzer: CISPR 14, CISPR22 and CISPR11. Either one can be selected simply by pressing the relevant key. The limit will be loaded and all the calculations will be done with reference to the selected limit: The Reference Standard for Click tests is always EN 55014-1 (or equivalent CISPR 14-1), which defines 4 different Limit Curves for Q-Peak... -
Page 37: Determination Of N
3.8.3 Determination of N As required by the standard, N may be determined either by counting the clicks, or by counting the switching operations. Fig. 3-6 Calculate N Select Clicks if N has to be calculated on the number of clicks, or select Sw.Op.+ or Sw.Op.- to determine N on the number of switching operations, going up and down the list of the available options in terms of switched current: 10mA;... - Page 38 3.8.5 Stop on Fail The Click test may be rather long, as the observation time and EUT cycle can take as long as 120 minutes. In order to save time and increase productivity, the PMM 9010F can stop the test as soon as a fail condition is achieved. Two options are therefore available: stop immediately as the fail condition occurs (Right away) or anyway at the End of Step.
-
Page 39: Terminate On
3.8.6 Terminate on To define the automatic stop condition, it is possible to select between two options: 40 Clicks/Time and Time/Manually. In the first case, the stop of the current run either happens after 40 clicks or after the defined time has elapsed; in the second case, the step is not terminated when reaching 40 clicks (thus allowing to test EUTs that are commanded by a program) but only when the defined time has elapsed. - Page 40 Once the PMM LISN sub-menu has been selected, a choice is available to define if to run the test on a specific Line (L1, L2, L3, N) and finally execute the complete test on that specific Line. 3-16 Setup and Panel Instructions...
-
Page 41: Max Time
The threshold level allowed ranges from 31 up to 120 dBµV. 3.8.11 Single Run The “Single Run” is a PMM CA0010 unique feature, which allows a relevant time saving in Click measuring approach. It is usually very difficult to measure QuasiPeak values for pulsed signals, in a way that linearity of the receiver could normally not fulfill such a special measurement’s requirement. -
Page 42: Test Set Up
Both in case the rate N is to be evaluated from the RF signal measurements and from the switching operations counting, it needs only the connections between the PMM CA0010 Click Analyzer and the PMM 9010F Emi Receiver, since the internal LISN is properly routed automatically. - Page 43 3.10 Diagnostic In case the PMM CA0010 unit is not connected – or anyway non properly functioning – the display of the PMM 9010F, after entering the Click window, will show again one of the channels in Idle mode, but without the indications “CHn”...
- Page 44 3.11 Click reports with The PMM Emission suite and PMM Click Analysis supplied softwares PMM Emission Suite provide both an easy tool to download Click measurements from the analyzer. or PMM Click Analysis software Here is an example of what the Suite screen can show when a Click report has been downloaded.
-
Page 45: Autocal
To run the autocalibration, please follow the simple instructions below: Install the setup as indicated in §2-10 switch the PMM CA0010 on, then after a short while switch also the PMM 9010F on, press the Setup function key,... - Page 46 When the self-calibration is successfully finished, a message like in the following picture is displayed: In order to avoid any possible external influence, it is suggested to disconnect all cables from the PMM 9010 RF ports during the self- calibration process. It is strongly recommended that the User launches the self-calibration every now and then.
-
Page 47: Installation
The User might have the need of administrator privileges to install the software. For further information, please see the next paragraph. The new releases can be requested to narda distributors, which list can be found in the official website: http://www.narda-sts.it 4.1.2 Installing CA0010... - Page 48 The User must have administrator privileges to install the CA0010 software; right click on the program .exe file and click “Run as administrator” to temporarily run the program or application as an administrator, until closing it (Windows 7 also allows to mark an application so that it always runs with administrator rights).
- Page 49 Fig.4-4 Installation folder Fig.4-5 Ready to install Sweep Mode Operating Instructions...
- Page 50 Fig.4-6 Installing CA0010 Fig.4-7 Installation successful CA0010 software is now installed in your PC, you can remove it, if needed, simply running the “Uninstall CA0010” application (see par 4-8). Sweep Mode Operating Instructions...
-
Page 51: Introduction
4.2 Introduction The PMM CA0010 software package contains the PMM Click Analysis (PCA) application and the PMM Click Generation (PCG) application. The PCG is described in chapter 5 of this manual. The measurement reports can also be downloaded using the PMM Emission Suit. -
Page 52: Highlight - Open Full
4.3 Highlight – An archived measurement can be loaded in Highlight mode or in Full Open Ful mode. Highlight mode is a powerful and quick way to trace and put in evidence the relevant events occurred during the acquisition of the disturbances. Click the Open Full software button to load the entire measurement;... - Page 53 4.4 Start The Start soft button is used to set the scan parameters and to run a new measurement. Fig. 4-9 Click Setup Sweep Mode Operating Instructions...
- Page 54 4.4.1 Setup When the software button is clicked, the Click Setup window pops up. Here it is possible to: • set the value in dB of a possible external attenuator, • choose the standard limit, • set if rate calculation will be based on RF signal measurement (Clicks) or on switching operations (current consumption threshold), •...
-
Page 55: Stop
When the PMM CA0010 is used the Preselector filters are always enabled. The Preselector is composed by a group of filters automatically selected by the analyzer. The aim of the preselector is to reduce the amount of out-of- band energy entering in the receiver, thus helping a lot in reducing saturation risks, intermodulation problems and similar undesired behaviors. -
Page 56: Report
4.6 Report When a measurement is completed, both if passed and failed, the analyzer prepare a detailed test report, in table form, where all the test information are shown. Fig. 4-10 Report The Lq Calculation refers the the first run while the Final Test Report is the outcome of the second run. -
Page 57: Autocalibration
To run the autocalibration, please follow the simple instructions below: Install the setup as indicated in §2-10 switch the PMM CA0010 on, then after a short while switch also the PMM 9010F on, click the Auto Calibration soft button,... - Page 58 When the self calibration starts, a pop up window appears, showing the status as it procedes. Fig. 4-11 Autocalibration If everithing goes well, at the end a message like in the picture above appears, showing that the calibration was succesfully terminated. 4-12 Sweep Mode Operating Instructions...
-
Page 59: Pmm Click Generation Page
PMM CA00010 in a complete click meter test set. Document CA0010EN-80502-1.01 - © NARDA 2018 Analyzer Mode Operating Instructions... -
Page 60: Software
5.3 Software Fig. 5-1 PMM Click Generation The DEFAULT_TAB configuration file contains the CISPR 16-1-1 standard tests of the base Table and of the Annex F Table. To be preserved as reference, this default file cannot be deleted or edited within the software. 5.3.1 Standard Tests On the screen, all the relevant information are reported. -
Page 61: Data Test
In the middle, the Data Test frame reports the signal parameters: 5.3.2 Data Test • E1 (Event 1) with its duration, in milliseconds, and level, in dBµV; • Separation (between Event 1 and 2, if present) with its duration, in milliseconds;... -
Page 62: Custom Signals
In addition to being able to generate all the standard tests, the system allows 5.3.3 Custom signals to create an arbitrary sequence of disturbances as desired. The internal generator consists in a high performance circuit, capable of producing pulsed signals which duration and level can be set with an optimal precision and resolution. - Page 63 When clicked, the Custom soft button enables a set of parameters that can be edited as desired, within the limits of the main specifications. Fig. 5-3 Custom signals parameters In the Data Test frame, for the custom disturbance generation, it is possible to set the duration of up to 4 events, each one with its amplitude, and a different separation interval between them.
-
Page 64: Cispr Pulses
The powerful internal generator implements also a section able to generate 5.3.4 CISPR Pulses wideband CISPR pulses, without the need of additional external expensive equipment. The amplitude attenuation for CISPR Pulses can be set inside the appropriate frame in the software. The maximum output level is available for 0.0 dB attenuation. -
Page 65: Introduction
• PMM 9010/03P EMI Receiver 30 MHz ÷ 300 MHz • PMM 9010/30P EMI Receiver 30 MHz ÷ 3 GHz; • PMM 9010/60P EMI Receiver 30 MHz ÷ 6 GHz Document CA0010EN-80502-1.01 - © NARDA 2018 PMM 9010-RMA Rack Mount Adapter... -
Page 66: Pmm 9010-Rma Main Specifications
1 – Holes Flanges used to fix the Rack Mount to the Rack 2 – Handles used to carry the Rack Mount 3 – PMM CA0010, 9010F or 9010/03P/30P/60P window 4 – Milled knob used to fix the frontal panel to the Rack 5 –... -
Page 67: Pmm 9010-Rma Inside View
6.6 PMM 9010-RMA Inside view Fig. 6-2 Inside view Legend:: 1 – Round holes of service 2 – Rectangular holes used to put CA0010, 9010F or 9010/03P/30P/60P Instrument; 3 – CA0010, 9010F or 9010/03P/30P/60P straps; 4 – Rectangular holes for future implementation; 5 –... -
Page 68: Rack Requirements
The rack must be of the following type: 6.7 Rack Requirements - Standard 19 inch (483 mm) with mounting rails that conform to English universal hole spacing per section 1 of ANSI/EIA-310-D-1992. - The minimum vertical rack space per chassis must be 3U (rack units), equal to 3 inches (132.5 cm). -
Page 69: Installation Guidelines
6.10 Installation When installing the chassis, follow these guidelines: guidelines - Plan your site configuration and prepare the site before installing the chassis. - Ensure that there is adequate space around the rack to allow for servicing the chassis and for airflow. - If the rack has wheels, ensure that the brakes are engaged or that the rack is otherwise stabilized - For a round hole (tapped) rack, use... -
Page 70: Installing The Pmm 9010-Rma
6.11 Installing the This section describes how to install the PMM 9010-RMA Rack Mount Adapter: PMM 9010-RMA - Insert the cage nuts behind the vertical rails with respect to the Rack Unit Boundary and the distance show below: ou can use a rack-insertion tool or a flat-blade screwdriver to install the cage nuts. -
Page 71: Use Of The Pmm 9010-Rma With Pmm 9010
PMM 9010-RMA or 9010/03P/30P/60P. with This section provides the information needed to install your CA0010 PMM CA0010 instrument in the PMM 9010-RMA Rack Mount Adapter. - Remove the frontal panel from the Rack unscrewing the milled knob without loosing it completely. - Page 72 This page has been left blank intentionally PMM 9010-RMA Rack Mount Adapter...
- Page 73 Moreover, we are continuously improving our quality, but we know this is a never ending process. We would be glad if our present efforts are pleasing you. Should one of your pieces of NARDA equipment need servicing you can help us serve you more effectively filling out this card and enclosing it with the product.
- Page 74 Suggerimenti / Commenti / Note: Suggestions / Comments / Note:...
Need help?
Do you have a question about the PMM CA0010 and is the answer not in the manual?
Questions and answers