Advertisement
Available languages
Available languages
INSTRUCTION SHEET
PRODUCT: 64678 Current • Page 1 of 3
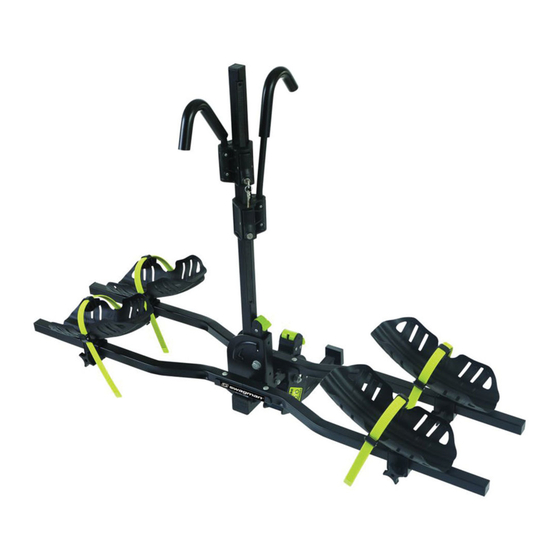
Assembly Instructions
1. Remove main assembly (A) and cross bars (B) from box.
2. Assemble the crossbars (Diagram 1). The crossbar is
made up of one male section and one female section.
Make sure both square holes are positioned upward.
3. Align the ratcheting upright arm (C) onto the center
section of the main assembly. Position it so that it
folds to the left side when viewing from the back of
the vehicle (Diagram 2). This will allow for easier use
of the ratchet hooks. Secure with two 8MM x 70MM
two carriage bolts, washers and nuts.
4. Place the assembled cross bars onto the main
assembly so that the small set screw holes at the end
of the bar are facing downwards. Insert the two 8MM
x 45MM carriage bolts through the bracket, into the
holes on the cross bars and secure with the washer
and nut (Diagram 3). Note the orientation of the bars
on the main assembly.
5. Repeat the same procedure with the second crossbar.
6. Install one long hook (D) and one short hook (E) onto
the upright ratchet arm (Diagram 4). NOTE: the long
hook goes on first. NOTE: depending on the bikes
you may have to install the short hook first and then
the long hook.
7. Slide the wheel trays (F) onto the cross bars (Diagram
5). The wheel trays should be orientated so that the
high side of the tray is closest to the centre post of
the rack and the buckles and knobs are facing the
back of the rack. Your bike size will determine the
best position for these 4 wheel holders. Review bike
Installation for more details.
8. After all of the wheel trays are installed you will need
to install the self taping screws (G) into the underside
ends of each crossbar (Diagram 5). NOTE: This will help
prevent the wheel tray from sliding off if you forget to
tighten the wheel tray knob when not in use.
9. If the rack is to be used on 1-1/4" receiver you will
need to remove the Allen Bolt that holds on the
spacers (Diagram 6).
Installing the Rack Into Your Vehicle:
1. Insert the bike rack into the 2" or 1-1/4 " receiver.
Install the ½" threaded locking hitch pin and tighten
to 50 ft lbs. (very tight). Put on the lock head until it is
securely attached. NOTE: A non-locking hitch pin and
clip is supplied. Some vehicle hitches may not have
room for the locking pin.
300 - 1880 Government St. • Penticton, B.C. Canada V2A 7J1 • Phone (250) 490-8883 • Fax (250) 490-8885 • www.swagman.net
Parts List
8MM x 45MM
Bike Lock Keys
Self Taping Screws
(B) Female
(A)
2x
8MM x 70MM Carriage Bolts
8MM x 45MM Carriage Bolts
8MM x 70MM
Optional Hitch Pin
(G)
6MM Allen Key
(B) Male
1
(C)
2
3
Bracket
4x
REV 14/11/19
Advertisement
Table of Contents

Related Manuals for Swagman 64678


Summary of Contents for Swagman 64678
- Page 1 Some vehicle hitches may not have 8MM x 45MM Carriage Bolts room for the locking pin. REV 14/11/19 300 - 1880 Government St. • Penticton, B.C. Canada V2A 7J1 • Phone (250) 490-8883 • Fax (250) 490-8885 • www.swagman.net...
- Page 2 Due to the increase in thinner/lighter “carbon frame bikes” this rack may be inappropriate because the hook clamps the frame. Please check with your bike manufacturer for specific details. REV 14/11/19 300 - 1880 Government St. • Penticton, B.C. Canada V2A 7J1 • Phone (250) 490-8883 • Fax (250) 490-8885 • www.swagman.net...
- Page 3 The rack is not under warranty if mounted in this location. ATTN: STATE OF CALIFORNIA CONSUMERS WARNING: Cancer and Reproductive Harm • www.P65Warnings.ca.gov REV 14/11/19 300 - 1880 Government St. • Penticton, B.C. Canada V2A 7J1 • Phone (250) 490-8883 • Fax (250) 490-8885 • www.swagman.net...
- Page 4 Certains Boulons 8 x 45 mm attelages de véhicules ne peuvent pas être dotés de goupille verrouillable. REV 14/11/19 300 - 1880 Government St. • Penticton, B.C. Canada V2A 7J1 • Phone (250) 490-8883 • Fax (250) 490-8885 • www.swagman.net...
- Page 5 Veuillez vérifier auprès du fabricant de vélo pour plus de détails. REV 14/11/19 300 - 1880 Government St. • Penticton, B.C. Canada V2A 7J1 • Phone (250) 490-8883 • Fax (250) 490-8885 • www.swagman.net...
- Page 6 à sellette d’attelage, de l’emplacement de l’installation ou du porte-vélos. Le porte-vélos n’est pas couvert par la garantie s’il est monté à cet endroit. REV 14/11/19 300 - 1880 Government St. • Penticton, B.C. Canada V2A 7J1 • Phone (250) 490-8883 • Fax (250) 490-8885 • www.swagman.net...
Need help?
Do you have a question about the 64678 and is the answer not in the manual?
Questions and answers