Advertisement
Available languages
Available languages
PRODUCT: 64940 4 Bike XP Rack - 2" Standard Receiver • Page 1 of 2
INSTRUCTIONS:
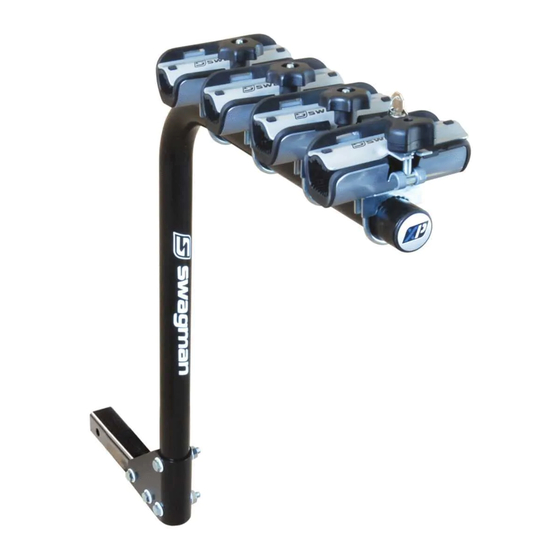
1. Assembling the 4 Bike Rack (diagram 1).
a. Slide rack 'C' into collar 'B' . Secure in place with 12mm x 80mm bolt, washers and lock nut.
b. Torque the nut using a 18mm wrench.
c. Slide the receiver piece 'A' into collar 'B' . Secure in place with two 12mm x 80mm bolts and lock nuts.
d. Torque the nuts on tightly using a 18mm wrench (60 ft/lbs).
e. Periodically check to make sure that all bolts, lock nuts, pins and clips are in place and secure.
2. Place your rack receiver into your receiver hitch* (diagram 3).
3. Fit rack as close to the vehicle as possible.
4. Secure your rack with the threaded hitch pin and clip. NOTE: Tighten the hitch pin to 40 ft. lbs.
5. Check to ensure rack is secure and safety pin is in place.
CRADLE INSTRUCTIONS (DIAGRAM 2):
1. Remove the large vinyl from the cradle exposing the nuts on the "C" clamps
2. Remove the nuts and pull off the "C" clamp
3. Push the "C" clamp under the top tube facing upward; install the tube bracket and then the cradle.
Position the locking cradle furthest from the rear of the vehicle and no further than within 1" of the
end of the tubing.
4. The cradles can be individually positioned in several locations. This will allow the cradles to be
angled so that when bikes are installed the tires will be level to the ground.
5. Install the two nuts and tighten equally so that no threads are showing on the top of each nut.
Periodically check to ensure that they are tight. NOTE: If one nut is tightened more than the other,
the threads will protrude through the vinyl causing damage to the bike frames.
6. Install the bikes and tighten down the top plates. Ensure that the spacer on the knob goes into the
round slot in the top plate. NOTE: Extreme force can be generated by the top plates so don't over
tighten the knobs or frame damage will occur.
7. A tether strap is supplied and should be used if excessive rack movement is noted. It is mounted on
the cradle closest to the vehicle. The fixing plate is mounted between the Bike Rack Tube Gripper Plate
and the metal cradle. The tether strap clip is inserted into the slot on the fixing plate. The webbing
strap is wrapped through a point on the vehicle and back through the metal spring loaded buckle.
There is a lot of length on the strap to allow for many different mounting locations. Each vehicle
is different so you will need to find a secure location. Tighten the strap and tie off the extra length of
webbing to prevent it from flapping in the wind and loosening up. Periodically check the strap to
insure that it is tight, especially if it gets wet.
8. The warrantee will be voided if the rack is overloaded with more bikes than the rack was intended for.
Swagman • 300 - 1880 Government St. • Penticton, B.C. Canada V2A 7J1 • Phone (250) 490-8883 • Fax (250) 490-8885 • www.swagman.net
INSTRUCTION SHEET
1
2
3
REV 24/11/10
Advertisement
Table of Contents

Related Manuals for Swagman 64940


Summary of Contents for Swagman 64940
- Page 1 8. The warrantee will be voided if the rack is overloaded with more bikes than the rack was intended for. REV 24/11/10 Swagman • 300 - 1880 Government St. • Penticton, B.C. Canada V2A 7J1 • Phone (250) 490-8883 • Fax (250) 490-8885 • www.swagman.net...
- Page 2 • The purchaser should be aware that the load created by a rack and bicycles can exceed the maximum rating on the hitch or bumper. • Swagman racks are powder coated to help prevent rust. When leaving the rack outside for extended periods of time the finish will loose its luster.
- Page 3 8. La garantie est nulle si vous installez un plus grand nombre de vélos que la capacité de charge du porte-vélos. REV 24/11/10 Swagman • 300 - 1880 Government St. • Penticton, B.C. Canada V2A 7J1 • Phone (250) 490-8883 • Fax (250) 490-8885 • www.swagman.net...
- Page 4 • Le revêtement des porte-vélos Swagman a été réalisé par poudrage afin de prévenir la rouille; il perdra cependant de son lustre si vous laissez le porte-vélos à l’extérieur pendant une longue période. Nous vous recommandons de ranger le porte-vélos à l’intérieur lorsque vous ne vous en servez pas.
Need help?
Do you have a question about the 64940 and is the answer not in the manual?
Questions and answers