Advertisement
Available languages
Available languages
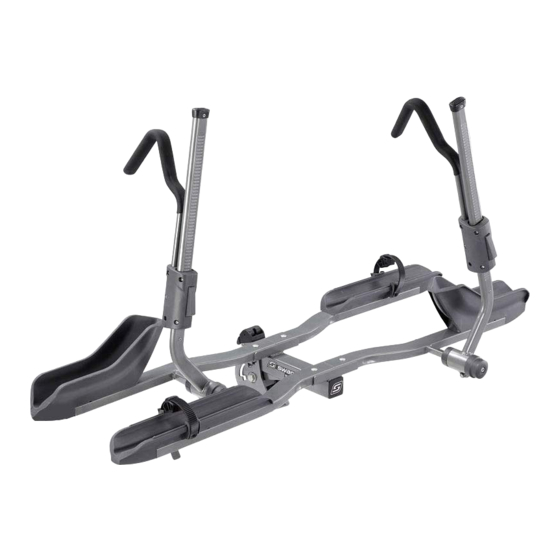
Assembly Instructions:
1. Remove main assembly (A) from box.
2. Insert cross bars into main assembly (A) (diagram 1). The crossbar
is made up of one male section and one female section. The
crossbars are labeled #1 and #2. Assemble the bars so that the #1
match and the #2 match. Make sure both square hole are positioned
upward. The male section has the upright pivot arm attached to it.
Position the arms so they are orientated as shown in diagram 2.
3. Place the assembled cross bars onto the main assembly so that the
square bolt-holes are position upward. Insert the carriage bolts into
the holes and secure with the washer and nut. Note the orientation
of the bars on the main assembly. The assembled #1 crossbar is
positioned closest to the vehicle.
4. Repeat the same procedure with the second set of cross bars.
Loading Bikes
1. Move the ratchet arm forward. Push the ratchet release and move the
ratchet hook assembly to the end of the ratchet arm (NOTE 1)
2. Put the bike into the wheel trays with the front wheel in the upswept
wheel tray.
3. W hile holding the bike rotate the ratchet arm upward towards the
fork crown.
4. Position the hook assembly tight against the fork crown or front
brake of the bike (diagram 3).
5. Pull the hook downward so that the hook is tight against the tire.
After the hook contacts the tire push down hard until you hear an
extra click in the ratchet release. NOTE: The hooks should be tight
against the fork crown and the tire. Move the bike back and forth to
ensure it is fully seating. Readjust is necessary
6. Move the strap in the rear wheel tray so it is positioned in the center
of the tire (diagram 4).
7. Push the strap through the buckle and pull the strap tight.
NOTE: On smaller wheels you will need to use the space block.
8. If carrying one bike use the inside position, nearest to
the vehicle.
IMPORTANT:
You have to ensure that all of the wheel straps are
attached and secure.
9. When the rack is not in use the main ratchet arm can be folded down
and the complete rack can be folded up against the vehicle. Ensure
that the cam lever is completely engaged before driving.
10. The rack can be tilted away from the vehicle by pulling the cam
lever and lowering the rack and bikes. NOTE: Ensure you return the
rack to the level position before driving.
Swagman • 300 - 1880 Government St. • Penticton, B.C. Canada V2A 7J1 • Phone (250) 490-8883 • Fax (250) 490-8885 • www.swagman.net
PRODUCT: 64685 Semi 2.0 Bike Rack • Page 1 of 2
INSTRUCTION SHEET
#1
#1
#2
NOTE 1
male
1
#2
A
2
male
3
4
REV 28/01/13
Advertisement
Table of Contents

Related Manuals for Swagman 64685


Summary of Contents for Swagman 64685
- Page 1 INSTRUCTION SHEET PRODUCT: 64685 Semi 2.0 Bike Rack • Page 1 of 2 Assembly Instructions: 1. Remove main assembly (A) from box. 2. Insert cross bars into main assembly (A) (diagram 1). The crossbar is made up of one male section and one female section. The crossbars are labeled #1 and #2. Assemble the bars so that the #1 match and the #2 match. Make sure both square hole are positioned upward. The male section has the upright pivot arm attached to it. Position the arms so they are orientated as shown in diagram 2. 3. Place the assembled cross bars onto the main assembly so that the square bolt-holes are position upward. Insert the carriage bolts into the holes and secure with the washer and nut. Note the orientation of the bars on the main assembly. The assembled #1 crossbar is positioned closest to the vehicle. 4. Repeat the same procedure with the second set of cross bars. Loading Bikes 1. Move the ratchet arm forward. Push the ratchet release and move the ratchet hook assembly to the end of the ratchet arm (NOTE 1) 2. Put the bike into the wheel trays with the front wheel in the upswept NOTE 1 wheel tray. 3. W hile holding the bike rotate the ratchet arm upward towards the male fork crown. 4. Position the hook assembly tight against the fork crown or front brake of the bike (diagram 3). 5. Pull the hook downward so that the hook is tight against the tire. male After the hook contacts the tire push down hard until you hear an extra click in the ratchet release. NOTE: The hooks should be tight against the fork crown and the tire. Move the bike back and forth to ensure it is fully seating. Readjust is necessary...
- Page 2 INSTRUCTION SHEET PRODUCT: 64685 Semi 2.0 Bike Rack • Page 2 of 2 Installing the Semi 2.0 into your Vehicle: 1. Insert the bike rack into the 2” or 1-1/4” receiver. Install the ½” threaded locking hitch pin and tighten to 50 ft lbs. (very tight). Put on the lock head until it is securely attached. 2. If the rack is used on a 1-1/4” receiver you will need to remove the Allen Bolts that holds on the spacer (diagram 5). 1/2” Threaded Pin 3. If you are using the cable, loop the cable through the triangle portion on the bike frames. Push the cable end with the collar through the loop at the other end of the cable. 4. The collar fits over the locking hitch pin as shown in diagram 6. Important Notes: 1. This bicycle rack has been designed to carry 1 or 2 bikes. 2. This rack is designed for typical use and applications (on paved or smooth gravel roads). Do not use this rack on a vehicle that will be driven on rough roads or where the rack (and bikes) will be subject to significant or constant jarring and/or shock, or any vehicle with very stiff springs that will transfer the load shock directly to the rack and bikes. 3. Proper fitting and installation of this carrier to your specific vehicle is critical, and is not the manufacturer’s responsibility. 4. Improper use of this product may result in damage to your rack, your vehicle, your bicycles, or even other vehicles driving behind you (as a result of colliding with or trying to avoid fallen bicycles and/or the rack). 5. The purchaser should be aware that the load created by a rack and bicycles can exceed the maximum rating on the hitch or bumper. 6. Swagman Racks are powder coated to help prevent rust. When leaving them outside for extended periods of time the finish will lose its luster. It is recommended that when not in use it is stored indoors.
- Page 3 MODE D’ASSEMBLAGE PRODUIT : 64685 Porte-vélos Semi 2.0 pour 2 bicyclettes • Page 1 de 2 Mode d’assemblage : 1. Sortez le bras central (A) de la boîte. 2. Insérez les barres transversales dans le bras central (A) (diagramme 1). Chaque barre est dotée d’une section mâle et d’une section femelle, et numérotée #1 ou #2. Assemblez les barres #1, puis les barres #2. Assurez-vous que les deux trous carrés sont placés vers le haut. La section mâle est celle comprenant le bras à cliquet. Placez les bras à cliquet comme il est montré dans le diagramme. 3. Assurez-vous que les trous de boulon carrés sont orientés vers le haut lorsque vous insérez la barre assemblée dans le bras central. Installez les boulons, les rondelles et les écrous, puis vissez-les. Regardez le diagramme pour voir la façon dont les barres sont orientées. La barre assemblée #1 doit être placée le plus près du véhicule. 4. Répétez la même procédure pour les deux autres barres transversales. Installation des vélos : 1. Déplacez le bras à cliquet vers l’avant. Appuyez sur le dispositif de blocage et remontez le crochet jusqu’au haut du bras (REMARQUE 1). 2. Insérez les roues du vélo dans les plateaux. La roue avant doit être placée dans le plateau avec la partie surélevée. REMARQUE 1 3. T enez le vélo et tournez le bras à cliquet vers le haut en direction de la tête de fourche. mâle 4. Placez solidement le crochet contre la tête de fourche ou le frein avant du vélo (diagramme 3). 5. Ramenez le crochet vers le bas jusqu’à ce qu’il soit appuyé contre le pneu. Une fois que le crochet est en contact avec le pneu, poussez mâle vers le bas jusqu’à ce que vous entendiez un autre déclic au niveau...
- Page 4 MODE D’ASSEMBLAGE PRODUIT : 64685 Porte-vélos Semi 2.0 pour 2 bicyclettes • Page 2 de 2 Installation du porte-vélos Semi 2.0 sur le véhicule : 1. Insérez le porte-vélos dans le récepteur de 2 po ou 1-1/4 po. Installez la goupille verrouillable de ½ po et serrez fermement jusqu’à 50 pi/lb. Vissez fermement la vis à tête de verrouillage. 2. Si vous utilisez le porte-vélos sur un récepteur de 1-1/4 po, vous devez enlever les boulons à tête Allen qui retiennent le bloc d’espacement (diagramme 5) 3. Si vous utilisez le câble de sécurité, passez-le dans la partie triangulaire du cadre des vélos. Tige filetée de 1/2 po Insérez l’extrémité du câble avec le collier dans l’attache à l’autre extrémité du câble. 4. Le collier s’insère dans la goupille verrouillable (diagramme 6). Remarques importantes : 1. Ce porte-vélos est conçu pour transporter un ou deux vélos. 2. Il est conçu pour un usage régulier sur des routes revêtues ou des routes en gravier en bon état. Ne l’utilisez pas sur des chemins cahoteux ou en mauvais état risquant de soumettre le porte-vélos à des mouvements brusques ou des chocs répétés. Il est également déconseillé de l’utiliser sur un véhicule doté d’une suspension très rigide, car les secousses seront transmises directement aux porte-vélos et aux vélos. 3. Il est indispensable que ce porte-vélos soit assemblé selon les instructions et installé correctement sur votre véhicule; cela n’engage pas la responsabilité du fabricant. 4. L’utilisation inadéquate du porte-vélos peut entraîner des dommages au porte-vélos, à votre véhicule, à vos bicyclettes ou aux véhicules qui vous suivent (après avoir frappé les vélos et/ou le porte-vélos ou en essayant de les éviter). 5. L’acheteur doit veiller à ce que la charge créée par le porte-vélos et les vélos ne dépasse pas la charge maximale permise pour l’attache ou le pare-chocs.
Need help?
Do you have a question about the 64685 and is the answer not in the manual?
Questions and answers