Advertisement
Available languages
Available languages
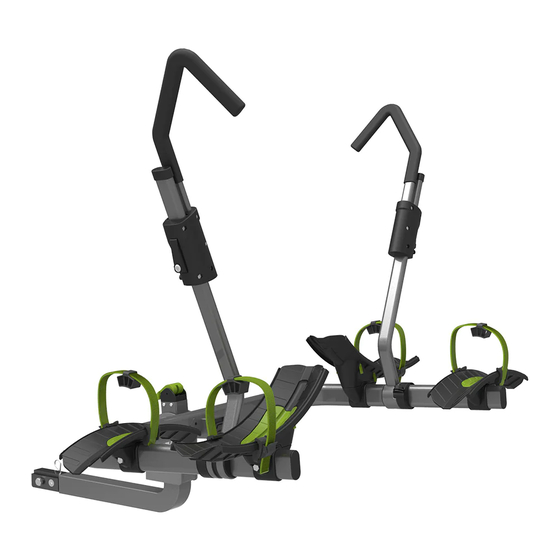
Assembly Instructions:
1. Remove main assembly from box. Assemble the main assembly with the main tube (receiver bar) by 2pcs 12.7mm bolts, washers and nuts.
Tighten securely (diagram 1).
2. For easier assembly, insert the main tube into your hitch.
3. 1. Slide the left rack arm through the wheel holder base and onto the "Main" frame.
2. Insert a nut to the wheel holder base from top.
3-1. Tighten the Pan head Allen 8mm bolt to the wheel holder base.
3-2. Install Pan head Allen 8mm bolt, washer and nut with supplied Allen keys. Repeat with the right arm (diagram 2).
4. Install the front and rear wheel trays onto the wheel holder mount (diagram 3). Note: Check the drawing for the correct position of the front
and rear trays. Attach the wheel trays using 2ea 6mm Allen bolts. Note: The front wheel tray bolts are ½" and the rear wheel trays are ¾" long.
DO NOT OVERTIGHTEN.
5. Insert the green TPR wheel tray inserts by lining up the tabs and pulling the insert into position. The tabs are there to aid in pulling the insert
into position.
6. Re-check all bolts to ensure they are tight.
Installing the Rack on to Your Vehicle:
1. Insert the bike rack into the 2" or 1-1/4" receiver. Install the 1/2" threaded locking hitch pin and tighten to 50 ft. lbs. (very tight). Put on the
lock head until it is securely attached.
2. If the rack is used on a 1-1/4" receiver, using a 4mm Allen wrench remove the 2 Allen set screws that holds on the collar (diagram 4).
1
3
Swagman • 300 - 1880 Government St. • Penticton, B.C. Canada V2A 7J1 • Phone (250) 490-8883 • Fax (250) 490-8885 • www.swagman.net
PRODUCT: 64687 Sitkka 2 Bike Rack • Page 1 of 3
2
INSTRUCTION SHEET
4
REV 28/02/17
Advertisement
Table of Contents

Related Manuals for Swagman Sitkka 64687


Summary of Contents for Swagman Sitkka 64687
- Page 1 2. If the rack is used on a 1-1/4” receiver, using a 4mm Allen wrench remove the 2 Allen set screws that holds on the collar (diagram 4). REV 28/02/17 Swagman • 300 - 1880 Government St. • Penticton, B.C. Canada V2A 7J1 • Phone (250) 490-8883 • Fax (250) 490-8885 • www.swagman.net...
- Page 2 Hook should be tight against the fork crown Push button and move up REV 28/02/17 Swagman • 300 - 1880 Government St. • Penticton, B.C. Canada V2A 7J1 • Phone (250) 490-8883 • Fax (250) 490-8885 • www.swagman.net...
- Page 3 The purchaser should be aware that the load created by a rack and bicycles can exceed the maximum rating on the hitch or bumper. • Swagman Racks are powder coated to help prevent rust. When leaving them outside for extended periods of time the finish will lose its luster. It is recommended that when not in use it is stored indoors.
- Page 4 2. Lorsque le porte-vélos doit être inséré dans un récepteur de 1¼ po, utilisez une clé Allen de 4 mm pour enlever les vis qui retiennent le collier dans l’attache (diagramme 4). REV 28/02/17 Swagman • 300 - 1880 Government St. • Penticton, B.C. Canada V2A 7J1 • Phone (250) 490-8883 • Fax (250) 490-8885 • www.swagman.net...
- Page 5 Appuyez fermement le crochet contre la tête de fourche Appuyez sur le bouton et remontez REV 28/02/17 Swagman • 300 - 1880 Government St. • Penticton, B.C. Canada V2A 7J1 • Phone (250) 490-8883 • Fax (250) 490-8885 • www.swagman.net...
- Page 6 • Le revêtement des porte-vélos Swagman a été réalisé par poudrage afin de prévenir la rouille; cependant, il perdra son lustre si vous laissez le porte-vélos à l’extérieur pendant une longue période. Il est recommandé de le ranger à l’intérieur lorsqu’il n’est pas utilisé.
Need help?
Do you have a question about the Sitkka 64687 and is the answer not in the manual?
Questions and answers