Advertisement
DO NOT TURN THE WATER ON TO THE SYSTEM UNTIL INSTALLATION IS COMPLETE
When choosing a location to install the system, select an area with enough room for service to be performed on the system. Do
not install the system in direct sunlight or subject the system to temperature extremes and/or excessive humidity.
ITEM
PART
NUMBER
NUMBER
1
200931
2
211623
3
201026
4
207797
5
211478
6
211663
7
211477
8
211479
9
211745
10
211481
11
200654
12
211482
13
207786
14
201028
15
211622
16
201018
17
200988
18
211456
•
Variable speed drill
•
Carbide grinding burr or file
•
1/4" drill bit (for making pilot holes)
•
Tubing cutter
The above tools and materials are available at any local hardware stores. If you are uncomfortable performing the
installation, please contact a local dealer or distributor for installation services
MKT – 558 – C
QUICK START GUIDE – SOLO I REVERSE OSMOSIS SYSTEM
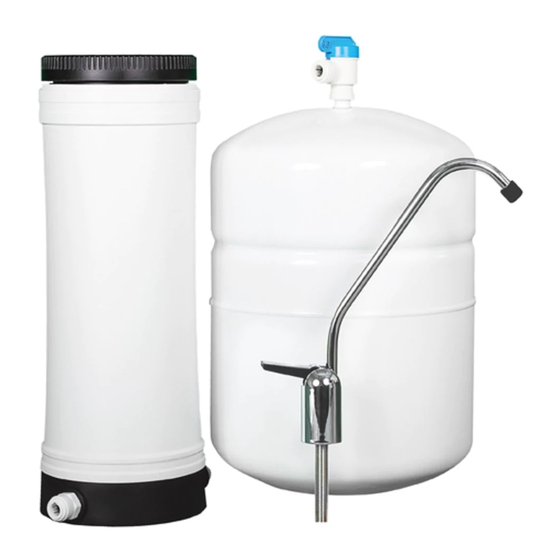
PERMEATE STORAGE TANK
PERMEATE STORAGE TANK VALVE
PRODUCT WATER LINE TO TANK AND FAUCET (3/8" WHITE TUBING)
1/4" QUICK CONNECT LEAK DETECTOR
1/4" QUICK CONNECT FEED WATER ADAPTOR (FOR 3/8" WATER SUPPY LINE)
FEED WATER LINE (1/4" BLUE TUBING)
5 MICRON SEDIMENT AND SINTERED CARBON BLOCK PRE FILTER
SOLO I REVERSE OSMOSIS MEMBRANE ELEMENT
SOLO I REVERSE OSMOSIS SYSTEM LID
3/8" QUICK CONNECT FITTING (1/4" MNPT THREAD)
INLINE GRANULATED ACTIVATED CARBON POST FILTER
3/8" QUICK CONNECT FAUCET ADAPTOR
CHROME FAUCET WITH AIR GAP CONNECTION
AIR GAP DRAIN LINE (3/8" BLACK TUBING)
3/8" QUICK CONNECT DRAIN SADDLE
SYSTEM DRAIN LINE FROM SYSTEM TO AIR GAP (1/4" BLACK TUBING)
CONCENTRATE FLOW RESTRICTOR (INSTALLED INTO END OF TUBING)
SOLO I REVERSE OSMOSIS SYSTEM
Tools and Materials Required for Installation
•
3/8" Drill bit
•
7/8" hole saw, or porcelain saw
•
Adjustable wrench
•
Tape measure
DESCRIPTION
•
•
•
Phillips screwdriver
Teflon tape
Protective eyewear
Page 1 of 3
Advertisement
Table of Contents

Related Manuals for Axeon SOLO I


Summary of Contents for Axeon SOLO I
- Page 1 QUICK START GUIDE – SOLO I REVERSE OSMOSIS SYSTEM DO NOT TURN THE WATER ON TO THE SYSTEM UNTIL INSTALLATION IS COMPLETE When choosing a location to install the system, select an area with enough room for service to be performed on the system. Do not install the system in direct sunlight or subject the system to temperature extremes and/or excessive humidity.
- Page 2 QUICK START GUIDE – SOLO I REVERSE OSMOSIS SYSTEM Feed Water Connection: 1.1. Locate the cold-water angle stop valve underneath the sink and turn it off. 1.2. Relieve the pressure by opening the cold-water line and disconnect the sink feed line.
- Page 3 QUICK START GUIDE – SOLO I REVERSE OSMOSIS SYSTEM 3.3. Apply Teflon tape to the threaded stem on the top of the tank (item 1). Install the tank valve (item 2) to the top of the tank. Connect the tank valve to the system tank connection using the provided white 3/8" tubing (item 3).
Need help?
Do you have a question about the SOLO I and is the answer not in the manual?
Questions and answers
no water. system don,t produce water?
The AXEON SOLO I Reverse Osmosis System may not be producing water due to several possible reasons:
1. Low Feed Water Pressure – The system requires a feed water pressure between 40-80 psi. If the pressure is too low, water may not pass through the membrane properly.
2. Clogged Filters or Membrane – The sediment filter, carbon block, or RO membrane may be clogged, restricting water flow.
3. High TDS or Contaminants – If feed water has more than 1,000 ppm of Total Dissolved Solids (TDS) or excessive chlorine (>1 ppm), the membrane may be damaged.
4. Leak Detector Activation – If a leak is detected, the built-in leak detector may interrupt the water supply.
5. Incorrect Installation or Blocked Tubing – Connections or tubing may be improperly installed or blocked, preventing water flow.
6. Storage Tank Issues – The 3.2-gallon pressurized storage tank may be full or have incorrect pressure, affecting water production.
Checking these factors can help diagnose why the system is not producing water.
This answer is automatically generated