Table of Contents
Advertisement
Advertisement
Table of Contents

Subscribe to Our Youtube Channel
Related Manuals for WatchGas NEO MP181


Summary of Contents for WatchGas NEO MP181
- Page 1 D e t e c t i o n User Manual Photo-ionization Detector www.watchgas.eu...
-
Page 2: Table Of Contents
NEO Photo-ionization detector User Manual D e t e c t i o n D e t e c t i o n Contents Contents Description Warning Caution Product Overview Display Charging a Lithium-ion Battery Low Voltage Warning Clock Battery Data Protection While Power is Off Instrument Operation Basic User Mode... -
Page 3: Description
The user should understand how to set the correct parameters and interpret the obtained results. • Use only WatchGas mPower battery pack M011-3002-000. Substitution of components may impair intrinsic safety. Recharge batteries only in non-hazardous locations. •... -
Page 4: Product Overview
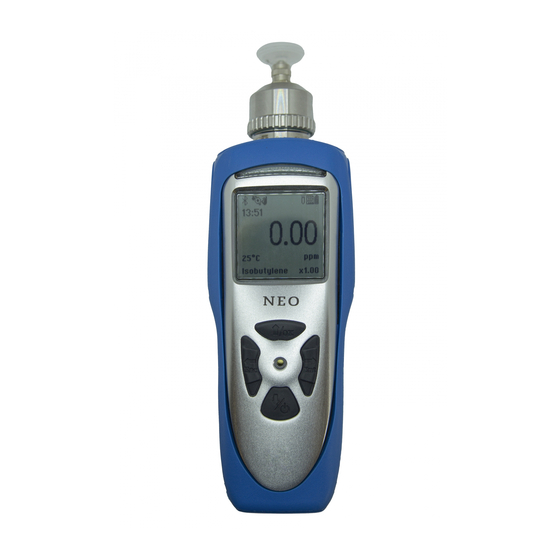
NEO Photo-ionization detector User Manual D e t e c t i o n D e t e c t i o n 1. Product Overview The instrument’s user interface consists of the INLET FILTER LCD display, Alarm LEDs, an alarm transducer, and four keys. -
Page 5: Charging A Lithium-Ion Battery
*NOTE: Any locally-obtained USB A to Micro B USB cable will work for charging, but will not work for communication with mPower Suite configuration and data transfer software. The WatchGas mPower USB cable P/N M-011-3003-000 is required for a PC to recognize the instrument and communicate with mPower Suite. -
Page 6: Clock Battery
& LEDs turn on, and then release. If the mPower logo does not appear first, there is likely a problem and Watchgas Technical Support should be contacted. The instrument then performs self-tests after the screen displays the firmware version and serial number. -
Page 7: Turning The Instrument Off
200’ (61 m) away horizontally, or 90’ (27.5 m) vertically, at about 3’ (0.9 m) per second flow rate. Note that at 200’ the PID response will be delayed by about 1 minute, the time required for the gas sample to reach the instrument. www.watchgas.eu... -
Page 8: Pump Status
NEO Photo-ionization detector User Manual D e t e c t i o n D e t e c t i o n Caution During operation, make sure the probe inlet and the gas outlet are free of obstructions. Obstructions can cause premature wear on the pump, false readings, or pump stalling. 5.4.1 PUMP STATUS During normal operation, the pump icon alternately shows inflow and outflow. -
Page 9: Testing The Alarms
The LCD display is equipped with an LED backlight to assist in reading the display under poor lighting conditions. Background lights can be turned on automatically under poor light condition and be set in a variety of ways. We can choose from the settings menu under Config Mode or through WatchGas mPower Suite. -
Page 10: Configuration Mode
NEO Photo-ionization detector User Manual D e t e c t i o n D e t e c t i o n 6. Configuration Mode The Config Mode is used to modify the instrument configuration settings. 6.1 NAVIGATING CONFIG MODE There are two types of menus in Config mode: 1) those that ask for selection from a list and 2) those that ask for a numerical value to be entered. -
Page 11: Entering En Exiting Configuration Mode
Radio On/Off Span Calibration Measurement Gas Alarm Mode Interval Display Set Cal. Gas Alarm Settings Pump Speed Set Span Value Comfort Beep Set Pump Stall Set Span 2 Value Man-Down Alarm 3-point Calibration Rolling Graph Real time data Language Self-Zeroing www.watchgas.eu... - Page 12 NEO Photo-ionization detector User Manual D e t e c t i o n D e t e c t i o n FLOW CHART FOR FOR CONFIGURATION MODE...
-
Page 13: Calibration
Note: To abort the zeroing and proceed to Span calibration, press the Left key at any time during the process. A confirmation message ‘Zero aborted!’ will appear, followed by the Span calibration menu. When complete, this message “Zero Calibration Done!” is shown, and the display automatically moves to the Span Calibration menu. www.watchgas.eu... - Page 14 NEO Photo-ionization detector User Manual D e t e c t i o n D e t e c t i o n Span Calibration This procedure determines the second (and third, if 3-Point Cal is selected in Monitor Setup) point(s) of the sensor calibration curve.
-
Page 15: Measurement
Press the Right key to select Gas Library, or Custom Gases. Press the Up key or Mode key to scroll through the gas list. For high-speed scrolling, press and hold the Up key until the desired gas name is reached. Press the Right key to select the gas and the Left key to save and exit. www.watchgas.eu... -
Page 16: Alarm Setting
NEO Photo-ionization detector User Manual D e t e c t i o n D e t e c t i o n 6.3.3 ALARM SETTING During each measurement period, the gas concentration is compared with the programmed alarm limits (Low, High, TWA and STEL). If the concentration exceeds any of the preset limits, the loud buzzer and red flashing LED are activated immediately to warn of the alarm condition. - Page 17 Man-Down alarm. Use Up or Mode to move up or down the list, Right to select, and Left to save and exit. Warning Time The Warning Time is the amount of time the Man-Down alarm stays on after it is triggered. The default time is 30s. Adjust as for Motionless Time. www.watchgas.eu...
-
Page 18: Datalog
NEO Photo-ionization detector User Manual D e t e c t i o n D e t e c t i o n 6.3.4 DATALOG The instrument automatically stores the concentration readings at regular time intervals (this function cannot be turned off). In the datalog sub-menu, a user can adjust the interval or clear all data. - Page 19 Use the Right key to enter Pump Speed, then Up or Mode to scroll on the list, Right to select, and Left to save and exit. Note that each Pump Speed has its own Stall Threshold. www.watchgas.eu...
- Page 20 Real Time Data Real time data output is available on some NEO models via a USB cable and/ or wirelessly via Bluetooth Low Energy using an Android App. Please contact WatchGas for more information.
- Page 21 Enable this function as with any other list selection menu. Wireless Wireless radio communication can be enabled if the instrument has a wireless module installed. Enable this function as with any other list selection menu. www.watchgas.eu...
-
Page 22: Connecting And Configuring
9. To update the instrument firmware, select “Firmware Upgrade”. The firmware must first be downloaded to the PC from the WatchGas website www.WatchGas.eu. *NOTE: Any locally-obtained USB A to Micro B USB cable will work for battery charging, but will not work for communication with mPower Suite software. -
Page 23: Datalog Reviel
2. To export data to a csv file readable by Excel or other spreadsheet software, move the cursor over the right data panel and click the right mouse button, and then select either the current Single Datalog file or all the stored data (Whole Datalog). MPOWER SUITE DATALOG SCREEN www.watchgas.eu... -
Page 24: Maintanance
NEO Photo-ionization detector User Manual D e t e c t i o n D e t e c t i o n 8. Maintenance 8.1 LAMP CLEANING OR CHANGING 1. Unscrew the Sensor Cap and pull the sensor straight out, using a slight rocking motion if necessary. -
Page 25: Troubleshooting
O-ring, tube connectors, Teflon tube compression fitting. “Lamp” alarm on during Lamp drive circuit. Turn unit off and back on. operation Weak or defective PID Lamp. Replace UV Lamp PC does not recognize Wrong cable Use mPower USB cable P/N M-011-3003- instrument www.watchgas.eu... -
Page 26: Specifications
NEO Photo-ionization detector User Manual D e t e c t i o n D e t e c t i o n 10. Specifications Size 230 x 74 x 55 mm (9.1 x 2.9 x 2.2 in) (with boot) Weight 708 g (24.9 oz) (w/boot) Sensor... -
Page 27: Limited Warranty
D e t e c t i o n 11. Limited Warranty WATCHGAS warrants this product to be free of defects in workmanship and materials-under normal use and service-for two years from the date of purchase from the manufacturer or from the product’s authorized reseller.
Need help?
Do you have a question about the NEO MP181 and is the answer not in the manual?
Questions and answers