Table of Contents
Advertisement
Available languages
Available languages
Quick Links
Art.-Nr.: 11844
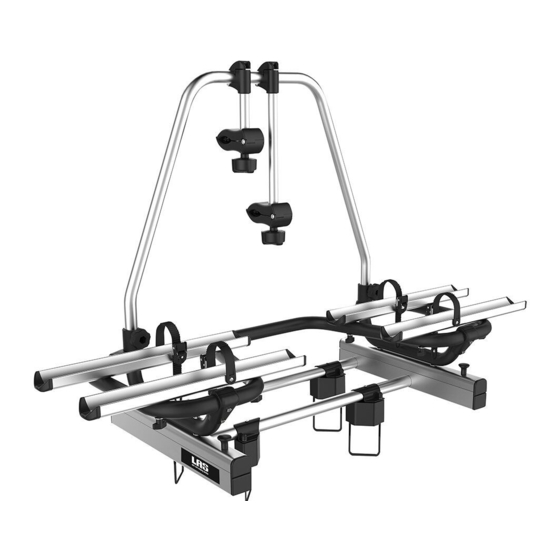
Aluminium Fahrradträger für die Deichsel
BC 260, gleitend
Bedienungsanleitung . . . . . . . . . . . . . . . . . . . . . . . . . . . . . . . 2
Article number 11844
Sliding aluminium caravan A-frame bike carrier,
BC 260
Operating instructions . . . . . . . . . . . . . . . . . . . . . . . . . . . . . . 16
Réf. 11844
Porte-vélos coulissant en aluminium pour timon
de caravane, BC 260
Manuel de l'opérateur . . . . . . . . . . . . . . . . . . . . . . . . . . . . 30
1
Advertisement
Chapters
Table of Contents

Related Manuals for LAS BC260


Summary of Contents for LAS BC260
- Page 1 Art.-Nr.: 11844 Réf. 11844 Aluminium Fahrradträger für die Deichsel Porte-vélos coulissant en aluminium pour timon BC 260, gleitend de caravane, BC 260 Bedienungsanleitung ....... 2 Manuel de l‘opérateur .
-
Page 2: Table Of Contents
Bei einer Weitergabe des Fahrradträgers geben Sie die Montageanleitung mit. BESTIMMUNGSGEMÄßER GEBRAUCH Der Fahrradträger BC260 dient dem Transport von max. zwei Fahrrädern. Der Fahrradträger darf nur an einer Wohnwagendeichsel montiert werden. Außerdem darf die maximal zulässige Belastung des Fahrradträgers nicht überschritten werden. -
Page 3: Sicherheitshinweise - Erläuterung Der Kategorien
Das jeweils verwendete Sicherheitssymbol ersetzt nicht den Text des Sicherheitshinweises. Lesen Sie deshalb den Sicherheitshinweis und befolgen Sie ihn genau! TECHNISCHE DATEN Der Träger ist geeignet für den Transport von bis zu zwei Fahrrädern. Typ: BC260 Beachten Sie das maximal zulässige Gewicht Ihres Wohnwagens Material: Aluminium und die maximal zulässige Stützlast Ihres Wohnwagens. - Page 4 WARNUNG! Personen- oder Sachschaden durch Überladen. Das Überschreiten der max. Nutzlast des Fahrradträgers, sowie der zulässigen Stützlast der Anhängerkupplung oder des zulässigen Gesamtgewichts des Wohnwagens kann zu schweren Unfällen führen. • Beachten Sie unbedingt die Angaben zur max. Nutzlast, zulässigen Stützlast und zulässigem Gesamtgewicht Ihres Wohnwagens.
-
Page 5: Lieferumfang
LIEFERUMFANG... -
Page 6: Montage Des Fahrradträgers Auf Der Wohnwagen Deichsel
MONTAGE DES FAHRRADTRÄGERS AUF DER WOHNWAGEN DEICHSEL Stellen Sie Ihr Wohnwagen auf einer ebenen Fläche ab. Ziehen Sie die Handbremse an. WARNUNG! Personen- oder Sachschaden durch beschädigten Fahrradträger. Beschädigungen des Trägers z. B. durch verbogene Teile, Risse oder Kratzer, schließen die sichere Funktion des Trägers aus. •... - Page 7 Die optimale Position auf der Wohnwagendeichsel. WARNUNG! Materialschaden durch Montage des Fahrradträgers an der Wohnwagendeichsel. Achten Sie beim Aufstellen des Fahrradträgers auf die Deichsel des Wohnwagens darauf, dass der Fahrradträger das Fahrzeug oder den Wohnwagen während des Gebrauchs nicht beschädigen kann. •...
- Page 8 Verwenden Sie bei Bedarf die Distanzklötze, um die Wölbung der Abdeckhaube der Deichsel auszugleichen. 1 Block um 3 cm zu erhöhen, 2 Blöcke um 6 cm zu erhöhen. Mit den vier mitgelieferten Befestigungs-Sets wird der Träger auf das Chassis montiert. HINWEIS: Es sind zwei rechte und zwei linke U-Bleche verfügbar (siehe Zeichnung unten).
-
Page 9: Fahrräder Montieren
Um dafür zu sorgen, dass der Träger auf seinem Platz bleibt wird dieser fixiert, indem Sie die vier Bohrungen der Gegenbleche in das Basisrohr übertragen. Bohren Sie diese Löcher 3mm groß. Danach wird mit den mitgelieferten Schrauben der Träger fixiert. WARNUNG! Personen- oder Sachschaden durch Verlust des Fahrradträgers während der Fahrt. - Page 10 ACHTUNG! Personen- oder Sachschaden durch herumfliegende Teile möglich. Nicht fest angezogene Flügelschrauben an den Schienen des Fahrradträgers können sich während der Fahrt lösen und zum Verlust der Schrauben und Schienen führen. • Schrauben Sie alle Flügelschrauben an den Schienen vor Fahrtantritt handfest an. HINWEIS Die Rahmenhalter können beliebig am Fahrrad platziert werden.
- Page 11 WARNUNG! Personen- oder Sachschaden durch Verlieren der Fahrräder. Das Fahren ohne Sicherheitsgurte kann zu Unfällen führen. • Überprüfen Sie vor jedem Fahrtantritt den korrekten und festen Sitz des Gurtes um die Fahrräder und Rahmenhalter des Trägers (siehe Abbildung 5). • Überprüfen Sie vor jedem Fahrtantritt den korrekten und festen Sitz der beiden Gurte um das Vorderrad und den Gurt um das Hinterrad des Fahrrades.
-
Page 12: Fahrradträger Wegschieben, Zugang Zur Deichselbox
FAHRRADTRÄGER WEGSCHIEBEN, ZUGANG ZUR DEICHSELBOX ACHTUNG! Sachschaden durch öffnende Heckklappe. Die Heckklappe könnte gegen den Fahrradträger oder Fahrräder schlagen und beschädigt werden. • Elektrische Heckklappen abschalten und manuell betätigen. ACHTUNG! Materialschaden durch Öffnen der Deichsel. Die Klappe der Deichselbox kann mit den Fahrrädern oder dem Fahrradträger in Kontakt kommen und diese beschädigen. •... -
Page 13: Wartung, Reinigung Und Pflege
WARNUNG! Personen- oder Sachschaden durch Verlust des Fahrradträgers während der Fahrt möglich. Das Fahren mit einem Fahrradträger, welcher nicht zurückgeschoben und verriegelt ist, kann dazu führen, dass der Fahrradträger abbricht oder das Fahrzeug beschädigt wird. • Schieben Sie den Fahrradträger vor dem Fahren wieder zurück (siehe Abbildung 4). •... -
Page 14: Explosionszeichnung
EXPLOSIONSZEICHNUNG... -
Page 15: Ersatzteile -Stückliste
STÜCKLISTE POS. NR. BESCHREIBUNG ANZAHL MAßE Basisrahmen Kunststoff Radhalter Spannband Kunststoff Abdeckkappe Radhalter-Spannband-Clip Rahmenhalter kurz Rahmenhalter lang U-Beugel Aluminium-Rohrrahmen Aluminium Radhalter Aluminium-Rohrrahmen Kunststoff-Abstandshalter (30mm) U-Verbindungsschraube 2x Links Befestigungsbügel 2x Links Sicherungspin Abdeckung für Mutter Selbstsichernde Mutter Kunststoff Rändelschraube Nutstein M8 x 55 Schloss Schraube M8 x 60 Scheibe... -
Page 16: Foreword
Hand on these fitting instructions when removing or passing on the bicycle carrier. PROPER USE The bicycle carrier BC260 is used for the transport of max. two bicycles. The bike carrier may only be mounted on a caravan A-frame. The permissible carrying capacity of the bicycle carrier must not be exceeded under any circumstances. -
Page 17: Safety Instructions - Explanation Of The Categories
The safety symbol used does not replace the text of the safety instruction. Read the safety instruction and follow it exactly! TECHNICAL DATA The bicycle carrier is suitable for the transport of two bicycles at Type: BC260 most. Please note that the maximum payload of your caravan may Material: Aluminium not exceed, just as you may not exceed the maximum permissible ball load of the tow bar. - Page 18 WARNING! Personal injury or material damage due to overloading. Exceeding the max. carrying capacity of the bicycle carrier or the permissible bearing load of the trailer coupling or the permissible overall caravan weight can lead to serious accidents. • Observe the information on the max. carrying capacity, permissible bearing load and permissible overall weight of your vehicle.
-
Page 19: Scope Of Delivery
SCOPE OF DELIVERY... -
Page 20: Fitting The Bicycle Carrier To The Caravan A-Frame
FITTING THE BICYCLE CARRIER TO THE CARAVAN A-FRAME Park your caravan on a level surface. Apply the handbrake. WARNING! Personal injury or material damage due to damaged bicycle carrier. Damage of the carrier, e.g. by bent parts, cracks or scratches, prevent the safe operation of the carrier. •... - Page 21 Find the most suitable place on the caravan A-frame. WARNING! Material damage due to the assembly of the bike carrier on the caravan A-frame. Take care when placing the bike carrier on the caravan A-frame that the bicycle carrier cannot cause damage to the vehicle or caravan during use.
- Page 22 If necessary, use the spacer blocks to compensate the bulging of the plastic A-frame cover. 1 block for 3cm increase, 2 blocks for 6cm increase. The carrier is secured to the frame with the four supplied fastening sets. NOTE: two right and two left brackets are available (see drawing below). First of all, you must place the U-bolt around the frame from the underside.
-
Page 23: Mounting Bicycles
To make sure that the carrier remains in its position, it must be secured with the four screws. To do so, 4 small holes (3 mm) must be drilled in the base part, after which the clamp and the base frame can be screwed together. - Page 24 ATTENTION! Personal injury or material damage possible due to loose parts. Improperly tightened wing nuts on the rails of the bicycle carrier can become loose during the journey, resulting in the loss of the nuts and rails. • Tighten all wing nuts on the rails hand tight before starting the journey. NOTE The frame holders are flexible to place on your bicycle.
- Page 25 WARNING! Personal injury or material damage due to loss of the bicycles. Carrying bicycles without using the safety straps can lead to accidents. • Before the start of every journey, check the correct and firm attachment of the strap around the bikes and the •...
-
Page 26: Sliding The Bicycle Carrier, Access To The Storage Space
SLIDING THE BICYCLE CARRIER, ACCESS TO THE STORAGE SPACE ATTENTION! Material damage due to opening tailgate of your vehicle. The tailgate could impact against the bicycle carrier or bicycle and be damaged. • Switch off electric tailgates and operate them manually. ATTENTION! Material damage caused by the opening of the storage door. -
Page 27: Maintanance, Cleaning And Care
WARNING! Personal injury or material damage possible due to loss of the bicycle carrier during the journey. A bicycle carrier which is slide backwards and locked can result in detachment of the carrier or damage on the vehicle. • Slide the bicycle carrier backwards before the start of the journey (see figure 4). •... -
Page 28: Exploded View
EXPLODED VIEW... -
Page 29: Spare Parts Overview - Part List
PART LIST POS. NR. DESCRIPTION REMARK Mainframe Wheelholder strap Wheelholder endcap Wheelholder strap clip Frameholder short Frameholder long U-tube Aluminium tubeframe Aluminium wheelholder Aluminium tubeframe Plastic distance block (30 mm) U-bolt 2x left Mounting bracket 2x right Lockingpin Nutcover Nylon nut Wingnut T-bolt M8 x 55... -
Page 30: Avant
En cas de transmission du porte-vélos à un tiers, fournissez également ces instructions de montage. UTILISATION CONFORME Le porte-vélos BC260 sert au transport de deux vélos max. Le porte-vélos ne doit être monté que sur un timon de camping-car. En outre, la charge maximale admissible du porte-vélos ne doit pas être dépassée. -
Page 31: Consignes De Sécurité - Explication Des Catégories
Le symbole de sécurité utilisé correspondant ne remplace pas le texte de la remarque de sécurité. Lisez donc la remarque de sécurité et veillez à la respecter ! CARACTÉRISTIQUES TECHNIQUES Le porte-vélos est conçu pour transporter jusqu’à deux vélos. Type : BC260 Respectez le poids maximal admissible de votre camping-car et la Matériau : Aluminium charge d’appui maximale admissible de votre camping-car. - Page 32 AVERTISSEMENT ! Dommages matériels ou aux personnes en cas de surcharge. Le dépassement de la charge utile max. du porte-vélos ainsi que de la charge d‘appui admissible de l‘attelage de remorque ou du poids total admissible du camping-car peut entraîner des accidents graves. •...
-
Page 33: Matériel Fourni
MATÉRIEL FOURNI... -
Page 34: Montage Du Porte-Vélos Sur L'attelage De Remorque
MONTAGE DU PORTE-VÉLOS SUR L’ATTELAGE DE REMORQUE Garez votre camping-car sur un terrain plat. Serrez le frein à main. AVERTISSEMENT ! Dommages matériels ou aux personnes en cas de porte-vélos endommagé. Les dommages sur le porte-vélos, par ex. à cause de pièces tordues, des fissures ou des rayures, empêchent une utilisation sûre du porte-vélos. - Page 35 La position optimale sur le timon du camping-car. AVERTISSEMENT ! Dommages matériels lors du montage du porte-vélos sur le timon du camping-car. Lorsque vous montez le porte-vélos sur le timon du camping-car, veillez à ce que le porte-vélos ne puisse pas endommager le véhicule ou le camping-car lors de l‘utilisation.
- Page 36 Si nécessaire, utilisez les cales de distances afin d’ é quilibrer la courbure du capot de protection du timon. 1 bloc pour lever de 3 cm, 2 blocs pour lever de 6 cm. Les quatre kits de fixation permettent de monter le porte-vélos sur le châssis. REMARQUE : Deux plaques universelles gauches et deux droites sont disponibles (voir le schéma ci-dessous).
-
Page 37: Montage Des Vélos
Pour s’assurer que le porte-vélos reste en place, il est fixé en report- ant les quatre trous de la plaque opposée dans le tube de base. Ces trous doivent faire 3 mm. Le support est ensuite fixé à l’aide des vis fournies. - Page 38 ATTENTION ! Dommages matériels ou aux personnes en cas de pièces projetées. Les vis à oreilles qui ne sont pas fermement serrées aux rails du porte-vélos peuvent se détacher lors du déplacement et provo- quer la perte des vis et des rails. •...
- Page 39 AVERTISSEMENT ! Dommages matériels ou aux personnes en cas de perte des vélos. La conduite sans les sangles de sécurité peut entraî- ner des accidents. • Avant chaque déplacement, contrôlez la fixation correcte de la sangle autour des vélos et du support de cadre du porte-vélos (voir illustration 5. •...
-
Page 40: Pousser Le Porte-Vélos, Accès À La Boîte Du Timon
REPOUSSER LE PORTE-VÉLOS, ACCÈS À LA BOÎTE DU TIMON ATTENTION ! Dommages matériels en cas d‘ouverture du hayon arrière. Le hayon arrière pourrait cogner contre le porte-vélos ou les vélos et être endommagé. • Coupez les hayons électriques et actionnez-les manuellement. ATTENTION ! Dommages matériels provoqués par l’ouverture du timon. -
Page 41: Maintenance, Nettoyage Et Entretien
AVERTISSEMENT ! Dommages matériels ou aux personnes en cas de perte du porte-vélos pendant le déplacement possible. Le fait de conduire avec un porte-vélos qui n’ e st pas refermé et verrouillé peut provoquer la rupture du porte-vélos ou endom- mager le véhicule. -
Page 42: Vue Éclatée
VUE ÉCLATÉE... -
Page 43: Vue D'ensemble Des Pièces De Rechange - Nomenclature
NOMENCLATURE N° POS. DESCRIPTION NOMBRE DIMENSIONS Cadre de base Sangle de serrage pour support de roue en plastique Capuchon en plastique Attache de sangle de serrage pour support de roue Support de cadre court Support de cadre long Étrier universel Cadre tubulaire en aluminium Porte-roue en aluminium Cadre tubulaire en aluminium... - Page 44 EAL GmbH Otto-Hausmann-Ring 107 +49 (0)202 42 92 83 0 info@eal-vertrieb.com 42115 Wuppertal +49 (0) 202 42 92 83 – 160 www.eal-vertrieb.com Deutschland / Germany / Allemagne © EAL GmbH, 11844, 10. 2019...
Need help?
Do you have a question about the BC260 and is the answer not in the manual?
Questions and answers