Table of Contents
Advertisement
Advertisement
Table of Contents

Related Manuals for Bresser WIFI 4Cast


Summary of Contents for Bresser WIFI 4Cast
- Page 1 Weather Station · WIFI 4Cast Instruction manual...
- Page 2 (codi QR) per accedir a les versions disponibles. Deseja um manual detalhado deste produto numa determinada língua? Visite a nossa Website através da seguinte ligação (QR Code) das versões disponíveis. www.bresser.de/P7001040 GARANTIE · WARRANTY · GARANTÍA · GARANZIA www.bresser.de/warranty_terms...
-
Page 3: Table Of Contents
Contents 1 Imprint (German) ............................ 4 2 Validity note .............................. 4 3 About this Instruction Manual........................ 4 4 General safety instructions ........................... 4 5 Parts overview and scope of delivery ...................... 6 6 Screen display .............................. 7 7 Before starting operation.......................... 8 8 Setting up power supply.......................... 8 9 Battery level indicator ............................ 9 10 Configuration / Setting up a WIFI connection.................... 9 11 Automatic time setting.......................... 11... -
Page 4: Imprint (German)
Errors and technical changes excepted. © 2019 Bresser GmbH All rights reserved. The reproduction of this documentation - even in extracts - in any form (e.g. photocopy, print, etc.) as well as the use and distribution by means of electronic systems (e.g. - Page 5 • Children must only use the device under adult supervision! Only use the device as described in the manual; otherwise, you run the risk of an electric shock. • Disconnect the device from the power supply by pulling the power plug when it is not used or in case of longer interruption of operation and before starting any work on maintenance and cleaning.
-
Page 6: Parts Overview And Scope Of Delivery
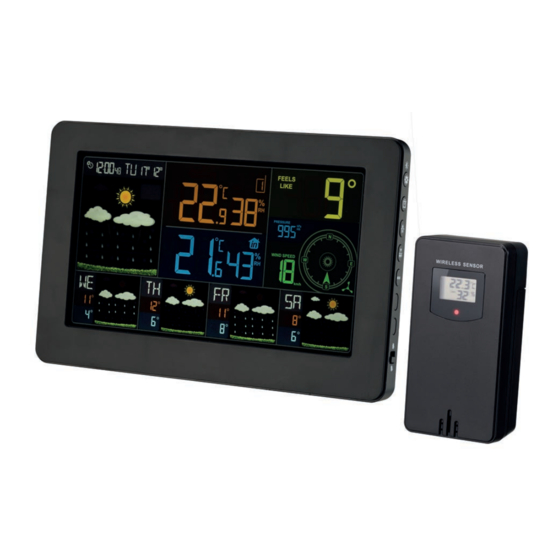
NOTICE Risk of voltage damage! The manufacturer is not liable for voltage damage due to improperly inserted batteries or through the use of an improper power adapter! 5 Parts overview and scope of delivery Illustration 1: All parts of base station (left) and wireless sensor (right) 1 Housing (base station) 2 Display (base station) 3 SNOOZE/LIGHT touch key (snooze function... -
Page 7: Screen Display
7 DOWN/WIFI key (decrease value or enable/ 8 MEM key (display MIN and MAX values or de- disable WIFI connection) lete stored values) 9 Alarm slide control (enable/disable alarm) 10 Connection socket for DC barrel connector 11 USB connection socket (connection of ex- 12 Battery compartment cover (base station) ternal devices for charging purposes) 13 Stand, fold-out (base station) -
Page 8: Before Starting Operation
7 Outdoor temperature (°C/°F adjustable 8 Outdoor humidity (RH in %) globally) 9 Battery level indicator (base station) 10 Outdoor sensor channel with symbol for enabled wireless connection 11 ‘Feels like’ temperature 12 Air pressure (hPa/mb) 13 Wind direction 14 Wind speed (km/h or mp/h adjustable) 15 Display of weekday, temperature values 16 Battery level indicator (outdoor sensor) and general weather forecast for the fifth... -
Page 9: Battery Level Indicator
3. The device is energized directly. 4. Wait until the indoor temperature is displayed on the base station. NOTICE! For permanent operation, mains power supply is recommended. Alternatively a power supply with batteries is also possible. Proceed as follows: 5. Remove the battery compartment cover. 6. - Page 10 1. Download and install the "WeatherSense" app on the smart device through Apple App Store or Google Play. Direct links to go there: https://itunes.apple.com/cn/app/weathersense/id1273633929?mt=8 https://play.google.com/store/apps/details?id=com.emax.weahter • For the following registration a valid e-mail address is required. A confirmation will be sent to this e-mail address after registration.
-
Page 11: Automatic Time Setting
14. The Wi-Fi connection between smart device/app and weather station will be established automat- ically. This may take a few minutes. After successful connection, the icons for "Wi-Fi" and for the signal strength as well as all available weather data will be displayed on the weather station's screen. -
Page 12: Snooze Function
14 Snooze function 1. When the alarm sounds, press the SNOOZE/LIGHT touch key to enable the snooze function. The alarm sounds again after the set time interval has elapsed (see "Alarm setting"). 2. When the alarm sounds, press any other key to stop the alarm until the set alarm time is reached again. -
Page 13: Wind Speed And Wind Direction
Illustration 6: Symbols for 3D weather forecast 1 Sunny 2 Mostly sunny 3 Partly Cloudy 4 Mostly cloudy 5 Cloudy 6 Scattered rain 7 Mostly rain 8 Rain showers 9 Heavy rain 10 Thunder & rain 11 Rain & hail 12 Hail 13 Snow &... -
Page 14: Feels Like Temperature
18 Feels like temperature • This functionality requires a smartphone or tablet that meets the necessary hardware re- quirements. • An active Internet connection via Wi-Fi is required for this functionality. The base station can use an app to graphically display information about the temperature felt in the "Feels like"... -
Page 15: Troubleshooting
Power supply DC 5V / 1.2A mains power adapter 2 x 1.5V batteries, type AA/LR6 Indoor temperature measuring range -20°C to 60°C ( -4°F to 140°F ) Indoor humidity measuring Range 20% to 95% (RH) Data display from the Internet* Air pressure, wind speed/direction, "Feels like"... -
Page 16: Ec Declaration Of Conformity
24 EC Declaration of Conformity Hereby, Bresser GmbH declares that the equipment type with item number 7001040 : is in compli- ance with Directive: 2014/30/EU. The full text of the EU declaration of conformity is available at the following internet address: www.bresser.de/download/7001040/CE/7001040_CE.pdf... -
Page 17: Warranty
You can consult the full guarantee terms as well as information on extending the guarantee period and details of our services at www.bresser.de/warranty_terms. 17 / 20... - Page 20 (de preferencia por e-mail: service@bresseruk.com e-mail). Telephone*: +44 1342 837 098 BRESSER UK Ltd e-mail: servicio.iberia@bresser-iberia. Suite G3, Eden House Enterprise Way Teléfono*: +34 91 67972 69 Edenbridge, Kent TN8 6HF...
Need help?
Do you have a question about the WIFI 4Cast and is the answer not in the manual?
Questions and answers