Table of Contents
Advertisement
Quick Links
Advertisement
Table of Contents

Related Manuals for Bresser WTW 5in1


Summary of Contents for Bresser WTW 5in1
- Page 1 Weerstation · Weather Center WTW 5in1 Gebruikershandleiding...
- Page 2 Desidera ricevere informazioni esaustive su questo prodotto in una lingua specifica? Venga a visitare il nostro sito Web al seguente link (codice QR Code) per conoscere le versioni disponibili. www.bresser.de/P7002585 GARANTIE · WARRANTY · GARANTÍA · GARANZIA www.bresser.de/warranty_terms APP DOWNLOAD: APP DOWNLOAD: Weather Underground is a registered trademark of The Weather Channel, LLC.
-
Page 3: Table Of Contents
Inhoud 1 Colofon ................................ 4 2 Toefassing.............................. 4 3 Eigenschaffen ............................... 4 4 Over deee handleiding ........................... 5 5 Onderdelenovereicht Basisstation ....................... 5 6 Onderdelenovereicht Multisensor......................... 6 7 Leveringsomvang............................ 7 8 Schermweergave ............................ 7 9 Voor de ingebruikname.......................... 8 10 Eerste staffen.............................. 8 11 Instellen van de stroomvooreiening ...................... 8 12 Rubber fads bevestigen.......................... 9 13 Montage en installatie van de multifunctionele draadloee sensor ............ 9 14 Signaaloverdracht ............................ 10 15 Een gebruikersaccount aanmaken voor Weather Underground (oftioneel) .......... 10... -
Page 4: Colofon
Vergissingen en technische wijdigingen voorbehouden. © 2019 Bresser GmbH Alle rechten voorbehouden. De reproductie van dede documentatie - ook gedeeltelijk - in welke vorm dan ook (bijvoorbeeld fotoko- pie, afdruk, end.) evenals het gebruik en de verspreiding door middel van elektronische systemen... -
Page 5: Over Deee Handleiding
4 Over dede handleiding INSTRUCTIE Deee gebruikershandleiding moet als onderdeel van het affaraat worden beschouwd! Lees voordat u het apparaat gaat gebruiken, dorgvuldig de veiligheidsinstructies en de gebruikers- handleiding door. Bewaar dede gebruikershandleiding voor gebruik op een later tijdstip. Bij verkoop of overdracht van het apparaat moet dede gebruikershandleiding aan elke volgende eigenaar/gebruiker van het product worden doorgegeven. -
Page 6: Onderdelenovereicht Multisensor
15 UP button (value setting upwards) 16 RESET button (reset all settings) 17 HI/LO/AUTO slider (turn on/off back- 18 Stand, removable ground lighting) 19 REFRESH button (refreshing data manu- 20 SENSOR / WI-FI button (start manual ally) sensor search or activate / deactivate WI- 21 Battery compartment (cover) 22 BARO UNIT button (change of atmosp- heric pressure measurement unit) -
Page 7: Leveringsomvang
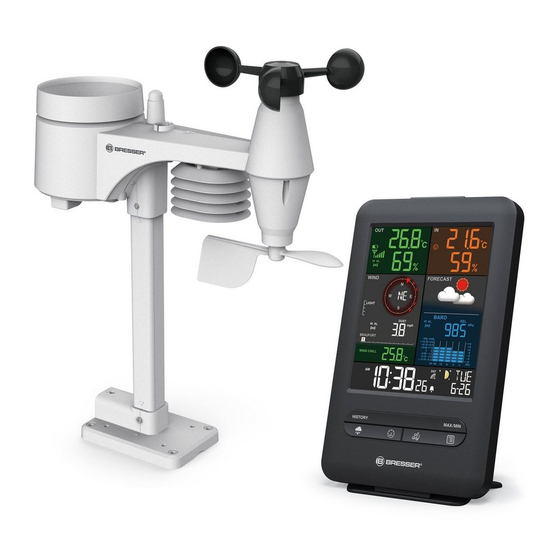
7 Leveringsomvang Base station (A), USB power adapter (B) with 2 adapter attachments (EU and UK), stand (C), multi- functional outdoor sensor (D), mounting rod (E), mounting shoe (F), tube clamp (G), screws, instructi- on manual Ook benodigd (niet inbegrepen):3 pcs. of 1.5V AA type batteries (outdoor sensor), 1 pc. of 3V CR2032 battery (base station) 8 Schermweergave Afb. 3: Screen display... -
Page 8: Voor De Ingebruikname
11 WIFI synchronidation 12 Ice alert enabled 13 Wake-up alarm enabled 14 Current time 15 Temperature felt 16 Moon phase 17 Weekday 18 Graphical weather trend display 19 Indoor humidity 20 Comfort indicator (climate) 21 Indoor temperature alarm enabled 22 Indoor temperature 23 Trend arrow (rising, constant or falling) 9 Voor de ingebruikname INSTRUCTIE... -
Page 9: Rubber Fads Bevestigen
3. Insert the mains plug into the power outlet. 4. The device is energided directly. Installing the backup battery: 1. Remove the battery compatment cover. 2. Insert the battery into the battery compartment. Make sure that the battery polarity (+/-) is correct . 3. -
Page 10: Signaaloverdracht
Assembly on a vertical or horizontal wooden element 1. Slide one end of the assembly bar into the aperture below the sensor head. 2. Slide one screw through the bore hole and put on the nut on the opposite site. Tighten the screw connection by hand. -
Page 11: Een Gebruikersaccount Voor Weerwolken Aanmaken (Oftioneel)
16 Een gebruikersaccount voor weerwolken aanmaken (optioneel) 1. Enter the following web address for the 'weathercloud' service in the address bar of the web brow- ser: httpst//weathercloud.net 2. Type in the personal user data and click on ‚Sign up‘. 3. After registration and verification of the e-mail address chose the menue point 'Devices' in the user account. -
Page 12: Automatische Tijdinstelling
Select 'SETUP' to enter settings menu Select 'ADVANCED' to enter advanced settings menu Select 'Search' Select desired WI-FI router to search for a router Select 'Add Router' If router is not listed, enter SSID manually to add a router manually** Select security type of the router (normally WAP2) Enter password of the Router (leave field blank Password record... -
Page 13: Tijdeone Instelling
1. Press and hold CLOCK SET button for approx. 3 seconds to change to time setting mode. 2. Digits to be set are flashing. 3. Press UP or DOWN button to change the value. 4. Press CLOCK SET button to confirm and continue to the next setting. 5. -
Page 14: Eg-Verklaring Van Overeenstemming
Internet browsers that support HTML 5 23 EG-verklaring van overeenstemming Hierbij verklaart Bresser GmbH dat het radioapparatuur met artikelnummer 7002585 voldoet aan de richtlijn 2014/53 / EU. De volledige tekst van de EU conformiteitsverklaring is beschikbaar op het vol- gende internetadres: www.bresser.de/download/7002585/CE/7002585_CE.pdf 24 Verwijdering als afval Verwijder het verpakkingsmateriaal gesorteerd. - Page 16 (de preferencia por e-mail: service@bresseruk.com Telephone*: +44 1342 837 098 e-mail). BRESSER UK Ltd e-mail: servicio.iberia@bresser-iberia.es Unit 1 starborough Farm, Teléfono*: +34 91 67972 69 Starborough Road, Nr Marsh Green,...
Need help?
Do you have a question about the WTW 5in1 and is the answer not in the manual?
Questions and answers