Zimmer HRC-03 Series Installation And Operating Instructions Manual
Gripper, electric
Hide thumbs
Also See for HRC-03 Series:
- Installation and operating instructions manual (55 pages) ,
- Installation and operating instructions manual (32 pages)

Subscribe to Our Youtube Channel
Related Manuals for Zimmer HRC-03 Series


Summary of Contents for Zimmer HRC-03 Series
- Page 1 INSTALLATION AND OPERATING INSTRUCTIONS HRC-03 series Gripper, electric DDOC00268 THE KNOW-HOW FACTORY www.zimmer-group.com...
- Page 2 INSTALLATION AND OPERATING INSTRUCTIONS: 2-jaw parallel gripper, electric, HRC-03 series Parameter explanation (glossary) Parameter Explanation The gripper is controlled with the "ControlWord". ControlWord The "ControlWord" is bit-exclusive, which means that only one bit at a time can be active in the "Word". The value "ZERO" is also permitted.
-
Page 3: Table Of Contents
INSTALLATION AND OPERATING INSTRUCTIONS: 2-jaw parallel gripper, electric, HRC-03 series Contents 1. Supporting documents ...............................5 2. Safety notice ..................................5 3. Proper use ....................................6 4. Personnel qualification ...............................6 5. Product description ................................6 Possible applications ......................................6 Forces and torques ......................................6 Type plate .........................................7 Criteria for use in collaborative applications .............................. - Page 4 INSTALLATION AND OPERATING INSTRUCTIONS: 2-jaw parallel gripper, electric, HRC-03 series Minimum travel path .......................................25 “Easy Startup” .........................................26 8.7.1 “Easy Startup” HRC-03 series ..............................26 Starting gripping movement ..................................27 Repeated movement in the same direction ..............................27 8.9.1 “Save recipe” ....................................28 8.10 Recipe examples “Load recipe” ..................................29 9.
-
Page 5: Supporting Documents
3. The gripper may be used only in accordance with its proper use and technical data. Zimmer GmbH shall accept no liability for any damage caused by improper use. -
Page 6: Proper Use
Forces and torques INFORMATION: For information on forces and torques, please visit our website. Zimmer Customer Service is available to provide you assistance if you have any further questions. Zimmer GmbH Im Salmenkopf 5 77866 Rheinau, Germany ... -
Page 7: Type Plate
INFORMATION: Please state the serial number in the event of damage or a complaint. Zimmer Customer Service is available to provide you assistance if you have any further questions. Criteria for use in collaborative applications The criteria listed below are the basis for the suitability of the... -
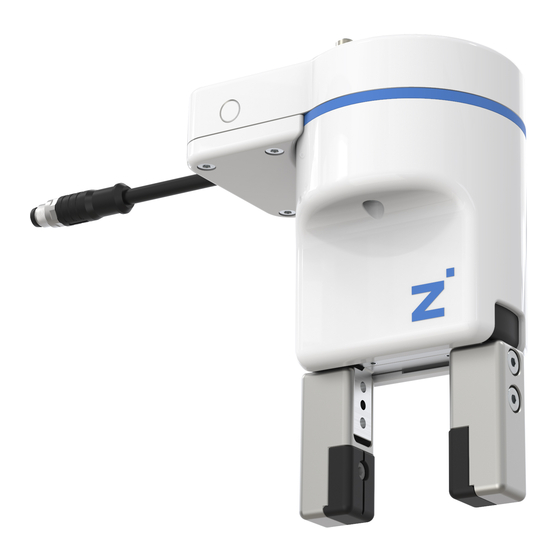
Page 8: Function
LED display/plastic ring Gripper jaws Electrical specifications INFORMATION: For information on electrical specifications, please visit our website. This data varies within the series depending on the specific design. Zimmer Customer Service is available to provide you assistance if you have any further questions. Zimmer GmbH Im Salmenkopf 5 77866 Rheinau, Germany +49 7844 9138 0 ... -
Page 9: Led Display
Power/communication Error Verified configuration INFORMATION: For information about the verified configuration, please visit our website. Zimmer Customer Service is available to provide you assistance if you have any further questions. Protection classes NOTICE: The gripper achieves protection class IP40 in all mounted positions of installation. Zimmer GmbH Im Salmenkopf 5 ... -
Page 10: Technical Data
INFORMATION: For information on technical data, please visit our website. This data varies within the series depending on the specific design. Zimmer Customer Service is available to provide you assistance if you have any further questions. Self locking mechanism INFORMATION: The gripper has a mechanical self locking mechanism to ensure that the workpiece remains held by the gripper in the event of power supply loss or failure (such as an emergency stop). -
Page 11: Io-Link" Installation
INSTALLATION AND OPERATING INSTRUCTIONS: 2-jaw parallel gripper, electric, HRC-03 series 7.2.2 “IO-Link” installation The gripper and the robot are connected to each other via an adapter flange. The gripper must be installed on a mounting surface in accordance with the levelness specifications. Length < 100 mm permitted unevenness < 0.02 mm Length > 100 mm permitted unevenness < 0.05 mm The following work steps must be observed during installation: ►... -
Page 12: Io-Link" Installation With Adapter Plate
INSTALLATION AND OPERATING INSTRUCTIONS: 2-jaw parallel gripper, electric, HRC-03 series 7.2.3 “IO-Link” installation with adapter plate The gripper and the robot are connected to each other via an adapter plate. The gripper must be installed on a mounting surface in accordance with the levelness specifications. -
Page 13: Digital + Integrated Analog Sensing" Installation
INSTALLATION AND OPERATING INSTRUCTIONS: 2-jaw parallel gripper, electric, HRC-03 series 7.2.4 “Digital + integrated analog sensing” installation Ö There is no LED ring for this gripper variant. A single-color plastic ring replaces the LED ring. The gripper and the robot are connected to each other via an adapter flange. The gripper must be installed on a mounting surface in accordance with the levelness specifications. Length < 100 mm permitted unevenness < 0.02 mm Length > 100 mm ... -
Page 14: Digital" Installation
INSTALLATION AND OPERATING INSTRUCTIONS: 2-jaw parallel gripper, electric, HRC-03 series 7.2.5 “Digital” installation The gripper and the robot are connected to each other via an adapter flange. The gripper must be installed on a mounting surface in accordance with the levelness specifications. Length < 100 mm permitted unevenness < 0.02 mm Length > 100 mm ... -
Page 15: Installation Of The Electrical System
► www.zimmer-group.com INFORMATION: The cables that are used by Zimmer GmbH feature a minimum bending radius of 10 x the outer diameter. This bending radius must not be undershot! ► All IO-Link cables that are installed in grippers have an outer diameter of 5 mm and thus a bending radius of 50 mm. -
Page 16: Io-Link" Installation
Before installing an accessory, make sure it is suitable for use with the selected variant. For information on all available accessories, please visit our website. Zimmer Customer Service is available to provide you assistance if you have any further questions. Zimmer GmbH Im Salmenkopf 5 ... -
Page 17: Commissioning
INSTALLATION AND OPERATING INSTRUCTIONS: 2-jaw parallel gripper, electric, HRC-03 series 8. Commissioning “Analog” and “Digital” commissioning 8.1.1 Restart “Analog“ and “Digital“ INFORMATION: When restarting the gripper, no signal must be present at PINS “DIR1” and “DIR2”. Condition for a cold start: „DIR1“... -
Page 18: Io-Link Commissioning
INSTALLATION AND OPERATING INSTRUCTIONS: 2-jaw parallel gripper, electric, HRC-03 series IO-Link commissioning 8.2.1 Process data The option exists for the gripper to be controlled only by the process data transmitted in each cycle. Outputs: Process data from the IO-Link master to the gripper! -
Page 19: Iodd Import
INSTALLATION AND OPERATING INSTRUCTIONS: 2-jaw parallel gripper, electric, HRC-03 series 8.2.2 IODD import ► Importing the IODD (device description) into the control system. Ö Call up our website at Ö www.zimmer-group.com Ö Select the desired gripper and download the corresponding .zip file via the “Download IODD” link. Ö The “.zip file” is required for importing into the control system. When the hardware configuration is complete and the IO-Link connection to the gripper is established, some data must be visible in the process input data. -
Page 20: Parameter
INSTALLATION AND OPERATING INSTRUCTIONS: 2-jaw parallel gripper, electric, HRC-03 series Parameter 8.4.1 “ControlWord” parameter NOTICE: In the “ControlWord” parameter, only one single bit or the value 0 may be set at a time. Only the values listed in the following table are valid:... -
Page 21: Devicemode" Parameter
INSTALLATION AND OPERATING INSTRUCTIONS: 2-jaw parallel gripper, electric, HRC-03 series Bit 7: „Adjust“ ► If no other bit is set in the control word, the “AdjustBit” can be used to execute a readjustment of the end positions of the jaw. -
Page 22: Positiontolerance" Parameter
The user can set the required gripping force to 4 stages. INFORMATION: The values for the gripping force can be found on the technical data sheet on our website. This data varies within the series depending on the specific design. Zimmer Customer Service is available to provide you assistance if you have any further questions. Name "GripForce" Data format... -
Page 23: Teachposition" Parameter
INSTALLATION AND OPERATING INSTRUCTIONS: 2-jaw parallel gripper, electric, HRC-03 series 8.4.6 “TeachPosition” parameter The operator communicates to the gripper the position at which the workpiece is expected via the “TeachPosition”. The “PositionTolerance” functions around this position. Thus the gripper can distinguish whether a correct or incorrect workpiece has been gripped. Confirmation that the correct workpiece has been... -
Page 24: Diagnosis" Parameter
INSTALLATION AND OPERATING INSTRUCTIONS: 2-jaw parallel gripper, electric, HRC-03 series Bit 15: „Error“ ► Error in the gripper. ► If this bit is active, the error message can be determined using the “Diagnosis” parameter. The following steps are required for the “fault acknowledgment”: If the gripper has a fault, the error bit is set in the status word. -
Page 25: Actualposition" Parameter
INSTALLATION AND OPERATING INSTRUCTIONS: 2-jaw parallel gripper, electric, HRC-03 series 8.4.9 “ActualPosition” parameter The parameter “ActualPosition” corresponds to the current position of the gripper jaws relative to the full stroke. The value is specified with a resolution of 0.01 mm. The values can move between the “BasePosition” (minimum values) and the “WorkPosition” (maximum values). -
Page 26: Easy Startup
INSTALLATION AND OPERATING INSTRUCTIONS: 2-jaw parallel gripper, electric, HRC-03 series “Easy Startup” Ö From switching on the gripper to the initial movement. The gripper is to be connected in accordance with its assignment plan. The gripper reports the “StatusWord”, “Diagnosis” and “ActualPosition” process data immediately after the internal controller is booted up. -
Page 27: Starting Gripping Movement
INSTALLATION AND OPERATING INSTRUCTIONS: 2-jaw parallel gripper, electric, HRC-03 series Starting gripping movement The gripper receives the move command by the “ControlWord” = 0x0100 or “ControlWord” = 0x0200 being sent. ► The movement order must be pending for as long as it takes until the desired position is reached. -
Page 28: Save Recipe
INSTALLATION AND OPERATING INSTRUCTIONS: 2-jaw parallel gripper, electric, HRC-03 series 8.9.1 “Save recipe” A schematic program example for saving a new recipe is shown in the following. (*Store tool workpiece recipes in Structured Text (ST)*) IF bSave = TRUE THEN iStep := 10;... -
Page 29: Recipe Examples "Load Recipe
INSTALLATION AND OPERATING INSTRUCTIONS: 2-jaw parallel gripper, electric, HRC-03 series 8.10 Recipe examples “Load recipe” For loading a new recipe, a schematic program example is shown in the following. (*Load workpiece recipes in Structured Text (ST)*) IF bLoad = TRUE THEN iStep := 10;... -
Page 30: Operation
INFORMATION: Zimmer Customer Service is available to provide you assistance if you have any further questions on adjustable gripping force and the emergency release. The gripper has an emergency release that can be mechanically opened in the event of a power failure. Before the emergency release can be opened, the sleeve must be removed. -
Page 31: Analog" And "Digital + Integrated Analog Sensing" Adjustable Gripping Force
INSTALLATION AND OPERATING INSTRUCTIONS: 2-jaw parallel gripper, electric, HRC-03 series 9.1.2 “Analog” and “Digital + integrated analog sensing” adjustable gripping force The gripping force can be adjusted in four stages using a rotary switch. The rotary switch can be reached through the opening... -
Page 32: Io-Link
INSTALLATION AND OPERATING INSTRUCTIONS: 2-jaw parallel gripper, electric, HRC-03 series “IO-Link” 9.2.1 “IO-Link” emergency release The following work steps must be observed before operating the emergency release: ► Unscrew the two fastening screws and withdraw the sleeve and the LED ring Ö... -
Page 33: Io-Link" Adjustable Gripping Force
10. Gripping force charts INFORMATION: For information on the gripping force charts, please visit our website. Zimmer Customer Service is available to provide you assistance if you have any further questions. Zimmer GmbH Im Salmenkopf 5 77866 Rheinau, Germany ... -
Page 34: Troubleshooting
INSTALLATION AND OPERATING INSTRUCTIONS: 2-jaw parallel gripper, electric, HRC-03 series 11. Troubleshooting Error code Error Possible cause Measure No error • Actuator power supply not connected ► Check the actuator power Actuator power supply is not • Cable break 0x100 supply present or too low. - Page 35 INSTALLATION AND OPERATING INSTRUCTIONS: 2-jaw parallel gripper, electric, HRC-03 series Error code Error Possible cause Measure ► Confirm the newly transferred • Process data sent by the process data with a 0x309 “TeachPosition” not transferred master has been changed "Handshake" ControlWord = ► Confirm the newly transferred •...
-
Page 36: Maintenance
Dismantling and reassembling the gripper without authorization may result in complications, as special installation equipment is required in some cases. Zimmer GmbH shall not be liable in the event of unauthorized dismantling and reassembling of the gripper or in the event of any malfunction or damage resulting from this. -
Page 37: Rohs Declaration
INSTALLATION AND OPERATING INSTRUCTIONS: 2-jaw parallel gripper, electric, HRC-03 series 16. RoHS declaration In terms of the EU Directive 2011/65/EU Name and address of the manufacturer: Zimmer GmbH 77866 Rheinau, Im Salmenkopf 5 +49 7844 9138 0 +49 7844 9138 80 ... -
Page 38: Declaration Of Incorporation
INSTALLATION AND OPERATING INSTRUCTIONS: 2-jaw parallel gripper, electric, HRC-03 series 18. Declaration of Incorporation In terms of the EU Machinery Directive 2006/42/EC (Annex II 1 B) Name and address of the manufacturer: Zimmer GmbH 77866 Rheinau, Im Salmenkopf 5 +49 7844 9138 0 ... -
Page 39: Declaration Of Conformity
INSTALLATION AND OPERATING INSTRUCTIONS: 2-jaw parallel gripper, electric, HRC-03 series 19. Declaration of Conformity In terms of the EC Directive 2014/30/EC on electromagnetic compatibility Name and address of the manufacturer: Zimmer GmbH 77866 Rheinau, Im Salmenkopf 5 +49 7844 9138 0 ... - Page 40 INSTALLATION AND OPERATING INSTRUCTIONS: 2-jaw parallel gripper, electric, HRC-03 series Zimmer GmbH Im Salmenkopf 5 77866 Rheinau, Germany +49 7844 9138 0 +49 7844 9138 80 www.zimmer-group.com ● ● ● ● ●...
Need help?
Do you have a question about the HRC-03 Series and is the answer not in the manual?
Questions and answers