Table of Contents
Advertisement
Advertisement
Table of Contents

Subscribe to Our Youtube Channel
Related Manuals for IFM Electronic DP2200


Summary of Contents for IFM Electronic DP2200
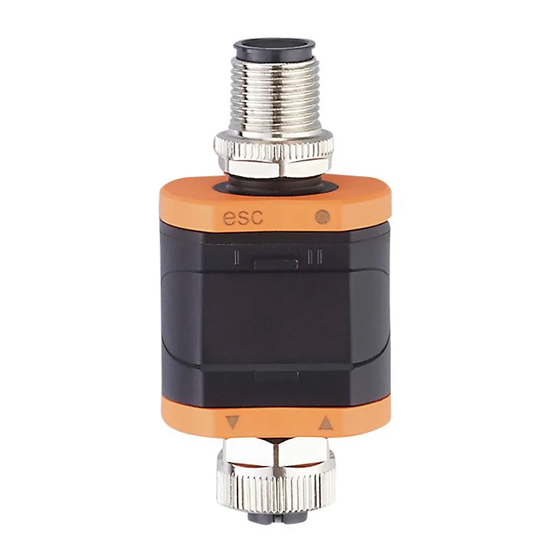
- Page 1 Operating instructions Analogue limit display DP2200...
-
Page 2: Table Of Contents
Contents 1 Preliminary note ���������������������������������������������������������������������������������������������������5 1�1 Symbols and warnings used ��������������������������������������������������������������������������5 2 Safety instructions �����������������������������������������������������������������������������������������������6 2�1 General ����������������������������������������������������������������������������������������������������������6 2�2 Target group ���������������������������������������������������������������������������������������������������6 2�3 Electrical connection ��������������������������������������������������������������������������������������6 3 Functions and features ����������������������������������������������������������������������������������������7 3�1 Block diagram ������������������������������������������������������������������������������������������������7 3�2 General application and functionality �������������������������������������������������������������7 3�3 Use as a stand-alone device without IO-Link ������������������������������������������������8 3�4 Application as an IO-Link device �������������������������������������������������������������������9 3�4�1 General information ������������������������������������������������������������������������������9... - Page 3 8�4 Parameters of the extended functions (EF) �������������������������������������������������19 8.4.1 rES ─ restore factory setting ��������������������������������������������������������������19 8.4.2 A.trm ─ analogue termination for OUT2 ���������������������������������������������19 8.4.3 ou1 ─ output function for OUT1 ����������������������������������������������������������19 8.4.4 dS1/dr1 ─ switching delay/switch-off delay for OUT1�������������������������19 8.4.5 ScAL ─ scaling of the displayed value �����������������������������������������������19 8�4�6 C�ASP/C�AEP - customer-specific analogue start/end point �������������20 8.4.7 coLr ─ display colours and colour changes ���������������������������������������22 8.4.8 cFH/cFL ─ upper/lower value for colour change �������������������������������22 8.4.9 diS ─ refresh rate of the displayed value ��������������������������������������������23 8.4.10 Lo/Hi ─ min/max measured input values ������������������������������������������23 8.4.11 ...
- Page 4 13 Maintenance, repair, disposal ��������������������������������������������������������������������������32 13�1 Maintenance ����������������������������������������������������������������������������������������������32 13�2 Cleaning the housing surface ��������������������������������������������������������������������32 13�3 Repair ��������������������������������������������������������������������������������������������������������32 13�4 Disposal �����������������������������������������������������������������������������������������������������32 14 Parameter list and factory settings ������������������������������������������������������������������33 This document is the original instructions�...
-
Page 5: Preliminary Note
1 Preliminary note This document applies to the threshold display DP2200� Keep this document during the entire duration of use of the device� WARNING Adhere to the warning notes and safety instructions (→ 2 Safety instructions)� 1.1 Symbols and warnings used ► Instructions >... -
Page 6: Safety Instructions
2 Safety instructions 2.1 General Adhere to the operating instructions� Non-observance of the instructions, operation which is not in accordance with use as prescribed below, wrong installation or incorrect handling can affect the safety of operators and machinery� The installation and connection must comply with the applicable national and international standards�... -
Page 7: Functions And Features
3 Functions and features 3.1 Block diagram DP2200 OUT1 (digital) Input (analogue) I OUT2 (analogue) A�trm Inputs/outputs of the device 1: IN (analogue input I A�trm = analogue termination OUT2 2: OUT1 (digital output) *) switchable internal load 3: OUT2 (analogue output I **) external load (optional) The current loop of the analogue input must be terminated�... -
Page 8: 3�3 Use As A Stand-Alone Device Without Io-Link
• As IO-Link device The device operates as an "analogue/IO-Link converter"� The evaluation of the measured current value depends on the parameters which are set with IO-Link tools or a PLC via IO-Link communication or directly on the device� In some points parameter setting via IO-Link tools or PLC is different from parameter setting via the menu (→ 8 Parameters)�... -
Page 9: 3�4 Application As An Io-Link Device
3.4 Application as an IO-Link device 3.4.1 General information The device has an IO-Link communication interface which requires an IO-Link- capable module (IO-Link master)� The IO-Link interface allows direct access to the process and diagnostic data and enables setting of the parameters of the unit during operation� It is possible to set parameters via a point-to-point connection�... -
Page 10: 3�4�2 Functionality
3.4.2 Functionality In the IO-Link SIO mode, the device has the same functionality as a stand-alone device� The measured value is also displayed� Additionally, the device converts the measured current and transmits the value via IO-Link connection to the PLC� 3.4.3 IO Device Description (IODD) You will find the IODDs necessary for the configuration of the IO-Link device and detailed information about process data structure, diagnostic information and... -
Page 11: 4�1 Push Rings (Buttons)
4.1 Push rings (buttons) ► To execute an [esc], [●], [▼] or [▲] command, press the corresponding corner of a push ring� Button Function [esc] Escape Return to the previous menu� Exit parameter setting without saving the new value� [●] Enter Enter menu mode (→ 8.2 Menu structure)� Selection of the parameter and acknowledgement of a parameter value� [▼] Down Selection of a parameter�... -
Page 12: 4�3�1 Representation Of The Measured Current Value
4.3.1 Representation of the measured current value 0�1 0�3 3�6 3�8 20�5 [mA] Input current "nPrb" "UL" 3�60���21�00 mA "OL" splay Process 32764 -32760 3600-21000 μA 32760 data Silent nPrb events 1: No measured data 2: Input current below the range (-) nPrb: No sensor 3: Input current above the range (+) -
Page 13: Electrical Connection
6 Electrical connection WARNING The device must be connected by a qualified electrician� The national and international regulations for the installation of electrical equipment must be adhered to� Voltage supply to SELV, PELV� WARNING ► Protect the supply voltage� Potential M12 connector (1) Fuse L+ / supply voltage... -
Page 14: 6�1 Maximum Length Of The Connection Cables
To ensure the protection rating fully tighten the screws of the used M12 connectors� Protection rating (→ 11 Technical data)� 6.1 Maximum length of the connection cables Without IO-Link on either side: 30 m� With IO-link communication on the master side: 20 m� All cables must be provided with a strain relief min�... -
Page 15: Parameters
8 Parameters 8.1 General Irrespective of the operating mode (stand-alone device/SIO or IO-Link device) there are two options to set the parameters of the device: • directly on the device via the menu • or via an IO-Link tool� Access via an IO-Link tool has a higher priority than parameter setting via the menu�... -
Page 16: 8�2 Menu Structure
8.2 Menu structure 4�10���20�00 4�10���20�00 1234 4�00���19�90 4�00���19�90 A�trm Hno Hnc Fno 0�0���50�0 0�0���50�0 ScAL OFF cccc ccc�c cc�cc c�ccc C�ASP -746���9745 C�AEP -366���9366 coLr rEd GrEn r1ou G1ou r-cF G-cF 4�10���20�00 4�00���19�90 0�000���4�000 1: Operating mode (→ 7) 2: Main menu (→ 8.3) 3: Extended functions (→ 8.4) Parameter list and factory settings (→ 14) -
Page 17: 8�3 Parameters Of The Main Menu
8.3 Parameters of the main menu 8.3.1 SP1/rP1 ─ set point/reset point OUT1 Upper/lower limit for measuring current at which OUT1 switches with hysteresis setting� Only displayed if the hysteresis function [Hno] or [Hnc] is set in [ou1]� I [mA] Set point Reset point Hysteresis... -
Page 18: Fh1/Fl1 ─ Min/Max Switching Limits For Window Function
8.3.2 FH1/FL1 ─ min/max switching limits for window function Upper/lower limit for measuring current at which OUT1 switches within the window setting� The parameters are only displayed if the window function [Fno] or [Fnc] is set in [ou1]� I [mA] Window upper value Window lower value OUT1... -
Page 19: 8�4 Parameters Of The Extended Functions
8.4 Parameters of the extended functions (EF) 8.4.1 rES ─ restore factory setting Resets all parameters to the factory setting (→ 14)� ► Select [rES]� ► Press [●]. ► Press and hold [▲] or [▼] until [----] is displayed. ► Briefly press [●]. 8.4.2 A.trm ─ analogue termination for OUT2 • [OFF] = OUT2 is externally connected, e�g� to the analogue input of another device�... -
Page 20: 8�4�6 C�Asp/C�Aep - Customer-Specific Analogue Start/End Point
8.4.6 C.ASP/C.AEP - customer-specific analogue start/end point Settings for scaled display values� The parameters are only displayed when [ScAL] is set to [cccc], [ccc�c], [cc�cc] or [c�ccc]� C�ASP value: -746 ��� 9745 corresponds to 4 mA� C�AEP value: -366 ��� 9366 corresponds to 20 mA� If a scaling is set via [ScAL], the C�AEP value also has to be adapted accordingly: With [ScAL] = [ccc.c] → C.AEP value x 10... - Page 21 100.0 Menu setting example ScAL ccc�c C�ASP 0�0 C�AEP 100�0 Input 10 mA [mA] Display 37�5 Example with scaled display value...
-
Page 22: Colr ─ Display Colours And Colour Changes
8.4.7 coLr ─ display colours and colour changes Assignment of the display colours "red" and "green" within the measuring range� • [rEd] = continously red (independent of the measured value)� • [GrEn] = continously green (independent of the measured value)� •... -
Page 23: Dis ─ Refresh Rate Of The Displayed Value
► Select [cFH] and set the upper limit� Setting range corresponds to the measured values� The lowest setting value is [cFL]� ► Select [cFL] and set the lower limit� Setting range corresponds to the measured values� The highest setting value is [cFH]�... -
Page 24: Dap ─ Damping
8.4.11 dAP ─ damping Damping of the measured analogue value� Setting also influences the set point, the IO-Link process data and the display� Value: 0�000���4�000 s (T value: 63 %)� At 0�000 damping is not active� 8.5 Parameters via IO-Link The following functions or parameters are only available via IO-Link tools�... -
Page 25: Parameter Setting
9 Parameter setting During parameter setting the device remains in the operating mode� It continues its monitoring functions with the existing parameters until the parameter setting has been completed� 9.1 Parameter setting in general Each parameter setting consists of 6 steps: Step Button Change from operating mode to parameter setting mode�... -
Page 26: 9�3 Notes On Programming
Select or change the parameter value (here e�g� [Fnc])� ► Press [▼] or [▲] for min. 2 s. > The currently set parameter value flashes (here e�g� [Hno])� > After 2 s�: - value is changed continuously by keeping the button pressed� - value is changed incrementally by pressing the button once� Numerical values (→ 9.3.4) Acknowledge the set parameter value�... -
Page 27: 9�3�2 Timeout
Customer locking If [C�Loc] is displayed when an attempt is made to modify a parameter value, an IO-Link communication is active (temporary locking)� Software locking If [S�Loc] is displayed, the sensor is permanently locked via software� This locking can only be removed with an IO-Link parameter setting software� 9.3.2 Timeout If no button is pressed for 30 s during parameter setting, the device returns to the operating mode with the unchanged value�... -
Page 28: Scale Drawing
10 Scale drawing M12 x 1 M12 x 1 Dimensions [mm] 11 Technical data Operating voltage DC 18���30 Nominal voltage DC Power consumption ≤ 1 Auxiliary supply for sensor from the operating voltage Current for sensor [mA] ≤ 800 Sensor type sensor with analogue current output: 4…20 2-wire or 3-wire sensor Accuracy [% FS]... -
Page 29: 11�1 Io-Link Device
Max� perm� relative humidity 90 (31 °C) linearly decreasing to 50 (40 °C) non condensing Maximum operating altitude 2000 above sea level Permissible air pressure [hPa] 750���1060 Connectors M12 connector, 4-pole M12 socket, 5-pole *) With screwed and firmly tightened M12 connectors (→ 6 Electrical connection) **) For IO-Link operating mode and turned off display: -25���70 °C 11.1 IO-Link device... -
Page 30: 11�2�1 Reference To
11.2.1 Reference to UL The electrical supply must only be made via SELV/PELV circuits� Supply of the device to limited energy according to chapter 9�4 UL 61010-1� The external circuits have to be isolated as required by figure 102 in UL 61010-2- 201�... -
Page 31: Fault Correction
12 Fault correction Display Error Fault correction Power Supply voltage too low� Check/correct the supply voltage (→ 6) and (→ 11)� Excessive current at switching Check switching output OUT1 output OUT1� for short-circuit or excessive current� Remove the fault� C�Loc Parameter setting via Wait until parameter setting via pushbuttons locked due to IO-Link is finished�... - Page 32 13 Maintenance, repair, disposal 13.1 Maintenance The device is maintenance-free� 13.2 Cleaning the housing surface ► Disconnect the device� ► Clean the device from dirt using a soft, chemically untreated and dry cloth� Micro-fibre cloths without chemical additives are recommended� 13.3 Repair The device must only be repaired by the manufacturer�...
- Page 33 14 Parameter list and factory settings Parameter Factory User settings settings SP1/FH1 Set point OUT1 6�00 rP1/FL1 Reset point OUT1 5�00 A.trm Analogue termination OUT2 Output function OUT1 Switching delay OUT1 0�0 s Switch-off delay OUT1 0�0 s ScAL Scaling value cccc ccc�c cc�cc...
Need help?
Do you have a question about the DP2200 and is the answer not in the manual?
Questions and answers