Table of Contents
Advertisement
Quick Links
INSTALLATION DETAILS
Recommended crew (Adult): 2
Installation time: 4 (8 man hrs)
User age: 5-12
Use zone: 72 in from all sides of unit
Weight:
SURFACING: Use of safety surfacing in compliance with
ASTM specification F1292 is required.
MAINTENANCE:
As the owner of the playground you are responsible for
maintenance of the equipment and play area. A
maintenance schedule must be developed, and the
equipment inspected frequently. A maintenance section
that includes component specific maintenance
requirements is included at the end of this manual.
Be sure to inspect surfacing for foreign objects that could
cause injury and that enough surfacing is in place in
accordance with ASTM and CPSC standards.
June 11, 2020
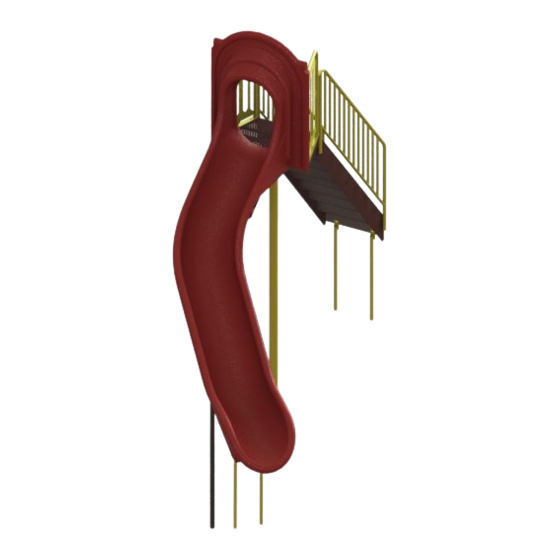
902-293 6' IND. SECTIONAL SLIDE (VL)
INSTALLATION INSTRUCTIONS
1
Advertisement
Table of Contents

Related Manuals for SportsPlay 902-293 6' IND. SECTIONAL SLIDE


Summary of Contents for SportsPlay 902-293 6' IND. SECTIONAL SLIDE
- Page 1 902-293 6’ IND. SECTIONAL SLIDE (VL) INSTALLATION INSTRUCTIONS INSTALLATION DETAILS Recommended crew (Adult): 2 Installation time: 4 (8 man hrs) User age: 5-12 Use zone: 72 in from all sides of unit Weight: SURFACING: Use of safety surfacing in compliance with ASTM specification F1292 is required.
-
Page 2: Parts List
902-293 6’ IND. SECTIONAL SLIDE (VL) INSTALLATION INSTRUCTIONS PARTS LIST PART # DESCRIPTION 435-640LR 6’ Sectional Slide 435-640LR Support Brace 435-640LR Slide Hardware Bag 905-712 Step to 6’ Deck 913-230 Transfer Point Inside Leg 913-712 Indep. Slide Post 913-714 Indep. Slide Handrail 913-721L Ind. - Page 3 902-293 6’ IND. SECTIONAL SLIDE (VL) INSTALLATION INSTRUCTIONS FOOTING INFORMATION Total footing depth is 40” less the height of the surfacing plus the height of the blocking material. If you are using 12” of surfacing the footing hole would need to be 28” plus the height of the blocking material (refer to both the side and front cutaway views to the right).
- Page 4 902-293 6’ IND. SECTIONAL SLIDE (VL) INSTALLATION INSTRUCTIONS ELEVATION AND FOOTING LAYOUT June 11, 2020...
-
Page 5: Specifications
INSTALLATION TIPS & TROUBLE SHOOTING Paint – Electrostatically applied & oven cured powder coat SportsPlay Equipment Inc. recommends pre-drilling the holes in the post when attaching a four-hole bracket with a Hardware – Stainless steel & tamper resistant number #7 drill bit. -
Page 6: Before You Begin
902-293 6’ IND. SECTIONAL SLIDE (VL) INSTALLATION INSTRUCTIONS BEFORE YOU BEGIN In addition to the components on the packing list you will need a drill with a ½” drill bit, tape measure, post hole digger, blocking material, level, and a dry erase marker. Detail A INSTALLATION STEPS __1) Review all instructions before beginning:... - Page 7 902-293 6’ IND. SECTIONAL SLIDE (VL) INSTALLATION INSTRUCTIONS INSTALLATION STEPS CONTINUED __6) Attach the Steps to 6’ Deck to Independent Sectional Slide Deck: Attach the Steps to 6’ Dec (2) to the Independent Sectional Slide Deck (8) using three 1” bolts (13), six 3/8” flat washers (10), and three 3/8”...
- Page 8 902-293 6’ IND. SECTIONAL SLIDE (VL) INSTALLATION INSTRUCTIONS INSTALLATION STEPS CONTINUED __8) Attaching the Steps to 6’ Deck to Independent Sectional Slide Deck: There is a left-side (6) and a right-side guard wall (7). The tabs will attach to the slide and will be parallel to each other. Attach the Independent Sectional Slide Guard Wall (6,7) to the Independent Sectional Slide Deck (8) with six 1”...
- Page 9 902-293 6’ IND. SECTIONAL SLIDE (VL) INSTALLATION INSTRUCTIONS INSTALLATION STEPS CONTINUED __9) Attaching the Handrails to the Structure: With help, insert the end of the handrail with the threads welded into it into the stub of the guard wall. Attach the handrails to the guard wall using a 2”...
- Page 10 902-293 6’ IND. SECTIONAL SLIDE (VL) INSTALLATION INSTRUCTIONS INSTALLATION STEPS CONTINUED __10) Assemble the slide: The two components of the slide need to be assembled. An additional hardware kit is attached to the slide entrance. Bolt the pieces of the slide together with the bolt heads on the slide entrance side.
- Page 11 902-293 6’ IND. SECTIONAL SLIDE (VL) INSTALLATION INSTRUCTIONS INSTALLATION STEPS CONTINUED __13) Attach the Support Brace to the Slide: Place the support brace into its designated hole. Remove the nuts one at a time to attach the support brace then reattach the nut. Tighten. See Detail Detail J __14) Attach the Guard Walls to the Slide: Using the holes in the tabs n the guard walls, mark and drill a ½”...
- Page 12 902-293 6’ IND. SECTIONAL SLIDE (VL) INSTALLATION INSTRUCTIONS THIS PAGE INTENTIONALLY LEFT BLANK. June 11, 2020...
-
Page 13: Equipment Maintenance
902-293 6’ INDEPENDENT SECTIONAL STRAIGHT (VL) SLIDE EQUIPMENT MAINTENANCE Brackets Welds Inspect all four-hole clamps and Inspect all welds for cracks. If a crack is found panel clamps. block access to the playground and contact your Ensure the setscrews are tight and distributor for replacement parts immediately. - Page 14 902-293 6’ INDEPENDENT SECTIONAL STRAIGHT (VL) SLIDE EQUIPMENT MAINTENANCE INSPECTION FORM MAKE COPIES OF THIS FORM TO USE FOR INSPECTION REVIEW THE “MAINTENANCE GUIDE” IN THE APPENDIX TO BETTER UNDERSTAND THE IMPORTANCE OF MAINTENANCE AND HOW TO DEVELOP A MAINTENANCE SCHEDULE. ...
Need help?
Do you have a question about the 902-293 6' IND. SECTIONAL SLIDE and is the answer not in the manual?
Questions and answers