PIONEER DJ CDJ-3000 Instruction Manual
Multi player
Hide thumbs
Also See for CDJ-3000:
- Service manual (89 pages) ,
- Quick start manual (5 pages) ,
- Connection manual (7 pages)

Related Manuals for PIONEER DJ CDJ-3000


Summary of Contents for PIONEER DJ CDJ-3000
- Page 1 Instruction Manual Multi player CDJ-3000 pioneerdj.com/support/ rekordbox.com For FAQs and other support information for this product, visit the websites above.
-
Page 2: Table Of Contents
Contents Before you start ................... 6 How to read this manual .................6 What’s in the box..................6 Product overview................. 7 PRO DJ LINK ..................7 Using mobile devices ................10 System requirements ................11 Part names ..................14 Top panel ....................14 Rear panel.....................17 Touch display ..................18 Jog display ....................26 PC/Mac setup .................. - Page 3 Playback ..................... 46 Playback/pause..................46 Playing a track from the touched point on the overall waveform...46 Reverse playback..................46 Basic operations during playback ............47 Adjusting the playback speed (Tempo Control) ........47 Adjusting the playback speed without changing the pitch (Master Tempo)..................48 Monitoring a different part of a track during playback (Touch Cue) ..48 Using the jog wheel ................
- Page 4 Saving a loop ..................57 Calling up a saved loop.................57 Deleting a saved loop................57 Hot Cues ..................... 58 Setting a Hot Cue..................58 Starting playback from a Hot Cue point ..........59 Deleting a Hot Cue................59 Calling up Hot Cues ................59 Quantize....................61 Using Quantize..................61 Beat Jump/Loop Move ..............
- Page 5 Auto standby ..................78 Changing the settings on the [SHORTCUT] screen......79 Setting items on the [SHORTCUT] screen..........80 Saving My Settings on a storage device (SD, USB) ......81 Calling up My Settings saved on a storage device (SD, USB)....82 Specifications ..................83 Additional information ..............
-
Page 6: Before You Start
Before you start How to read this manual • Thank you for choosing this Pioneer DJ product. Be sure to read this manual, the “Quick Start Guide” and the “Precautions for Use” which are also included with this product. These documents include important information that you should understand before using the unit. -
Page 7: Product Overview
Product overview For the best experience, we recommend mainly playing audio tracks analyzed by rekordbox when using this unit. rekordbox is a software application that supports music management and DJ performances. You use this unit to create professional DJ performances with audio tracks managed by rekordbox. - Page 8 They will be device (SD, USB). analyzed automatically. Step 2: Club or venue Title: Pro-DJ Music Artist: Pioneer DJ Connect the storage device • DJ using the rekordbox tracks and The playback history is (SD, USB) to a multi player.
- Page 9 • DJ using the rekordbox tracks and data. • Share the rekordbox data between the units in the PRO DJ LINK network. Step 3: Home or studio Title: Pro-DJ Music Artist: Pioneer DJ rekordbox Check and manage the playback history on rekordbox.
-
Page 10: Using Mobile Devices
Product overview Using mobile devices You can connect this unit to a mobile device with rekordbox installed and use the unit to play tracks from rekordbox. • For a list of the mobile devices supported by the unit, visit the URL below. rekordbox.com/feature/mobile/ •... -
Page 11: System Requirements
Product overview System requirements Supported audio sources This unit supports the following sources. – SD memory card – USB device – PC/Mac (page 27) SD memory cards, SDHC memory cards, and miniSD memory cards and microSD memory cards (use them with an SD memory card adapter) are collectively referred to as “SD memory card”... - Page 12 Product overview SD memory cards • The unit can play audio files saved on SD memory cards that conform to SD standards. • CPRM is not supported. USB devices • The unit can play audio files saved on USB mass storage class devices. •...
- Page 13 Product overview Supported file formats The unit supports audio files in the following formats. Sampling Type Extension Format Bit depth Bit rate frequency MPEG-1 44.1 kHz, .mp3 AUDIO 32 to 320 kbps 48 kHz LAYER-3 MPEG-4 16 bit .m4a, AAC LC 44.1 kHz, .aac, 16 to 320 kbps...
-
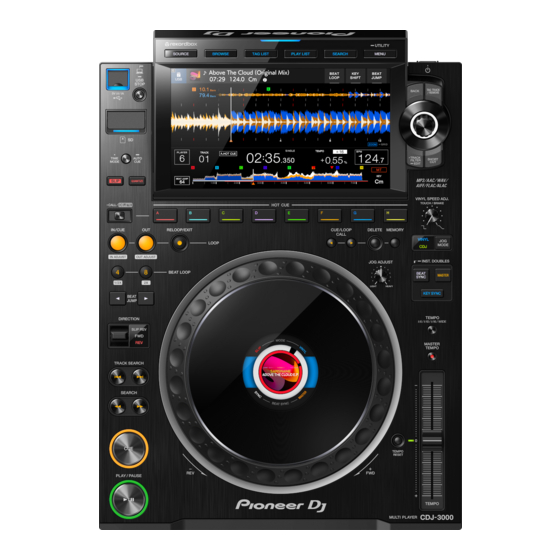
Page 14: Part Names
Part names Top panel 21 22 PLAY/PAUSE button (page 46) CUE button (page 51) SEARCH buttons (page 47) TRACK SEARCH buttons (page 47) DIRECTION FWD, REV, SLIP REV lever (pages 46, 64) Lights up during reverse playback or Slip Reverse. BEAT JUMP buttons (page 62) - Page 15 Part names 4 BEAT LOOP (1/2X) button (pages 54, 56) 8 BEAT LOOP (2X) button (pages 54, 56) LOOP IN/CUE (IN ADJUST) button (pages 51, 54) 10. LOOP OUT (OUT ADJUST) button (page 54) 11. LOOP RELOOP/EXIT button (pages 56, 59) 12.
- Page 16 Part names 31. Rotary selector (page 24) 32. TRACK FILTER/EDIT button (page 38) 33. SHORTCUT button Displays the [SHORTCUT] screen. 34. VINYL SPEED ADJ. TOUCH/BRAKE knob (page 50) 35. CUE/LOOP CALL buttons (pages 52, 57) 36. DELETE button (pages 53, 57) 37.
-
Page 17: Rear Panel
Part names Rear panel button Turns the unit on and off. AUDIO OUT L/R terminals Connect the supplied analog audio cable. DIGITAL OUT terminal Connect the supplied digital audio cable. AC IN Connect to a power outlet with the supplied power cord. LINK terminal Connect the supplied LAN cable. -
Page 18: Touch Display
Part names Touch display [SOURCE] screen Press the [SOURCE] button to display the source selection screen. Device icon Displays the connected device and the player number. • If [BACKGROUND COLOR] is set for the device, the icon’s background is displayed in the chosen color. - Page 19 Part names Browse screen Press the [BROWSE], [TAG LIST], [PLAYLIST], or [SEARCH] button to display the browse screen (track list). You can browse the rekordbox library on a storage device (SD, USB) or on a connected PC/ Mac. • If you browse a storage device (SD, USB) that does not contain a rekordbox library on the BROWSE screen, the folder and track lists are displayed in a hierarchical structure.
- Page 20 Part names INFO Displays or hides the detailed information for the highlighted track in the list. Track list Displays a track list of the selected hierarchical level or playlist. • Touch the title row to sort the list. • Touch on the title row to display the sub-column selection screen and select a sub-column to be displayed.
- Page 21 Part names Playback screen (Waveform screen) 16 17 Number of beats for a loop Displays the number of beats set for a loop. Enlarged waveform Displays the enlarged waveform, cue points, loop points, and Hot Cue points, etc. that have been analyzed by rekordbox. •...
- Page 22 Part names Device icon Displays the icon of a device selected on the [SOURCE] screen. Track information Displays the information of the loaded track. Displays the detailed information of the loaded track. BEAT LOOP (pages 55, 64) KEY SHIFT (page 70) BEAT JUMP (page 62) 10.
- Page 23 Part names 18. Time display (minutes, seconds, msec) Displays the remaining time or elapsed time. • [REMAIN] is displayed for the remaining time display. 19. SINGLE/CONTINUE indicator Displays the playback mode for the loaded track. • Set the playback mode in [PLAY MODE] in the [UTILITY] settings (page 75). 20.
- Page 24 Part names Basic operations on the touch display Use the rotary selector or touch the screen to operate it. Using the rotary selector 1 Turn the rotary selector to move the cursor and highlight an item. 2 Press the rotary selector to confirm your selection. •...
- Page 25 Part names Touch operations 1 Touch the desired item to highlight it. 2 Touch the highlighted item again to confirm your selection. • If you touch a hierarchical level, the lower level is displayed. • If you touch a track, [LOAD] is displayed. Touch [LOAD] to load the track and display the Waveform screen.
-
Page 26: Jog Display
Part names Jog display SLIP indicator Lights up when Slip mode is turned on. Artwork Displays the artwork of the loaded track. SYNC indicator Lights up when Beat Sync is turned on. Playback point indicator Indicates the playback point (turns during playback and stops when the track is paused). VINYL indicator Lights up when Vinyl mode is turned on. -
Page 27: Pc/Mac Setup
PC/Mac setup To play audio tracks stored on a PC/Mac via the unit, install the relevant driver software on your computer. – Audio driver software (for Windows): Driver software used for outputting the PC/Mac audio when using the unit with DJ software. You do not need to install this driver if you use a Mac. - Page 28 PC/Mac setup Downloading the driver software Download the dedicated driver software to your PC/Mac from the URL below. pioneerdj.com/support/ Installing the driver software 1 Double-click the downloaded installation file. 2 Read the License Agreement terms carefully. If you agree to the terms, mark the [Agree] check box and click [OK].
-
Page 29: Connections (Basic Styles)
Connections (basic styles) Turn the unit off and disconnect the power cord before connecting other units. Connect the power cord after all the connections are complete. • Use the supplied power cord. • Read the instruction manuals for the devices you are going to connect with the unit. •... - Page 30 Connections (basic styles) • Disconnect storage devices (SD, USB) before disconnecting LAN cables. • Install the rekordbox (for Mac/Windows) USB connection (LINK Export) driver software before connecting a PC/Mac to the unit via USB (page 27). SD & USB Export Read more: SD &...
- Page 31 Connections (basic styles) Wired LAN connection You can connect up to 2 computers (PC/Mac). Connection diagram (when connecting 4 multi players): LAN cable PC/Mac PC/Mac Audio cable rekordbox rekordbox Switching hub Rear panel Multi players DJ mixer Power cord To power outlet USB connection You can connect up to 2 computers (PC/Mac).
- Page 32 Connections (basic styles) • Insert or pull a USB cable straight into/out of the USB port on the rear panel. Be careful not to apply force in a vertical or horizontal direction. Wireless LAN (Wi-Fi) connection You can connect up to 4 computers (PC/Mac). Connection diagram (when connecting 4 multi players): LAN cable Audio cable...
-
Page 33: Storage Device Connection (Sd, Usb)
Storage device connection (SD, USB) SD memory card • Do not remove an SD memory card from the unit or turn the unit off while the SD memory card indicator is blinking. The unit’s management data may be deleted or the SD memory card may become unreadable. -
Page 34: Usb Device
Storage device connection (SD, USB) 4 Close the SD memory card cover. USB device • Do not disconnect a USB device from the unit or turn the unit off while the USB device indicator is blinking. The unit’s management data may be deleted or the USB device may become unreadable. -
Page 35: Track Selection
Track selection Selecting a source 1 Press the [SOURCE] button. Devices connected to the unit are displayed on the [SOURCE] screen. 2 Select a device. Selecting a track Selecting a track on the browse screen 1 Open the browse screen. A track list is displayed. -
Page 36: Searching For A Track
Track selection Selecting a recently played track 1 Press the [MENU/UTILITY] button on the Waveform screen. The list of recently played tracks is displayed. 2 Select a track. • Press the [MENU/UTILITY] or [BACK] button to close the list. Searching for a track Using the Search feature The Search feature is only available when browsing the rekordbox library. - Page 37 Track selection Using the Jump feature The unit supports 2 jump modes. Alphabet Jump 1 Press and hold the rotary selector when the alphabetical order list is displayed. Alphabet Jump mode turns on, and the first character of the highlighted track or category is displayed on the screen.
- Page 38 Track selection Using Track Filter You can narrow down tracks by BPM, key, or the tag information added by rekordbox, etc. The Track Filter feature is only available when browsing the rekordbox library. You can specify the filter conditions on the Track Filter editing screen. •...
- Page 39 Track selection Specifying the conditions on the Track Filter editing screen 1 Press and hold the [TRACK FILTER/EDIT] button. The Track Filter editing screen appears. 2 Specify the filter conditions. 1. MASTER PLAYER Touch to retrieve BPM and key of the track being played on the master player. 2.
-
Page 40: Monitoring The Sound Before Loading A Track (Touch Preview)
Track selection Monitoring the sound before loading a track (Touch Preview) You can monitor the sound of a track via a DJ mixer before loading the track. 1 Connect the unit and a Touch Preview compatible DJ mixer via PRO DJ LINK. 2 Connect headphones to the DJ mixer. -
Page 41: Using History
Track selection Using History Tracks played for approximately 1 minute are recorded in the History (playback list). • A new History is automatically created on a storage device (SD, USB) when it is connected to the unit. • You can set the name of History in [HISTORY NAME] in the [UTILITY] settings (page 77). •... -
Page 42: Using A Hot Cue Bank
Track selection Using a Hot Cue Bank You can set Hot Cues to the [HOT CUE] (A to H) buttons on the unit using a Hot Cue Bank set with rekordbox. • Hot Cue Banks cannot be edited via the unit. You will need to use rekordbox for editing. For details, see the rekordbox Instruction Manual, available at the URL below. -
Page 43: Using The Tag List
Track selection Using the Tag List You can tag a track you want to play next or tracks you think will work well in your performance and review them via the Tag List. • You can view the Tag List via multi players connected in the PRO DJ LINK network. •... - Page 44 Track selection Deleting an individual track on the BROWSE, PLAYLIST or SEARCH screen 1 Highlight a track. 2 Pres the [TAG TRACK/REMOVE] button. The track is deleted from the Tag List. Deleting an individual track on the Waveform screen 1 Press the [TAG TRACK/REMOVE] button on the Waveform screen.
- Page 45 Track selection Converting the Tag List to a playlist A playlist converted from the Tag List is displayed in the [PLAYLIST] category. • You cannot convert the Tag List to a playlist if the rekordbox library is not saved on the storage device (SD, USB).
-
Page 46: Playback
Playback Playback/pause 1 Press the [PLAY/PAUSE ] button. During pause: Starts playing the loaded track. During playback: Pauses the track. Playing a track from the touched point on the overall waveform 1 Touch the overall waveform during pause or while pressing the top of the jog wheel in Vinyl mode. -
Page 47: Basic Operations During Playback
Playback Basic operations during playback Functions Descriptions Press the [SEARCH ] or [SEARCH ] button to fast- Fast-forward/fast-reverse forward or fast-reverse. Fast-forward or fast-reverse continues until you release the button. Press the [TRACK SEARCH ] button to jump to the beginning of the next track. -
Page 48: Adjusting The Playback Speed Without Changing The Pitch (Master Tempo)
Playback Adjusting the playback speed without changing the pitch (Master Tempo) If you turn on Master Tempo, you can change the playback speed of a track using the [TEMPO] slider without changing the pitch. 1 Press the [MASTER TEMPO] button to turn on Master Tempo. The button lights up when Master Tempo is turned on. -
Page 49: Using The Jog Wheel
Using the jog wheel Setting the jog wheel mode 1 Press the [JOG MODE] button. Each press switches between the following modes. — Vinyl mode : Stops playback with a press on the top of the jog wheel and scratches a track by turning the jog wheel while pressing the top. —... -
Page 50: Adjusting The Weight Of The Jog Wheel
Using the jog wheel Adjusting the weight of the jog wheel 1 Turn the [JOG ADJUST] knob. Turn clockwise: Increases the weight. Turn counterclockwise: Decreases the weight. Adjusting the playback and stopping speeds (for Vinyl mode) You can adjust the following speeds. –... -
Page 51: Cue
You can quickly call up a cue point you have set previously. Setting a cue point During pause 1 Press the [CUE] button. A cue point is set. • Press the [ SEARCH ] or [ SEARCH ] button or turn the jog wheel during pause to fine-adjust the pause position. -
Page 52: Checking A Cue Point (Cue Point Sampler)
Checking a cue point (Cue Point Sampler) 1 Jump to a cue point. Read more: Jumping to a cue point (page 51) 2 Press and hold the [CUE] button. Playback continues until you release the [CUE] button. Saving a cue point 1 Set a cue point. -
Page 53: Deleting A Saved Cue Point
Deleting a saved cue point 1 Call up a saved cue point. Read more: Calling up a saved cue point (page 52) 2 Press the [DELETE] button. Setting the Auto Cue When loading or searching for a track, a cue point can be automatically set to the position immediately before the first sound in the track (skipping any silence at the beginning). -
Page 54: Loop
Loop You can choose a section of a track to play repeatedly. Setting a loop Manual setting 1 While the track is playing, press the [LOOP IN/CUE (IN ADJUST)] button at the point where you want to start the loop (loop-in point). -
Page 55: Fine-Adjusting Loop Points
Loop Using [BEAT LOOP] on the Waveform screen You can choose the number of beats for loop playback. 1 Touch [BEAT LOOP] on the Waveform screen. The number of beats selection screen appears. 2 Touch the number of beats you prefer. Loop playback starts according to the selected number of beats. -
Page 56: Adjusting The Length Of A Loop
Loop Adjusting the length of a loop Reducing a loop length by half 1 Press the [4 BEAT LOOP (1/2X)] or [CUE/LOOP CALL button during loop playback. The loop length is reduced by half each time you press the button. Doubling a loop in length 1 Press the [8 BEAT LOOP (2X) ] or [CUE/LOOP CALL ] button during loop playback. -
Page 57: Emergency Loop
Loop Emergency Loop The unit automatically plays a beat loop if it cannot start playing the next track when the end of the current is reached. This prevents situations where your performance is interrupted by silence. • You cannot DJ during Emergency Loop playback. •... -
Page 58: Hot Cues
Hot Cues You can quickly call up a Hot Cue point by pressing the [HOT CUE] (A to H) buttons and start playback from that point in the track. Setting a Hot Cue 1 Press one of the [HOT CUE] (A to H) buttons at the point where you want to set a Hot Cue. -
Page 59: Starting Playback From A Hot Cue Point
Hot Cues Starting playback from a Hot Cue point 1 Press one of the [HOT CUE] (A to H) buttons that have a Hot Cue set. Playback starts from the Hot Cue point. • Press the [LOOP RELOOP/EXIT] button to cancel playback of the loop if one was set to the button you pressed. - Page 60 Hot Cues — [rekordbox SETTING]: Automatically calls up Hot Cues from tracks with the icon (indicates that the tracks have [HOT CUE AUTO LOAD] set using rekordbox) when you load them. [A. HOT CUE] lights up in white on the screen. —...
-
Page 61: Quantize
Quantize Cue points, loop-in points, loop-out points, and Hot Cue points are automatically set to the closest beat position even if your timing is off the beat when you set them. You can use Hot Cues, loop, reverse playback, and Slip without breaking the rhythm of the track you are playing. -
Page 62: Beat Jump/Loop Move
Beat Jump/Loop Move You can move a playback point by the specified number of beats from the point where the button is pressed. Using Beat Jump/Loop Move Using the [BEAT JUMP ] buttons The playback point jumps by the number of beats set in [BEAT JUMP BEAT VALUE] in the [UTILITY] settings or on the [SHORTCUT] screen (page 74). - Page 63 Beat Jump/Loop Move 2 Touch your preferred number of beats. The playback point jumps by the relevant number of beats from the point where you press the button. • If you do this during loop playback, the loop moves.
-
Page 64: Slip
Slip If you turn on Slip mode, normal playback continues in the background (but you cannot hear it) when you perform the following operations. When you end the operation, Slip is canceled and normal playback starts from the exact point the track would have reached. -
Page 65: Setting Slip Mode
Slip Setting Slip mode 1 Press the [SLIP] button. The [SLIP] button lights up when Slip mode is turned on. • The [SLIP] button blinks while Slip is in use. • The current playback point in Slip mode is indicated by a yellow line on the overall and enlarged waveforms on the Waveform screen. -
Page 66: Beat Sync
Beat Sync If you turn on Beat Sync, the tempo (BPM) and beat position of the track on the unit automatically synchronize with the loaded track on the sync master in the PRO DJ LINK network. • Beat Sync cannot be used with tracks that have not been analyzed by rekordbox. •... -
Page 67: Changing The Sync Master
Beat Sync Changing the sync master You can change the sync master in the following ways. – Change the track on the sync master or pause playback. – Press the [MASTER] button on the sync master. – Press the [MASTER] button on another multi player to set it as the sync master. Using Instant Doubles You can use another multi player in the PRO DJ LINK network to start playback of the track that is on the sync master from the same position. -
Page 68: Beatgrid
Beatgrid You can adjust the beatgrid. • You cannot adjust the beatgrid for tracks that have not been analyzed by rekordbox. Adjusting the beatgrid 1 Press and hold the rotary selector. Grid Adjust mode turns on. 2 Turn the rotary selector to adjust the beatgrid. •... -
Page 69: Key Sync
Key Sync You can adjust the key of a track being played on the unit to match with the key of a track loaded on the sync master. • You cannot adjust the key for tracks that have not been analyzed by rekordbox. Using Key Sync 1 Press the [KEY SYNC] button when a track is loaded. -
Page 70: Key Shift
Key Shift You can shift the key of a track. Using Key Shift 1 Touch [KEY SHIFT] on the Waveform screen. The Key Shift screen appears. 2 Touch [−] or [+] to adjust the key. Each press shifts the key up or down by a semitone. •... -
Page 71: Using A Dj Application (Midi/Hid)
Using a DJ application (MIDI/HID) If you use a USB cable to connect a PC/Mac with MIDI or HID compatible software (DJ application) installed, you can control the application from the unit. USB cable PC/Mac Audio cable DJ app Rear panel Multi player DJ mixer Power cord... -
Page 72: Controlling A Dj Application
Using a DJ application (MIDI/HID) Controlling a DJ application 1 Connect the unit and a PC/Mac. 2 Press the [SOURCE] button. The [SOURCE] screen appears. 3 Select [CONTROL MODE]. Control mode turns on. 4 Launch a DJ application. The unit starts communicating with the DJ application. •... -
Page 73: Settings
Settings You can change the unit settings in the [UTILITY] settings or on the [SHORTCUT] screen. If you save [MY SETTINGS] (the unit’s functions settings) on a storage device (SD, USB), you can load them to the unit instantly during DJ handovers, etc. Changing the [UTILITY] settings 1 Press and hold the [MENU/UTILITY] button. -
Page 74: Utility Settings
Settings Utility settings * : Factory setting Categories/setting items Descriptions DJ SETTING Determines whether or not you can load another track during playback. LOAD LOCK • Setting values: UNLOCK , LOCK Sets the number of beats for Quantize. QUANTIZE BEAT VALUE •... - Page 75 Settings Categories/setting items Descriptions Sets playback mode. • Setting values: CONTINUE, SINGLE* • [CONTINUE]: Automatically loads the next track when PLAY MODE playback reaches the end of a track. • [SINGLE]: Stops playback when playback reaches the end of a track. The next track is not automatically loaded. DISPLAY (LCD) Sets the brightness of the screen.
- Page 76 Settings Categories/setting items Descriptions DISPLAY (INDICATOR) Determines whether the indicators blink for buttons that can be used for Slip when you press the [SLIP] button. SLIP FLASHING • Setting values: OFF, ON* Determines the display setting for when an On Air Display compatible DJ mixer is connected to the unit via PRO DJ ON AIR DISPLAY LINK.
- Page 77 Settings Categories/setting items Descriptions SYSTEM Sets the auto standby function (page 78). AUTO STANDBY • Setting values: OFF, ON* Sets the attenuation level for the sound output from the unit. OUTPUT ATT. • Setting values: −12dB, −9dB, −6dB, −3dB, 0dB* •...
-
Page 78: Auto Standby
Settings Auto standby When [AUTO STANDBY] is set to [ON], the unit enters standby mode after 4 hours without being used in the following ways. — No storage device (SD, USB) is connected to the unit. — No PC/Mac is connected to the unit via the USB port on the rear of the unit. —... -
Page 79: Changing The Settings On The [Shortcut] Screen
Settings Changing the settings on the [SHORTCUT] screen 1 Press the [SHORTCUT] button. The [SHORTCUT] screen appears. Player settings Device information Device settings My Settings 2 Select a setting value. Read more: Setting items on the [SHORTCUT] screen (page 80) •... -
Page 80: Setting Items On The [Shortcut] Screen
Settings Setting items on the [SHORTCUT] screen *: Factory setting Setting items Descriptions Player settings Selects the content (phase meter or waveform) to be WAVEFORM/PHASE displayed on the playback (Waveform) screen. METER • Setting values: PHASE METER, WAVEFORM* HOT CUE AUTO LOAD LCD BRIGHTNESS JOG LCD... -
Page 81: Saving My Settings On A Storage Device (Sd, Usb)
Settings Saving My Settings on a storage device (SD, USB) You can save the [UTILITY] settings and some other settings on a storage device (SD, USB). • The settings marked with in the [UTILITY] settings table are saved (page 74). •... -
Page 82: Calling Up My Settings Saved On A Storage Device (Sd, Usb)
Settings Calling up My Settings saved on a storage device (SD, USB) You can call up My Settings from a storage device (SD, USB). • You can call up My Settings from rekordbox or a storage device (SD, USB) connected to a multi player in the PRO DJ LINK network. -
Page 83: Specifications
Specifications Main unit weight ..................... 5.5 kg (12.1 lbs) Max. external dimensions ........329 mm (W) × 453 mm (D) × 118 mm (H) Tolerable operating temperature ..............+5 °C to +35 °C Tolerable operating humidity .............5% to 85% (no condensation) Analog audio output (AUDIO OUT L/R) Output terminals..................RCA terminal Output level ................... -
Page 84: Additional Information
Additional information Troubleshooting If you think something is wrong with the unit, check the information below and refer to the [FAQ] for the CDJ-3000 at the URL below. pioneerdj.com/support/ • Inspect devices connected to the unit. • The unit may restore proper operation after you turn it off and on. - Page 85 Additional information You cannot save settings. • Wait for at least 10 seconds to turn the unit off after changing settings. Changed settings may not be saved if you turn the unit off immediately after you make the changes. The unit does not recognize a connected USB device. •...
- Page 86 Additional information It takes a long time to read a storage device (SD, USB) (flash memory or hard disk). • It may take some time to read a storage device (SD, USB) if many folders and files are saved on the storage device (SD, USB). •...
-
Page 87: Lcd Display
Additional information LCD display • Small black or shining points may appear on the LCD display. This is a phenomenon inherent to LCD displays and not a malfunction. • When using the unit in cold places, the LCD display may be dark for a while after the power is turned on. -
Page 88: Trademarks And Registered Trademarks
Additional information Trademarks and registered trademarks • rekordbox™ is a trademark or registered trademark of AlphaTheta Corporation. • PRO DJ LINK™ is a trademark or registered trademark of AlphaTheta Corporation. • Mac is a trademark of Apple Inc., registered in the U.S. and other countries. •... -
Page 89: Cautions On Copyrights
Additional information Cautions on copyrights rekordbox restricts playback and duplication of copyright-protected music contents. • When coded data, etc., for protecting the copyright is embedded in the music contents, it may not be possible to operate the program normally. • When rekordbox and the unit detect that coded data, etc., for protecting the copyright is embedded in the music contents, processing (playback, reading, etc.) may stop.
Need help?
Do you have a question about the CDJ-3000 and is the answer not in the manual?
Questions and answers