
Related Manuals for AFL FlexScan FS200 OTDR


Summary of Contents for AFL FlexScan FS200 OTDR
- Page 1 Test & Inspection FlexScan FS200 OTDR ® With SmartAuto , FleXpress and LinkMap ® ™ ® Quick Reference Guide www.AFLglobal.com or (800) 321-5298, (603) 528-7780...
- Page 2 Controls, Display, Interfaces 1. Power button 8. Dust cover 2. Power jack (5 VDC) 9. Home button 3. Charge/AC indicator 10. Start/stop test button 4. USB ports 11. VFL indicator 5. OTDR/source port 12. VFL button 6. Power meter port 13.
- Page 3 Home Screen The Home screen is the FlexScan’s Main menu that is displayed at startup. While in any other screen, return to Home by either pressing the Home button or touching (if available) the Back soft key. This screen contains menus of Test and Utility modes that allow users to set test parameters, select user preferences, manage saved test results, configure general settings and perform other non-test functions.
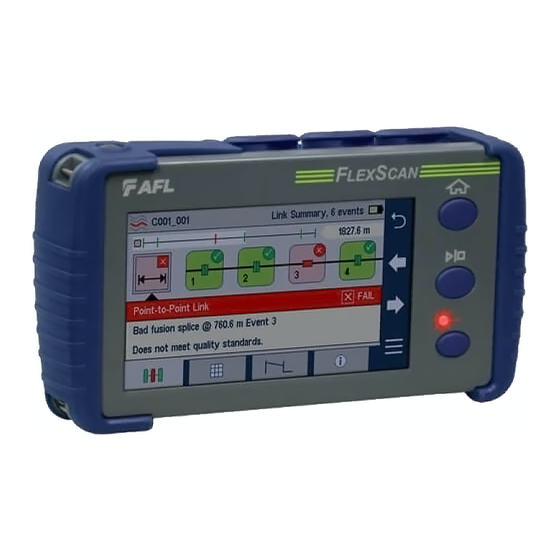
- Page 4 OTDR Modes: SmartAuto with LinkMap Display Summary ™ ® While in the SmartAuto OTDR Settings Menu: Touch the desired setting field/tab (e.g. Test Type) to display a • sub-menu (where applicable). Touch to navigate to next/previous screen. • Touch to return to the previous menu. •...
- Page 5 OTDR Modes: Live Fiber Detection and Launch Quality Check Live Fiber Detection To prevent service disruption on live PONs, FlexScan performs a Live Fiber check prior to every OTDR test. If a live fiber is detected, FS200-50B/100/300 models display a warning screen and do not allow testing;...
- Page 6 OTDR Modes: Testing in SmartAuto ™ Initiate the SmartAuto test by touching ‘Press to start’ soft key or pressing Start/Stop button. 1. FlexScan begins testing with the Live Fiber check and if a live fiber is NOT detected, proceeds to next step. 2.
- Page 7 OTDR Modes: Testing in SmartAuto ™ Link Summary icon: may be Event icon: event icons may be green (pass), red green (all events passed), red (fail), or black (major fault). Pass/fail/major fault (one or more events failed, is based on event loss and reflectance thresholds but no major fault detected), configured by the currently selected Pass/Fail Rule.
- Page 8 Expert and Real Time OTDR: Trace Display File name: consists of cable A and B 1310 nm trace is red; White background indicates name and fiber number, or “New cursors 1550 nm trace is blue the currently selected (active) Trace” if file has not been saved wavelength.
- Page 9 Expert and Real Time OTDR: Trace Display Touch the cursor select key Vertical zoom: Touch the up/ down arrow to zoom trace to enable and display the ‘cursors control’ mode view vertically around the currently active cursor Horizontal zoom: Touch the right/left arrow to zoom trace view horizontally around the Touch the LinkMap icon to...
- Page 10 Light Source and Power Meter Operation Source Settings and Features 1. Touch to enable/disable light source. RED dot indicates that source is ON. 2. Touch to select test mode: Wave ID, CW, Tone (270 Hz, 330 Hz, 1 kHz, 2 kHz). –...
- Page 11 Saving, Recalling and Uploading Test Results Test results may be stored in the FlexScan Internal memory or on USB . Saved test results are organized into a Cable sub-folder within a Job folder Results, Internal Results, USB Cables, Internal Jobs, Internal A name of the saved result consists of several parameters, which are Save As Screen defined in the Save As screen...
- Page 12 Touch this icon to toggle between Internal Memory & USB (if USB stick present) Refer to the FlexScan User’s Guide (available on the supplied CD or USB stick and www.AFLglobal.com). ©2019 AFL , all rights reserved. FS200-00-1ENG Revision AC 2019-01-15...
Need help?
Do you have a question about the FlexScan FS200 OTDR and is the answer not in the manual?
Questions and answers