Table of Contents
Advertisement
Overview
Settings
SmartAuto
FlexScan® FS200 OTDR
With SmartAuto®, FleXpress® and LinkMap®
Overview
Settings
Real-Time OTDR
www.AFLglobal.com | +1 (800) 235-3423
Expert
Real-Time
OLS/OPM
User's Guide
SmartAuto OTDR
Inspecting Connectors
Managing Results
1
Inspection
Results
Reports
Test & Inspection
Expert OTDR
Generating Reports
Contact Us
Advertisement
Table of Contents

Related Manuals for AFL FlexScan FS200 OTDR


Summary of Contents for AFL FlexScan FS200 OTDR
- Page 1 Overview Settings SmartAuto Expert Real-Time OLS/OPM Inspection Results Reports Test & Inspection FlexScan® FS200 OTDR With SmartAuto®, FleXpress® and LinkMap® User’s Guide Overview SmartAuto OTDR Expert OTDR Settings Inspecting Connectors Generating Reports Real-Time OTDR Managing Results Contact Us www.AFLglobal.com | +1 (800) 235-3423...
-
Page 2: Table Of Contents
Using FlexReports for Downloading Test Results from FlexReporter-Cloud ....42 To Start SmartAuto Test .................... 21 Generating Reports ....................42 Live Fiber Detection....................21 Launch Quality Check ....................22 Contacts ....................... 43 Understanding LinkMap Display Features ..............23 ©2021-2023 AFL , all rights reserved. FS200-00-1000 Revision AD, 2023-07-03... -
Page 3: Safety And Legal
Warranty Terms and Conditions AFL products are warranted against defective material and workmanship for a period of (1) one year from the date of delivery to the end user. Any product that is found defective within the warranty period will, at the discretion of AFL, be repaired or replaced. Warranty will be voided if the product has been repaired or altered by other than an authorized AFL product repair facility, if the void sticker has been compromised, or which have been subject to misuse, negligence, or accident. -
Page 4: Apple Inc. Legal Notice
• cords, or test jumpers. Refer to your company’s safety procedures when working with optical systems. NOTICE: FlexScan OTDR contains no user serviceable parts, it must be returned to AFL or authorized agents for repair and calibration. • IMPORTANT: Proper care in handling should be taken when using any precision optical test equipment. Scratched or contaminated optical •... -
Page 5: Hardware And User Interface Overview
Overview Settings SmartAuto Expert Real-Time OLS/OPM Inspection Results Reports Hardware and User Interface Overview Hardware Controls and Interfaces Ref Feature Description Ref Feature Description Power button Press to power FlexScan OTDR on/off. VFL port This is a CLASS II LASER output. Do not stare Power port (5 VDC) This is interface for the AC power adapter/ into beam! The VFL (visual fault locator) port charger. -
Page 6: Battery Charging
Overview Settings SmartAuto Expert Real-Time OLS/OPM Inspection Results Reports Battery Charging You may charge the battery while your FlexScan is switched on or off by attaching the supplied AC charger. Plug the included AC charger into AC outlet. • Connect charger plug to the Power port. •... -
Page 7: Configuring Flexscan To Auto-Off
Overview Settings SmartAuto Expert Real-Time OLS/OPM Inspection Results Reports Configuring FlexScan to Auto-Off The Auto-Off feature is available for conserving battery power on your FlexScan. To Configure the Auto-Off Timer: Turn your FlexScan On. From the displayed Home screen, touch Settings. •... -
Page 8: How To View Device Information
Overview Settings SmartAuto Expert Real-Time OLS/OPM Inspection Results Reports How to View Device Information FlexScan software revision, serial number, and calibration date can be viewed from the Device Information screen, which is accessed from the Home screen. 1. From the Home screen, touch the Menu soft key. -
Page 9: User Interface Overview
Overview Settings SmartAuto Expert Real-Time OLS/OPM Inspection Results Reports User Interface Overview Home Screen Features The Home screen is the FlexScan’s Main screen that is displayed at startup. While in any other screen, return to Home by either pressing the Home button or touching and holding (if available) the Back soft key. -
Page 10: General Settings
Overview Settings SmartAuto Expert Real-Time OLS/OPM Inspection Results Reports General Settings General Settings, Page 1 of 3 While in the General Settings screen: Touch the desired setting field/tab (e.g. Distance Units) to display a sub-menu. • Touch Left/Right Arrows to display additional General Settings screen. •... - Page 11 Overview Settings SmartAuto Expert Real-Time OLS/OPM Inspection Results Reports 6. Screen Brightness and Auto-dim: Touch the on/off control to enable/disable the Auto Brightness • General Settings, Screen 1 of 3 feature. – When the Auto Brightness feature is disabled , you may adjust Brightness by touching and/or touching and dragging the adjustment slider right/left to increase/decrease the Brightness value.
- Page 12 – Auto-Save only – Results will be saved, but not sent. – Auto-Save & Send – Results will be saved and sent to a Bluetooth-paired mobile device running AFL FlexApp. Configure Job, OTDR End, Far End, Cable and Fiber# names for saved results and touch Done.
- Page 13 Overview Settings SmartAuto Expert Real-Time OLS/OPM Inspection Results Reports To configure automatic MPO Switch control: Touch Switch Mode. • A popup error message appears if Switch Mode selected with no MPO switch connected and enabled. • Switch Settings screen appears if switch connected and enabled. •...
-
Page 14: Smartauto Otdr With Flexpress And Linkmap Display
Overview Settings SmartAuto Expert Real-Time OLS/OPM Inspection Results Reports SmartAuto OTDR with FleXpress and LinkMap Display ® ® ® Using Touchscreen Controls While in the SmartAuto OTDR setup screen: If no setting changes required: Touch ‘Press to start’ to initiate testing. •... -
Page 15: Smartauto Settings Summary
Overview Settings SmartAuto Expert Real-Time OLS/OPM Inspection Results Reports SmartAuto Settings Summary 1. Test Type: Limited to Characterize in FS200-100 model. • Select Characterize or FleXpress Fast Test in FS200-60/300/303/304 models when Network Type = Point-to-Point. • 2. Pass/Fail Rule: Indicates selected LinkMap event Pass/Fail rules. Touch to select ITU G.671, TIA-568.3-D or User. Touch and hold to view/edit Pass/Fail event thresholds. -
Page 16: Configuring Pass/Fail Rule
Overview Settings SmartAuto Expert Real-Time OLS/OPM Inspection Results Reports Configuring Pass/Fail Rule ITU G.671 Pass/Fail Settings may be viewed but NOT changed. • TIA-568.3-D Pass/Fail Settings may be viewed but NOT changed. • User Pass/Fail Settings may be viewed and changed. •... -
Page 17: To View And Edit User Pass/Fail Rule Settings
Overview Settings SmartAuto Expert Real-Time OLS/OPM Inspection Results Reports To View and Edit User Pass/Fail Rule Settings While in the SmartAuto Settings screen, make sure the User Rule label is displayed in the Pass/Fail Rule field. • – If not, touch the Pass/Fail Rule field to display the Rules menu and touch the User option to select. When back in the SmartAuto Settings screen, touch and hold the displayed User Rule to open one of the settings screen: •... -
Page 18: Configuring Fiber Type
Overview Settings SmartAuto Expert Real-Time OLS/OPM Inspection Results Reports Configuring Fiber Type G.65x Fiber Settings may be viewed but NOT changed. • User Settings may be viewed and changed. • To View G.65x Fiber Settings While in the SmartAuto Settings screen, make sure a G.65x fiber type is displayed in the Fiber Type field. •... -
Page 19: To View And Edit User Fiber Type Settings
Overview Settings SmartAuto Expert Real-Time OLS/OPM Inspection Results Reports To View and Edit User Fiber Type Settings While in the SmartAuto Settings screen, make sure the User Fiber Type label is displayed in the Fiber Type field. • If not, touch the Fiber Type field to display the Fiber Type menu and touch the User option to select. •... -
Page 20: Enabling Launch Quality Check
Overview Settings SmartAuto Expert Real-Time OLS/OPM Inspection Results Reports Enabling Launch Quality Check When Launch Quality Check feature is enabled, FlexScan checks loss and reflectance of OTDR connection to network enabling the user to detect dirty, damaged, poorly seated, or mismatched (UPC to APC) connectors. To Enable Launch Quality Check While in the SmartAuto Settings screen, touch the on/off control to enable •... -
Page 21: Testing In Smartauto Otdr
Overview Settings SmartAuto Expert Real-Time OLS/OPM Inspection Results Reports Testing in SmartAuto OTDR ® To Start SmartAuto Test Initiate the SmartAuto test by touching ‘Press to start’ soft key or pressing Test start/stop button. 1. FlexScan begins testing with the Live Fiber check and if a live fiber is NOT detected, proceeds to next step. 2. -
Page 22: Launch Quality Check
Overview Settings SmartAuto Expert Real-Time OLS/OPM Inspection Results Reports Launch Quality Check An optional launch quality check enables users to detect dirty, damaged, poorly seated, or mismatched (UPC to APC) connectors. To perform the launch quality check: 1. With the Launch Quality Check option enabled in the OTDR or General Settings screen, initiate an OTDR test. 2. -
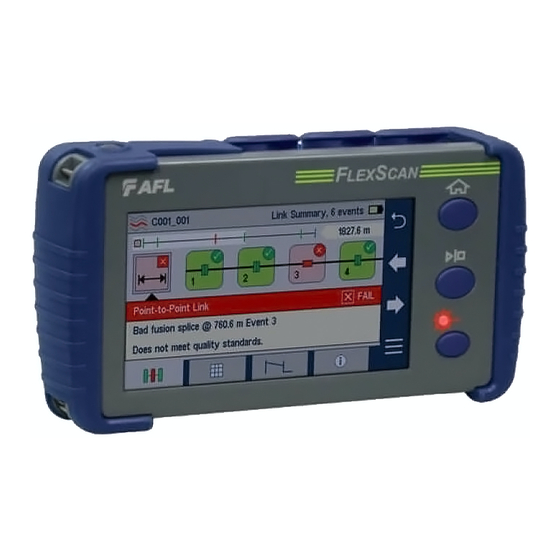
Page 23: Understanding Linkmap Display Features
Overview Settings SmartAuto Expert Real-Time OLS/OPM Inspection Results Reports Understanding LinkMap Display Features LinkMap is an icon-based representation of the analyzed network. x/y or x1-x2/y, where Link map thumbnail view x = number of the selected event with proportionally spaced x1-x2 = link section between events events x1 and x2... - Page 24 Overview Settings SmartAuto Expert Real-Time OLS/OPM Inspection Results Reports Event icon: event icons may be green (pass), red (fail), or black (major fault). Pass/Fail/ major fault is based on event loss and reflectance thresholds configured by the Link Summary icon: may be currently selected Pass/Fail Rule.
-
Page 25: Expert Otdr
Overview Settings SmartAuto Expert Real-Time OLS/OPM Inspection Results Reports Expert OTDR Understanding Expert/Real-time OTDR Settings Parameter Description Trace Length The Trace Length parameter determines the distance range of the full (unzoomed) trace. It also determines the distance between data points in the trace: the longer Trace Length, the wider the data point spacing. -
Page 26: Expert Otdr Settings
Overview Settings SmartAuto Expert Real-Time OLS/OPM Inspection Results Reports Expert OTDR Settings The Expert OTDR mode is accessed from the Home screen by touching the Expert OTDR tab. While in the Expert OTDR screen: Touch the desired test setup parameter to display a sub-screen. •... -
Page 27: Real-Time Otdr
Overview Settings SmartAuto Expert Real-Time OLS/OPM Inspection Results Reports Real-Time OTDR Real-Time OTDR Settings The Real-Time OTDR mode is accessed from the Home screen by touching the Real-Time OTDR tab. While in the Real-Time OTDR screen: Touch the desired test setup parameter to display a sub-screen. •... -
Page 28: Testing In Expert And Real-Time Otdr Mode
Overview Settings SmartAuto Expert Real-Time OLS/OPM Inspection Results Reports Testing in Expert and Real-Time OTDR Mode To Test in Expert or Real-Time OTDR Mode Initiate an OTDR test by pressing the Start/Stop button. 1. FlexScan begins testing with the Live Fiber check and if a live fiber is NOT detected, proceeds to next step. For details, see section “Live Fiber Detection”... - Page 29 Overview Settings SmartAuto Expert Real-Time OLS/OPM Inspection Results Reports Fiber under test Receive cable (if present) Launch cable (if present) Maximum Reflectance between A and B cursor Loss-per-distance between Distance from A to B cursor A and B cursors Loss between A and B cursor Vertical zoom: Touch the up/down arrow to zoom...
-
Page 30: Light Source And Power Meter Operation
Overview Settings SmartAuto Expert Real-Time OLS/OPM Inspection Results Reports Light Source and Power Meter Operation Light Source Settings and Features 1. Touch to enable/disable light source. RED dot indicates that source is ON. 2. Touch to select test mode: Wave ID, CW, Tone (270 Hz, 330 Hz, 1 kHz, 2 kHz). Select Wave ID mode for fastest loss measurements. -
Page 31: Inspecting Fibers With Focis Flex And Flexscan
Overview Settings SmartAuto Expert Real-Time OLS/OPM Inspection Results Reports Inspecting Fibers with FOCIS Flex and FlexScan Optical connectors may be inspected using FOCIS Flex auto-focusing connector inspection probe with IEC Pass/Fail analysis. Captured fiber end- face images and Pass/Fail results are immediately displayed on the FOCIS Flex and on the paired FlexScan OTDR and may be saved in either FOCIS Flex or FlexScan. -
Page 32: Pairing Flexscan With Focis Flex Inspection Probe
Overview Settings SmartAuto Expert Real-Time OLS/OPM Inspection Results Reports Pairing FlexScan with FOCIS Flex Inspection Probe To transfer fiber-end images from the FOCIS Flex inspection probe and display inspection results on FlexScan, you must first pair your FOCIS Flex probe with FlexScan. Enable Bluetooth on FlexScan From the Home screen, touch Settings . -
Page 33: Inspecting Optical Connectors
Overview Settings SmartAuto Expert Real-Time OLS/OPM Inspection Results Reports Inspecting Optical Connectors Once FlexScan is paired to FOCIS Flex with Bluetooth enabled on both units, perform the following steps. On FOCIS Flex: If testing an optical fiber connector, slide the ferrule of the optical fiber into the adapter tip installed on the FOCIS Flex inspection port. •... -
Page 34: Results: Saving, Recalling, Sharing
Overview Settings SmartAuto Expert Real-Time OLS/OPM Inspection Results Reports Results: Saving, Recalling, Sharing Understanding FS200 File Naming Structure Test results may be stored in the FlexScan Internal memory or on USB. Saved test results are organized into a Cable sub-folder within a Job folder. A name of the saved result consists of several parameters, which are defined in the Save As screen as follows: The Cable folder is named: OTDREnd_FarEnd_Cable... - Page 35 Overview Settings SmartAuto Expert Real-Time OLS/OPM Inspection Results Reports Job, OTDR End, Far End, and Cable fields are user-defined and may be set and/or edited in the String Editor screen: • – Touch the desired field to display String Editor. –...
-
Page 36: Saving To A Newly Created Folder
Overview Settings SmartAuto Expert Real-Time OLS/OPM Inspection Results Reports Saving to a Newly Created Folder 1. While in the Results view, touch Menu. 2. From the displayed sub-screen, touch Save As to display the Results Manager screen. 3. Define <Job>, <OTDR End>, <Far End>, <Cable>, and <Link> fields used to name saved results and edit if required. Touch Done when finished. Note: this will make the newly created Job, OTDR End, Cable, or Fiber current. -
Page 37: Viewing Saved Test Results
Overview Settings SmartAuto Expert Real-Time OLS/OPM Inspection Results Reports Viewing Saved Test Results 1. From the Home screen, touch Saved to display Results Manager, which may be displayed as Jobs, Cables, or Results screen. 2. Navigate through Job/Cable/Results screen to locate the desired test result and touch to display it. In Jobs screen: use Up/Down arrow keys to navigate to the desired folder, then touch it to display saved folders. -
Page 38: Deleting Jobs/Cables/Files
Overview Settings SmartAuto Expert Real-Time OLS/OPM Inspection Results Reports Deleting Jobs/Cables/Files 1. From the Home screen, touch the Saved icon to display the Results Manager, which may be displayed as Jobs screen, Cables screen, or Results screen. 2. Navigate through the Jobs/Cables/Results screen to locate the desired results. 3. -
Page 39: Transferring Files To A Pc Via Usb
Overview Settings SmartAuto Expert Real-Time OLS/OPM Inspection Results Reports Transferring Files to a PC via USB Home Screen To transfer files from your FlexScan to a PC using a USB cable, perform the following: Connect your FlexScan to a PC using the supplied micro-USB to USB cable. Make sure the micro- •... -
Page 40: Backing Up Results To External Usb Memory Stick
Overview Settings SmartAuto Expert Real-Time OLS/OPM Inspection Results Reports Backing up Results to External USB Memory Stick To back up internally stored results to USB memory stick: 1. Turn on the FlexScan OTDR. 2. Plug in an external USB memory stick. 3. -
Page 41: Restoring Results From External Usb Memory Stick
Overview Settings SmartAuto Expert Real-Time OLS/OPM Inspection Results Reports Restoring Results from External USB Memory Stick Use a PC to restore backed up FlexScan results from the USB memory stick: 1. Turn on the FlexScan OTDR and connect to a PC via USB cable. 2. -
Page 42: Generating Reports With Flexreporter Software Suite
Generating Reports with FlexReporter Software Suite FlexReporter Software Suite works with AFL Test and Inspection instruments to provide a simple-to-use, high performance cloud enabled reporting platform. FlexReporter combines FlexApp – a mobile App that wirelessly transfers test results to FlexReporter-Cloud from the field with a fast, comprehensive, 3-step reporting solution –... -
Page 43: Contacts
+1 (800) 235-3423 (Option 3) Sales Support https://www.aflglobal.com/en/Contact/Product-Sales-Team Sales@AFLglobal.com +1 (800) 235-3423 (Option 4) Purchase Orders, Quote, RMA SPBCustomerPO@AFLglobal.com Service Request AFLEquipmentService@AFLglobal.com Product Service Request Form +1-800-235-3423 (Option 2) AFL Test & Inspection web www.AFLglobal.com/Test Product Registration www.AFLglobal.com/Register AFL’s Customer Portal - Direct content.AFLglobal.com/Direct.html...
Need help?
Do you have a question about the FlexScan FS200 OTDR and is the answer not in the manual?
Questions and answers
I have an AFL Flexscan fs-200-304c-a that has a dirty otdr port. Is there an acceptable method for cleaning this. If so, guidance would be appreciated.
To clean the OTDR port on an AFL FlexScan FS200, always use approved cleaning supplies, such as a One-click cleaner, before mating the connectors.
This answer is automatically generated