
Related Manuals for Wirquin ONE


Summary of Contents for Wirquin ONE
- Page 1 MECHANISM WIRQUIN ONE MECHANICAL FLUSH VALVE ASSEMBLY INSTRUCTIONS Code 240728 Issue No. Mar/2018 Date...
- Page 2 Description Flush Valve Bridge Flush Valve Body Base Sealing Washer Backnut Close Coupling Washer Chrome Push Button Close Coupling Bolted Kit...
- Page 3 Flushing Valve 1 - Unscrew push button from bridge of flushing valve and pull up and remove. 2 - Remove bridge from flushing valve body (simply push the lugs in and pull up). 3 - Unclip flush valve body from flush valve base.
- Page 4 Fitting base and bolted close coupled kit 4 - Remove cistern from wall and pan. 5 - Replace the bolted close coupling kit (item H). 6 - Fit sealing washer (item D) onto base (item C) - sealing washer to be fitted on inside of cistern. 7 - Fit the backnut (item E) handtight and 1/4 turn with suitable spanner.
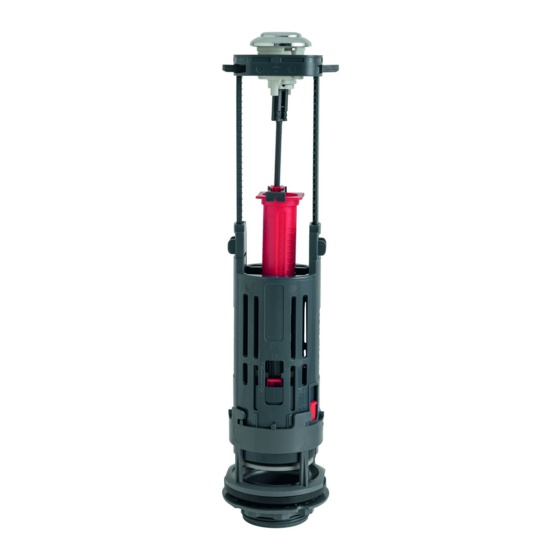
- Page 5 Fitting flush valve body to base 10 - Clip flush valve body to base. (Simply clip in and turn to lock in place)
- Page 6 Setting overflow height 11.1 - Turn the internal overflow to unlock. 11.2 - Set he internal overflow 20mm above the waterline inside the cistern. 11.3 - Turn and lock the internal overflow in place. Please Note: the internal overflow must be set 20mm above the waterline inside the cistern.
- Page 7 Setting the height of the flush valve bridge 12 - Clip the bridge back onto the flush valve body and leave above the cistern body. 13 - Put the cistern lid on top of the bridge and gently push down until the lid is located on the cistern body.
- Page 8 Fitting push button Push button rod locating hole 14 - Fit the push button into the cistern lid hole making sure the rod is located into the push button rod locator on the internal over flow tube. Warning: if the rod is not located in the push button rod locator the flushing valve will not operate.
- Page 9 IMPORTANT Priming the flushing valve 16 - Turn water supply back on and fill the cistern. 17 - Firmly press the full flush push button all the way down and release, this will activate the full flush. Repeat for part flush. Please note the full flush cycle works on the release of the push button 18 - The flushing valve is now automatically adjusted and ready...
- Page 10 Full and part flush volumes Full flush adjustment Up for less water, down for more water Part flush adjustment Up for less water, down for more water If you want to increase or reduce the full or part flush volumes then remove the push button and cistern lid.
-
Page 11: Troubleshooting
Trouble shooting Removing flushing valve sealing washer Do not use Use only soapy or clean water Problem Solution Check that the push button rod is located into the It does not flush push button rod locator on the internal overflow tube (see page 7). - Page 12 WIRQUIN FLUSHING VALVE RANGE MECHANICAL PNEUMATIC CABLE ► ► ► i:;•t=1 WIRQUIN ONE KAYLA QUICK FIT JOLLVTRONIC JOLLVFLUSH Multiple/ Description Reference EAN code Packaging Packing WIRQUINONE 10120440 5017134134247 1/8/240 macdee WIRqu,n Watch our INSTALLATION Video WIRQUIN Ltd. Warmsworth Halt Industrial Estate, Warmsworth, Doncaster DN4 9LS, United Kingdom Technical and Sales enquiries: 0044 (0) 333 222 4488 Email: sales@wirquin.co.uk...
Need help?
Do you have a question about the ONE and is the answer not in the manual?
Questions and answers