Table of Contents
Advertisement
Quick Links
Advertisement
Table of Contents

Related Manuals for Ballard Designs Tuscan Secretary Desk


Summary of Contents for Ballard Designs Tuscan Secretary Desk
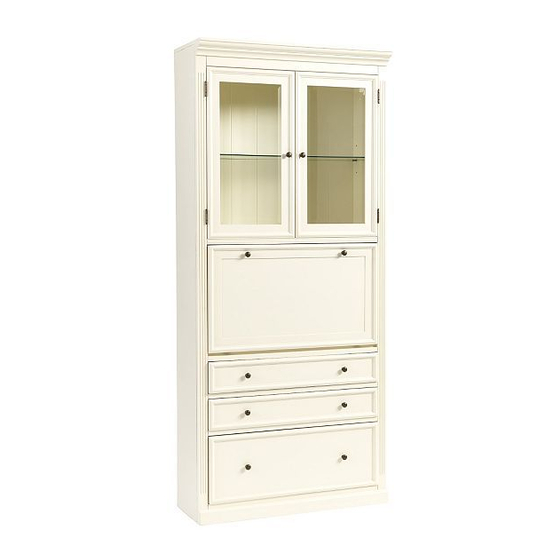
- Page 1 Customer Service: 800-367-2810 Online: www.ballarddesigns.com PRODUCT NAME: Tuscan Secretary Desk ITEM NUMBER: MO400 ASSEMBLED DIMENSIONS : 81 3/4”H x 36”W x 15”D PRODUCTS ARE NOT INTENDED IMPORTED FOR COMMERCIAL USE. UPDATED: 6/17/2019 Page 1 of 7...
- Page 2 Remove all parts, hardware and protective packaging from carton and carefully arrange on a clean, level, padded surface. NOTE: To avoid accidentally discarding small parts or hardware, REQUIRED TOOLS: retain all carton contents until -Phillips Screwdriver assembly and installation are complete. -Pencil -Power Drill (optional) Requires at least two people for...
- Page 3 NOTE: Assemble in intended area for use. STEP 1: Open lower drawer and install File Rods (B) into notches in drawer edge. NOTE: To prevent an accidental tip-over, a locking mechanism has been installed on the lower two drawers which prevents both to be open at the same time. One drawer must be closed in order to open the other.
- Page 4 NOTE: Assemble in intended area for use. LEVELERS: If doors are uneven, adjust Levelers on bottom of each corner by turning clockwise or counter-clockwise until doors are evenly aligned. LIGHTED CABINET: Plug electrical cord into an outlet. Cabinet is equipped with an “Easy Touch” dimmer control which allows for three levels of brightness.
- Page 5 NOTE: Assemble in intended area for use. ANTI-TIP INSTALLATION STEP 1: Locate Wall Studs then center Secretary in front and mark their location on wall. Push Secretary fully against the wall. Studs WARNING Tip-Over Hazard Wall WALL BRACKET MUST BE ATTACHED TO WALL STUD Prevent tipping accidents.
- Page 6 NOTE: Assemble in intended area for use. ANTI-TIP INSTALLATION STEP 3: Pull Secretary away from wall then position and attach both L-Brackets (D) to the Wall Studs using Screws (C). Wall ANTI-TIP INSTALLATION STEP 4: Slide Secretary back to wall and re-center under each installed L-Bracket (D).
- Page 7 NOTE: Save this page for future bulb replacement. HALOGEN BULB REPLACEMENT: Qty. Item needed Halogen JCD G8 120V 25W Replacement Bulb (A) NOT INCLUDED Unplug the unit from the wall. Remove the Lens Cover (B) from the Fixture Body (C) by turning it counter clockwise and pulling it away from the unit.
Need help?
Do you have a question about the Tuscan Secretary Desk and is the answer not in the manual?
Questions and answers