Table of Contents
Advertisement
Quick Links
Important information about your new a/c system.
Please read the following directions prior to
installing this a/c system.
PN's: CK-7586258, CK-758642,
CK-7586304, CK7586SBC, CK-7486NC
Jeep CJ Series
Aftermarket Air Conditioning
Installation instructions
Jeep Wrangler is a registered Trademark of Daimler Chrysler Corporation
Advertisement
Table of Contents

Summary of Contents for Nostalgic AC CK-7586258
- Page 1 Important information about your new a/c system. Please read the following directions prior to installing this a/c system. PN’s: CK-7586258, CK-758642, CK-7586304, CK7586SBC, CK-7486NC Jeep CJ Series Aftermarket Air Conditioning Installation instructions Jeep Wrangler is a registered Trademark of Daimler Chrysler Corporation...
- Page 2 Important information about your system, and warranty DO NOT ADD ANY OIL TO ANY PART OF THE SYSTEM. DO NOT USE THE SIGHT GLASS TO CHARGE THE SYSTEM. DO NOT OVERCHARGE THE SYSTEM. This Kit is designed to work with R134a refrigerant, not any other refrigerant (freon). The system has been designed and tested using R134a refrigerant.
-
Page 3: Charge The System
IMPORTANT INFORMATION ABOUT THE INSTALLATION FOR THE CJ A/C KIT Evaporator / Blower Unit information: Prior to installing your evaporator unit, make sure the blower motor spins without rubbing the case. The motor gets knocked around in shipping and may move. If the wheel is rubbing, loosen the clamp and re-center the motor. - Page 4 Important information about your system, and warranty DO NOT ADD ANY OIL TO ANY PART OF THE SYSTEM. DO NOT USE THE SIGHT GLASS TO CHARGE THE SYSTEM. DO NOT OVERCHARGE THE SYSTEM. The YJ Kit is designed to work with R134a refrigerant, not any other refrigerant (freon). The system has been designed and tested using R134a refrigerant.
-
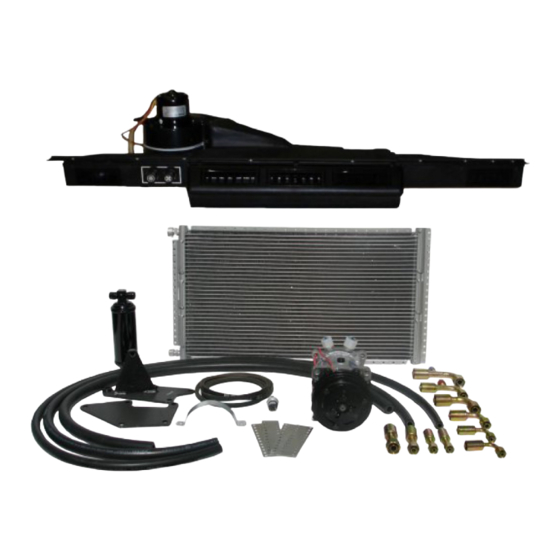
Page 5: Parts List
High Low Pressure switch PN: 119-9900 Binary Pig Tail PN: 119-9904 Condenser PN: 44-1418 Engine Mount kit with belt CK-7586258 PN: 8005 CK-758642 PN: 8011 CK-8795SBC Depends on engine specs, per customers setup CK-8795 NC No compressor bracket Hardware bag kit PN: 920-1008... - Page 6 Step One 1. Disconnect the Negative cable first and then Positive Battery Cable. 2. Remove the Ashtray from underneath the dashboard. Slide the ashtray out of the holder in order to remove all the screws. 3. Leave all the wires going to the ashtray connected if possible, or disconnect and reconnect after the installation.
- Page 7 mount the unit to the bottom of the dashboard. BE SURE TO SECURE EVERY HOLE WITH A SCREW. 3. The original wires on the ashtray will hookup, as they were before you added the a/c. (if the ashtray is present in the Jeep) The lighter may have to go on the other side of the unit (passenger side).
- Page 8 6. Pull the carpet back on the passenger side and locate the area for the hoses to go through the firewall. The holes will have to be drilled with a 1.25” hole saw. The center of the first hole will be two inches under the heater box and two inches two the right of the transmission tunnel curve.
- Page 9 Step Three Installing the Drier 1. If the switch is not attached to the drier, attach it at this time. The switch only goes on “hand Tight” use a wrench to tighten it. BE SURE TO ONLY SNUG THE SWITCH. 2.
-
Page 10: Installing The Condenser
Step Four Installing the condenser 1. There is not a direct fit in condenser for a CJ. We use the largest universal condenser in this vehicle. The condenser brackets can be bent by hand or in a vice. 2. Drain the radiator into a clean drain pan. 3. - Page 11 13. We recommend attaching the hoses to the condenser before reinstalling the radiator. 14. Once the hoses are attached reinstall the Radiator, and shroud 15. Fill the Radiator with the antifreeze and water. You may have to run the Jeep in order to fill the radiator to its full capacity.
-
Page 12: Connecting The Hoses
4. If you have a 304 / 360 engine you will not need any additional pulleys. The original setup used two belts on the compressor. The new compressor does not require that kind of tension. One belt will run the alternator; the other belt will run the compressor. - Page 13 Make sure the hoses do not rub any metal. Securing them with tie straps is recommended.
-
Page 15: Finishing The Installation
Step Seven Finishing the installation 1. Wiring the system: This system only needs three wires to hook up the system. 2. The first wire is a red wire with an inline fuse. This is an ignition wire. Find a source that gets power with the key on, and splice / plug it into that connection. 3. - Page 16 Supplement Gas Pedal Adjustment * On some Wranglers the gas pedal has a tall piece of metal above the hole that the gas pedal cable goes through. If your Wrangler has this long pedal arm you are going to have to cut it down to clear the blower housing.
Need help?
Do you have a question about the CK-7586258 and is the answer not in the manual?
Questions and answers