Table of Contents
Advertisement
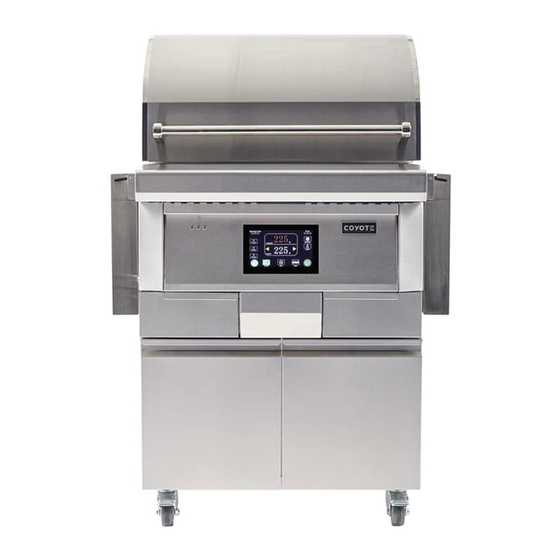
Coyote Stainless Steel Pellet Grill
For use with Natural Wood Pellets
C1P28
Conforms to ANSI STD Z21.58-2015
Certified to CSA STD 1.6-2015
Outdoor Cooking Appliance
4006980
IMPORTANT: Read all instructions and warnings before using this product! Use of this product, as
with any similar outdoor grill, will involve risks from high temperatures and from exposure to
smoke and fumes. Please exercise caution and common sense.
To Installer or Person Assembling Grill: Leave this manual with grill for future reference.
To Consumer: Keep this manual for future reference as it contains important Warnings and
Instructions.
COYOTE OUTDOOR LIVING, INC.
Use & Care Manual
C1P36
PUT SERIES NO. LABEL HERE
C1P28-FS
FOR OUTDOOR USE ONLY
C1P36-FS
Advertisement
Table of Contents

Subscribe to Our Youtube Channel
Related Manuals for Coyote C1P28


Summary of Contents for Coyote C1P28
- Page 1 Coyote Stainless Steel Pellet Grill Use & Care Manual For use with Natural Wood Pellets C1P28-FS C1P36-FS C1P28 C1P36 Conforms to ANSI STD Z21.58-2015 Certified to CSA STD 1.6-2015 FOR OUTDOOR USE ONLY Outdoor Cooking Appliance PUT SERIES NO. LABEL HERE...
- Page 2 Welcome & Congratulations Congratulations on your purchase of a new grill! We are very proud of our product and we are completely committed to providing you with the best service possible. Your satisfaction is our #1 priority. Please read this manual carefully to understand all the instructions about how to install, operate and maintain your grill for your safety and for optimum performance and longevity.
-
Page 3: Table Of Contents
Table of Contents & Critical Safety Warnings Safety Instructions…......3 Limited Warranty…………………………….5 Grill Models ........7 Locating the Grill....... 8 Electrical Requirements ………………….11 How to Store Pellet Fuel ……………..12 Operation of your Grill....…..13 Using the Digital Display…………………..18 Care & Maintenance......25 Parts Listings.........…..29 Wiring Diagram……………………………….31 Safety Symbols... -
Page 4: Safety Instructions
General Safety Instructions For Outdoor Use Only. Coyote grills are only intended for residential use and are not intended for commercial use, where anyone other than the original purchaser (homeowner) would be using and maintaining the grill. NEVER use indoors or in any type of enclosed area, such as a garage, shed or breezeway. Keep clear of trees and shrubs. - Page 5 dripping and correct it. If damage to the power supply is discovered, call a qualified technician for service. 17. NEVER heat any unopened glass or metal container of food on the grill. Pressure may build up and cause the container to burst, possibly resulting in death, serious personal injury, or property damage. 18.
-
Page 6: Limited Warranty
MERCHANTABILITY AND FITNESS FOR A PARTICULAR PURPOSE. Coyote Outdoor Living, Inc. issues this limited warranty to the original purchaser at the original site of delivery with proof of purchase and specifically warrants that the Coyote Outdoor Pellet grill when subject to normal residential use, will be free from defects in workmanship and materials for the periods specified below. - Page 7 Coyote Outdoor may approve your claim and elect to replace such parts without charge. In every instance, the customer is responsible for shipping and handling of replacement parts. Component repair or replacement is the exclusive remedy under this limited warranty and Coyote Outdoor shall not be liable for any incidental or consequential damages.
-
Page 8: Grill Models
Whether you are in need of a slimmer 28” grill for your patio, or are in need of a larger 36” grill that can entertain and bring style to any size party, Coyote has the grill for you! Product Size BTU/HR Model No. -
Page 9: Locating The Grill
Proper ventilation is necessary to allow heat inside your grill to escape. Failure to provide proper ventilation will nullify Coyote’s warranty and will cause a risk of bodily injury •... - Page 10 Coyote insulated jacket. The insulated jacket will act as a barrier to protect your grill island from the heat and fire of your Coyote grill. If an insulated jacket is not used in a combustible material island, the warranty on the Coyote grill will be voided immediately and safety cannot be ensured.
- Page 11 High Elevation Installation and Use Coyote Grills are designed to operate most efficiently at 0-2000 feet above sea level. From 2000-4000 feet above sea level you will not notice any substantial decrease in your heat. Above 4000 feet, you may experience longer cooking times on your grill than experienced at sea level.
-
Page 12: Electrical Requirements
3. Make sure unit is completely cool before installing or removing parts. 4. Do not operate Coyote outdoor wood pellet grill with a damaged cord, plug, or after the appliance malfunctions or has been damaged in any manner. Contact the manufacturer for repair. -
Page 13: How To Store Pellet Fuel
Storing and Loading Pellet ........................................................ You should use always 100% Natural Hardwood BBQ Wood Pellets. They are no thicker than the eraser on the end of a pencil. These clean burning wood pellets generate about 8000 BTU’s per pound with very little ash (.3lb/40lb bag) and low moisture content (5-7%) and are “carbon neutral”. -
Page 14: Operation Of Your Grill
Operating the Grill NEVER stand with head, body, or arms over the grill when lighting. • ALWAYS ensure the area around the barbecue is clear of flammable substances such as gasoline, yard • debris, wood, etc. ALWAYS ensure there is no blockage of the airflow through the vent space located below the face of •... - Page 15 Heating Element & Burner Pot Picture 1 Picture 2 Picture 3 Picture 1 – Heating Element • Heating element inside tube shown • Two fans in the front blow hot air through the tube and ignite the pellets in the burner pot Picture 2 –...
- Page 16 Pellet Drawer Picture 1 Picture 2 Picture 3 Picture 1 – Dual Auger • Front of grill pulls out to reveal dual auger and pellet hopper underneath. • This “pellet drawer” pulls out on glides for easy access and secure closure. Picture 2 –...
- Page 17 Smoking Grate Removal Tool • All pellet grills come with a tool to help remove the smoking grate • The sear grate has actual handles built into it for easy removal 3-in-1 Versa-Rack, Gasket Tier – Single Rack Installed Tier – Double Rack Installed Versa-Rack Setup includes 2 different sets of rails: •...
- Page 18 GRILLING MODES The Coyote Pellet Grill and Smoker has three different grilling modes depending on the type of food you will be cooking Smoke Mode, Grill Mode, & Sear Mode. Grill, Smoke are determined by setting the target temperature, and the grill will automatically maintain your target temperature setting. The sear mode functions separately and is designed to be used only with the searing grate.
-
Page 19: Using The Digital Display
Using the Digital Display PELLET GRILL OVERVIEW Filling the Hopper and Auger • Lock / Unlock Display • Setting the Temperature • Grill Startup & Grill Shutdown • Halogen Lights • Using the Timer • Using Temp Probes • Settings Menu •... - Page 20 Locking and Unlocking the Display When the grill is powered on, the display will be locked by default. On the bottom left corner of the display screen there is a red button with a “LOCK” icon. To unlock the display, press the lock icon for three seconds.
- Page 21 6. Once the grill is ignited, the flame logo will change into a red stop button. SHUTDOWN Once finished cooking your food, now it is time to shut down your Coyote Pellet Grill and Smoker. To shut down your grill;...
- Page 22 Timer Button Halogen Lights The Coyote Pellet Grill and Smoker comes equipped with two interior halogen lights. To turn the lights ON/OFF simply press the lights button on the right side of the display. The button will be green when the lights are on.
- Page 23 Temp Probes Your pellet grill includes 3 temperature probes to monitor internal temperatures of the meat you are cooking. Simply plug the probes into one of the ports on the left side of the grill panel and the other end into the meat. (Cover port openings when not in use.) Settings Menu On the right side of your grill display there is a setting button.
- Page 24 Changing the Password If necessary the system password can be changed. While the password keypad is displayed there is a yellow keypad at the top right corner. Enter the default 4 digit password and press the key icon. The change password keypad will appear. You will be to change your password to any 4 digit number. (If you change the password make sure you write the password down.) The table below shows general guidelines to follow when learning to use your new Pellet Grill and Smoker.
- Page 25 Preparing Food for the Grill Always observe safe food-handling and safe food-preparation practices when using this Grill, to prevent food-borne illnesses. Always cook foods adequately. Undercooked foods can retain bacteria, especially if thawed or exposed to • warm conditions prior to cooking. Always use separate plates and utensils for the handling of raw food.
-
Page 26: Care & Maintenance
Soak the string you use to tie up roasts and poultry on the rotisserie spit to protect it from burning. • Use a disposable aluminum tray filled with water, fruit juice, wine or a marinade to add extra flavor and •... - Page 27 5. If your grill has developed surface discoloration or surface rust, clean the unit as stated above and use a good third-party polish to remove or reduce the spots. Follow instructions provided on any third-party polish products. Coyote does not insure or guarantee the performance of or results from such products. Environmental Factors that can affect your Grill...
- Page 28 Ways to Avoid Rust on your Grill: 1. Purchase a Coyote Grill cover for your unit. This will ensure that your cover is a correct fit and breathable, while providing the protection needed to keep contaminants off of the surface.
- Page 29 If the grill does not function properly, use the chart below to assist in diagnosing the problem. Troubleshooting is for general purposes only. ALWAYS ERR ON THE SIDE OF SAFETY. If the problem still exists, contact our Coyote Customer Service line at 855-520-1559.
-
Page 30: Parts Listings
Problem: Possible Causes and Solutions: Flare-ups • Check heat shield and cooking grates for excess food or grease build-up. • Ensure grill is not placed directly in the path of wind. • Be sure drip trays are clean (do not use aluminum foil on drip tray.) Note: Some flare-ups may be inevitable if cooking greasy foods. - Page 31 Grill Exploded View...
-
Page 32: Wiring Diagram
C1P00038 Inlet Shield C1P00016 Through right C1P28039 Circuit Board Box - C1P28 C1P00017 Trough left C1P28040 Drip Tray Drawer Left - C1P28 C1P28018 Warming Rack - C1P28 C1P28041 Drip Tray Drawer Right - C1P28 C1P00019 Sear Grate C1P00042 Drawer Glide... - Page 33 C1P36 Parts List Part # Name Part # Name C1P36001 Hood - C1P36 C1P36024 Hopper Baffle - C1P36 C1P36002 Wind guard - C1P36 C1P36025 Hopper - C1P36 C1P36003 Lower Hood - C1P36 C1P36026 Hopper Cover - C1P36 C1P36004 Rear Panel - C1P36 C1P00027 Burner Pot C1P00005...
- Page 34 Cart Exploded View...
- Page 35 C1P28FS Parts List Part # Name Part # Name C1PFS00001 Side Shelf Holder A C1PFS00013 Slide Holder C1PFS00002 Side Shelf Holder B C1PFS00014 Side plate of drawers - Right C1PFS00003 Side Panel - Left C1P28FS015 Bottom Panel - C1P28FS C1PFS00004 Side Shelf Inner Holder - Left C1PFS00016 Wheel holder A...
- Page 36 C1P36FS Parts List Part # Name Part # Name C1PFS00001 Side Shelf Holder A C1PFS00013 Slide Holder C1PFS00002 Side Shelf Holder B C1PFS00014 Side plate of drawers - Right C1PFS00003 Side Panel - Left C1P36FS015 Bottom Panel - C1P36FS C1PFS00004 Side Shelf Inner Holder - Left C1PFS00016 Wheel holder A...
- Page 37 WIRING DIAGRAM...
Need help?
Do you have a question about the C1P28 and is the answer not in the manual?
Questions and answers