Advertisement
Quick Links
Advertisement

Related Manuals for Heatmiser UH6


Summary of Contents for Heatmiser UH6
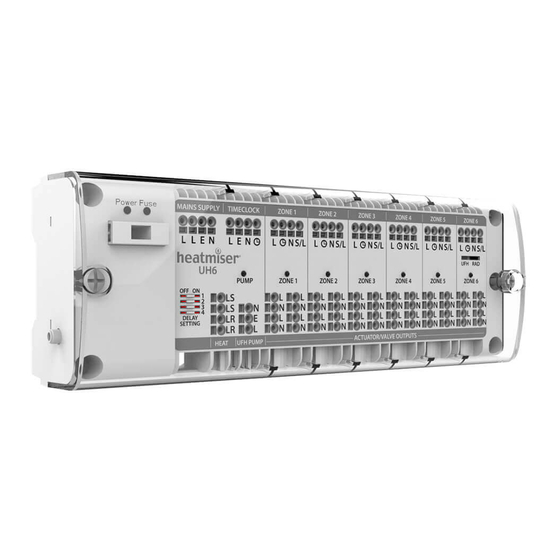
- Page 1 Model: UH6 Compact Wiring Centre...
- Page 2 The UH6 is an 6 Zone wiring centre for use with Heatmiser 230v powered thermostats. The UH6 can be used to control any actuator or valve which requires a 230v AC signal to open. For mid position valves and those requiring a closing signal, a changeover relay would be required.
- Page 3 90˚ counter clockwise and pull the cover o . The UH6 can be mounted directly to the wall using the two screw holes in the back, or alternatively, the unit can be DIN rail mounted, as shown here;...
- Page 4 To prevent this, it is good practice to operate the pump once a day, the creepage function does this for you. Once enabled the UH6 will operate the pump for 1 minute, only if the outputs have not been operated by a thermostat, within the preceding 24 hours.
- Page 5 L = Live When an under- oor heating zone sends a call for heat to the UH6, the live & neutral output will supply 230v to the manifold pump. It is recommended that this is fed through a high limit switch placed on the heating manifold, to protect against mechanical failure of the manifolds temperature control.
- Page 6 UH6 Wiring Cable sizes that can be used: Stranded cable 0.75mm - 1.5mm. Solid core cable 1.0mm - 1.5mm Cable lengths for zone inputs should be measured according to the diagram shown below. 15mm The L, , N & S/L cables are the same length for all zones as shown in the diagram on the left.
- Page 7 Using approx 170mm length of earth cable, link from the rst earth connection on the UH6 earth terminal block, and position in the mains supply E (earth) slot, as shown here. Push into the groove to hold cable in position.
- Page 8 Note: The goes directly in the earth slot. repeating for additional zones. connection is not used. Repeat for additional zones. A complete wiring example of the UH6 is shown on page 5 Wiring Centre...
- Page 9 Installing UH6 Front Module Locate the UH6 front module on to the back plate, ensuring each cable aligns with the slots on the front panel. Turn the four screws 90˚ clockwise to lock the front module in position. Model: UH6...
- Page 10 You may have a preference of inserting the cables from right to left or left to right. Once you've nished inserting your thermostat cables, the UH6 will appear similar to as shown below... Wiring Centre...
- Page 11 Bend the actuator wires around & insert the Neutral wire into the upper N connection. Then insert the Live wire into the upper L connection. As shown in image 4. Repeat this process for all other zones, any outputs that are not needed can be ignored. Model: UH6...
- Page 12 Inserting UFH Pump & Heat Output Cables UFH Pump: This 230v output is used for an under oor heating manifold pump. Connections are marked; N = Neutral E = Earth L = Live When a zone calls for heat*, the live & neutral output will supply 230v to the manifold pump. It is recommended that this is fed through a high limit switch placed on the heating manifold, to protect against mechanical failure of the manifolds temperature control.
- Page 13 Fitting the front cover To place the clear front cover on to the UH6, line up the front cover with the slots along the top & bottom edge, then slide the front on. Turn the two screws 90˚ clockwise to lock the front cover in position.
- Page 14 UH6 - DS-SB 6 ZONES WITH TIME CLOCK (5 X UFH, 1 X RADIATOR ZONE) WIRING KEY TM1 Timeclock UFH Zone UFH Zone UFH Zone UFH Zone UFH Zone Radiator Zone NEUTRAL EARTH LIVE SWITCH LIVE TIMER LIVE END SWITCH...
- Page 15 UH6 - NEOSTAT 6 ZONES WITH TIME CLOCK (5 X UFH, 1 X RADIATOR ZONE) WIRING KEY UFH Zone Radiator Zone UFH Zone UFH Zone UFH Zone UFH Zone NEUTRAL EARTH LIVE SWITCH LIVE END SWITCH or HEAT ENABLE N A1 A2 - RT...
- Page 16 UH6 - 230v Thermostat Range WIRING KEY Slimline DS-SB Edge Touch V2 neoStat NEUTRAL EARTH LIVE SWITCH LIVE END SWITCH or HEAT ENABLE L N SL RT- RT+ L N A1 A2 - RT1 A L N A1A2 - RT1 RT2...
- Page 17 System Con guration ENGINEER TO COMPLETE ON INSTALLATION UH6 Wiring Centre Title: ............Zone Type Under-Floor Radiator Heating Title Zone 1 ............Zone 2 ............Zone 3 ............Zone 4 ............Zone 5 ............Zone 6 ............Model: UH6 Model: UH6...
- Page 18 Notes ........................................................................................................................................................................................................................................................................................................................................................................................................................................................................................................................................................................................................................................................................................................................................................................................................................................................................................................................................................Wiring Centre...
- Page 19 Notes Model: UH6 Model: UH6...
-
Page 20: Want More Information
Or view technical speci cations directly on our website: www.heatmiser.com Heatmiser UK Ltd VIDEO Units 1-5 Hurstwood Court, Mercer Way Shadsworth Business Park, Blackburn, Lancashire, BB1 2QU, United Kingdom. Twitter: @heatmiseruk Facebook: facebook.com/thermostats Products Commonly used with the UH6 wiring centre. DS-SB Touch Edge NeoStat v2 Rev 1.0...
Need help?
Do you have a question about the UH6 and is the answer not in the manual?
Questions and answers