Midtronics DCA-8000 Quick Start Manual
Toyota/lexus
Hide thumbs
Also See for DCA-8000:
- User manual (56 pages) ,
- Instruction manual (36 pages) ,
- Quick start manual (4 pages)
Advertisement
Quick Links
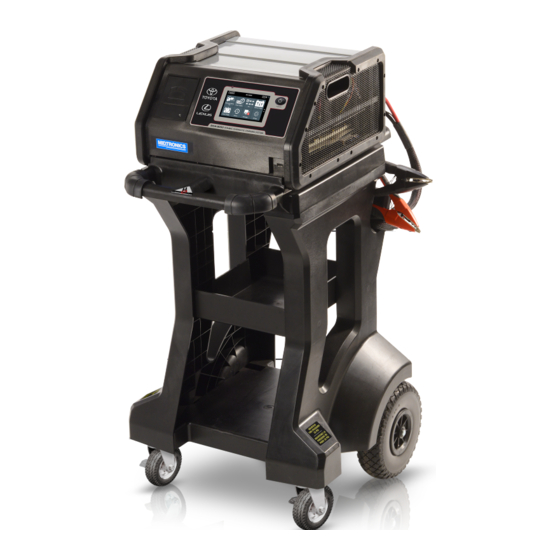
DCA-8000
IMPORTANT: Always leave the DCA-8000 plugged-
in when not in use to allow the tool to automatically
check for and perform any available software updates.
Charging Cables
1.
Insert the communication cable
until the connector locks into
place.
2.
For strain relief, pre-twist each
quick connector counter clock-
wise, before inserting and rotat-
ing clockwise 180° onto each
Locking Post on the back of the
charger.
3.
The connection process is complete when all three cables
are secured to the charger.
Locking Power Cord
Pull back on the red
tab on the side of the
connector to release/
remove the power
cord from the charger's
power socket.
Wireless Barcode Scanner Cable
1.
Insert the RJ50 connector into the bottom of the scanner
base until it clicks into place.
2.
With a flat blade screwdriver, pry off the plastic cover over
the DB9 connection on the back of the charger.
3.
Use the screws on the DB9 connector to secure the cable
from the dock to the charger.
NOTE: The barcode scanner base is magnetic and can
be placed anywhere on top of the DCA charger.
www.midtronics.com
DCA-8000
Toyota/Lexus
Initial Setup
1.
Pull Back To
Release
2.
3.
Upon initial power-up, the Language Settings screen is dis-
played. Tap Next to continue.
System
Select the Controller default language
Language
displayed on the screen.
Test Result
Select the Controller default language for
Language
all displayed tests and test results.
Email
Select the default standard language for
Language
the analyzer to use for all tests and results
sent via email.
Print
Select the default standard language for
Language
the analyzer to use for all tests and results
printed using a networked printer.
A Consent to collect data screen is displayed. Read the
terms for collecting data, tap the Consent check box and
then tap Next to continue.
Select the correct logo for the dealer location.
Midtronics Inc.
7000 Monroe Street Willowbrook, IL 60527
Quick Start Guide
Page
1
March 2019
Quick Reference Guide
167-000898EN-A
167-000898EN-A
March 2019
Advertisement

Related Manuals for Midtronics DCA-8000


Summary of Contents for Midtronics DCA-8000
- Page 1 Toyota/Lexus Quick Reference Guide 167-000898EN-A 167-000898EN-A March 2019 IMPORTANT: Always leave the DCA-8000 plugged- in when not in use to allow the tool to automatically check for and perform any available software updates. Charging Cables Insert the communication cable until the connector locks into place.
- Page 2 Page DCA-8000 Quick Reference Guide 167-000898EN-A March 2019 The Date/Time Settings are displayed. Tap Next to continue To delete a network: Tap a displayed network to select it. after making any adjustments. Tap trash can icon ( ) to delete it.
- Page 3 Page DCA-8000 Quick Reference Guide 167-000898EN-A March 2019 Advanced Battery Test To delete an email address: Tap a displayed email address to select it. Tap trash can icon ( ) to delete it. Use In Vehicle Test to perform Battery Tests on...
- Page 4 Page DCA-8000 Quick Reference Guide 167-000898EN-A March 2019 Tap the box across from each displayed parameter and se- lect the correct information from the displayed list. NOTE: See Appendix B in the Instruction Manual for complete parameter descriptions. The charger performs a series of tests and the results are then displayed on the charger screen.