Table of Contents
Advertisement
Quick Links
Advertisement
Table of Contents

Related Manuals for Seitron GAS T ONE


Summary of Contents for Seitron GAS T ONE
-
Page 3: Table Of Contents
TABLE OF CONTENTS IMPORTANT INFORMATION Information about this manual Danger levels and other symbols SAFETY Safety check Intended use of the product Improper use of the product Precautions for the usage of the Li-Ion battery package WORKING PRINCIPLE General overview of the Analyzer PRODUCT DESCRIPTION Piezoelectric, temperature compensated pressure sensor ®... - Page 4 ANNEX B - Declaration of Conformity WARRANTY CERTIFICATE SEITRON S.p.A. a socio unico - ALL RIGHTS RESERVED - Total or partial reproduction of this document by any means (including photocopying or storage on any electronic medium) and transmittal of same to third parties in any manner, even electronically, is strictly prohibited unless explicitly authorized in writing by SEITRON S.p.A.
-
Page 5: Important Information
11/02/19 10:00 INFO SERV [1/2] Seitron S.p.A. Tel. 0424 567842 Information on the display Fax. 0424 567849 www.seitron.it Dispose of the battery pack at the end of its working life only at the dedicated collecting bin. -
Page 6: Safety
For the maintenance of the instrument, strictly comply with what’s described in this manual at the “Maintenance” chapter. All the interventions not specified in this manual, may be performed exclusively by Seitron assistance centres. Otherwise, Seitron declines every responsibility about the normal operation of the instrument and on the validity of the several homologations. -
Page 7: Working Principle
WORKING PRINCIPLE 3.1 General overview of the instrument The instrument is featured with: - Internal pressure sensor. - Intuitive user interface; the instrument could be used even without the instruction manual support. - Wide and bright graphic display. - Rechargeable 'Li-Ion' battery. Main functions: - Gas distribution installations testing according to standards UNI7129 and UNI11137. -
Page 8: Product Description
DESCRIPTION OF THE PRODUCT 4.1 Piezoelectric, temperature compensated pressure sensor The instrument is internally provided with a piezo-resistive differential pressure sensor which can be used for the tightness test of the installation and the pressure measurement of the latter. The measurement range is -100,00 hPa ... +200,00 hPa. Any potential drift of the sensor are nulled thanks to the autozeroing system. -
Page 9: Components Description
COMPONENTS DESCRIPTIONS 5.1 Instrument interface DESCRIPTION: Polyester keyboard with preformed keys and main command functions: KEYS FUNCTION Activates the context keys shown on the display. - Turns on and off the instrument. - If pressed briefly, accesses the instrument menu. - If pressed for at least 2 seconds, turns off the instrument. - Page 10 Display CAUTION: If the instrument is exposed to extremely high or extremely low temperatures, the quality of the display may be temporarily impaired. Display appearance may be improved by acting on the contrast key. Battery status, date and time. 11/02/19 10:00 MEASUREMENTS Selected menu.
-
Page 11: Technical Specifications
TECHNICAL SPECIFICATIONS 6.1 Technical specifications Power supply: Li-Ion battery pack with internal protection circuit. Average life of the battery pack: 500 empty / full charge cycles. Battery charger: External 5Vdc 2A battery charger with female A-type USB connector + connection to the device with the same serial communication cable supplied. -
Page 12: Using The Instrument
Remove the instrument from its packing and check it for damage. Make sure that the content corresponds to the ordered items. If signs of tampering or damage are noticed, notify that to the SEITRON service center or agent immediately and keep the original packing. -
Page 13: Qr Code Generation
“Print” shown on the display when the tightness test is over or during the pressure and temperature measurement and on the memory menu. To correctly display and store the measurement and/or tightness tests data it is necessary to install on your device the Seitron App “SMARTFLUE LITE MOBILE” downloadable from the AppStore. -
Page 14: Connection Diagram
7.5 Connection diagram AA AL05 POWER BANK* AAKT05 = Only for battery charge. POMX010000SE 034389 010420... -
Page 15: Start Screen
’ ’ button it is possible to access the configuration menu. 05/03/19 10:00 MEASUREMENTS ► Tight. test Pressure Temperature GAS T ONE Keep N.S.:0 pressed for a Fw:1.00-EVAL03 few seconds 05/03/19 10:00 WARNING! -
Page 16: Measurements
MEASUREMENTS Menu→Measurements 05/03/19 10:00 FUNCTION MEASUREMENTS Enters in the selected measure. ► Tight. test Pressure Temperature Selects the available parameters. Returns to the previous screen. PARAMETER DESCRIPTION The instrument is able to perform the tightness test on installations using combustible gas according to UNI 7129-1: 2015 and UNI 11137: 2012 standards, respectively related to new or restored installations and existing installations. -
Page 17: Measurements Menu→Measurements→Tightness Test
Menu→Measurements→Tightness test 05/03/19 10:00 DESCRIPTION TIGHT. TEST Enters the selected parameter ►New piping Exist. piping Result Selects the available parameters Goes back to the previous screen PARAMETER DESCRIPTION Through this menu it is possible to perform the tightness test, according to standard UNI 7129-1: 2015, on new or renewed installations or after a repairing operation. -
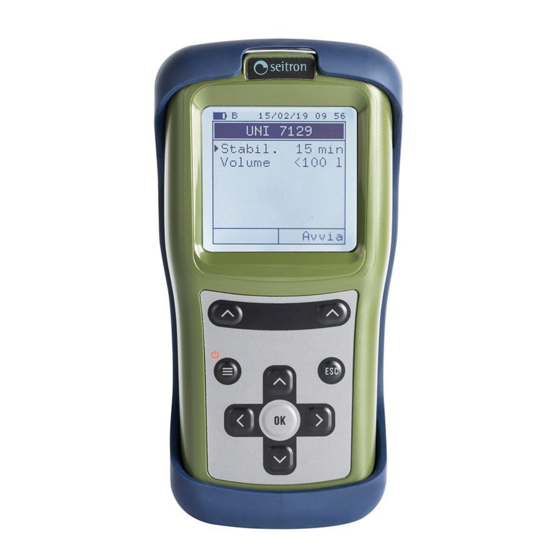
Page 18: Measurements Menu→Measurements→Tightness Test→New Inst. (Uni 7129)
Menu→Measurements→Tightness test→New inst. (UNI 7129) 05/03/19 10:00 UNI 7129 ► Stabil. 15 min Duration of the stabilization phase that can be set between 15 .. 99 minutes. Volume manual Volume input mode can be set as “Manual” and “<100 l”. 20.0 l System volume, which can be set if known. - Page 19 If you use volume calculation, for each section of piping it is necessary to set the material, the nominal diameter and the length of the same. The GAS T ONE calculates the volume of the section ("partial volume") and it adds it up, activating the context key ' V+ ' (add up piping), to the calculation of the volume of the system.
- Page 20 Once the stabilization phase is terminated the tightness test is started. This test is performed by observing how the pressure decays in time during a fixed 5 minutes interval, as stated in the applied standard. During the tightness test phase the following values are displayed: P ini: Pressure measured at the beginning of the test.
-
Page 21: Tightness Test Configuration According To Standard Uni 7129
9.3.1 TIGHTNESS TEST CONFIGURATION ACCORDING TO STANDARD UNI 7129-1: 2015 05/03/19 10:00 05/03/19 10:00 05/03/19 10:00 UNI 7129 UNI 7129 UNI 7129 ►Stabil. 15 min ►Stabil. ►Stabil. 16 min Volume <100 l Volume <100 l Volume <100 l Start Start Start 05/03/19 10:00... - Page 22 05/03/19 10:00 05/03/19 10:00 05/03/19 10:00 UNI 7129 MEASURE V MEASURE V Stabil. 15 min Connect hose System Volume manual to P+ stabilization... Start 100.0 l ► Measure V Calculate V Start Start Restart 05/03/19 10:00 MEASURE V Take, with the syringe (that comes with the tightness test kit), 100 ml of gas.
- Page 23 05/03/19 10:00 05/03/19 10:00 UNI 7129 CALCULATE V Stabil. 15 min Tot. V 100.0 l Total acquired volume Volume manual Part. V 0.0 l Volume of the set pipe section 100.0 l ► Mater. Set the piping section material Measure V Diam.
-
Page 24: Tightness Test Performance According To Standard Uni 7129
9.3.2 PERFORMING TIGHTNESS TEST ACCORDING TO STANDARD UNI 7129-1: 2015 05/03/19 10:00 05/03/19 10:00 UNI 7129 WARNING ►Stabil. 15 min Fill the system Volume <100 l to a Start pressure of 100.00 h Press OK to continue Start 05/03/19 10:00 05/03/19 10:00 PRESSURE... -
Page 25: Measurements Menu→Measurements→Tightness Test→Exist. Inst. (Uni 11137)
Measurements menu→Measurements→Tightness test→Exist. inst. (UNI 11137) Duration of the stabilization phase that can be set between 1 and 99 minutes. 11/12/17 10:00 11/12/17 10:00 UNI 11137 [1/2] TIGHT. TEST Pipe system selection Fuel used in the system: (inside or outside the Stabil. - Page 26 If you use volume calculation, for each section of piping it is necessary to set the material, the nominal diameter and the length of the same. GAS T ONE calculates the volume of the section ("partial volume") and it adds it up, activating the context key ' V+ ' (sum piping), to the calculation of the volume of the system.
- Page 27 Table volumes: Examples relating to the various lengths of indoor systems, capacity approximately corresponding to 18dm , depending on the material and the diameter of the fuel gas adduction pipe. Steel Copper / Multilayer/ Polyethylene Diameter length (m) Internal diameter (mm) length (m) 1/2"...
-
Page 28: Tightness Test Configuration According To Standard Uni 11137
Non compliant (not suitable for operation): In this situation the measured leakage is such that the piping is not suitable for operation and must immediately placed out of order. Once the leakage problem has been fixed the piping must tested again for its tightness according to the UNI 7129 standard. - Page 29 05/03/19 10:00 05/03/19 10:00 05/03/19 10:00 UNI 11137 UNI 11137 UNI 11137 ► Stabil. 1 min ► Stabil. ► Stabil. Fuel: L.P.G. Fuel: L.P.G. Fuel: L.P.G. Test gas: Test gas: Test gas: Volume <18 l Volume <18 l Volume <18 l Start Start Start...
- Page 30 05/03/19 10:00 05/03/19 10:00 05/03/19 10:00 UNI 11137 [1/2] UNI 11137 [1/2] UNI 11137 [1/2] Stabil. 1 min Stabil. 1 min Stabil. 1 min Fuel: L.P.G. Fuel: L.P.G. Fuel: L.P.G. Test gas: Test gas: Test gas: Volume manual Volume manual Volume manual ►...
- Page 31 05/03/19 10:00 05/03/19 10:00 MEASURE V UNI 11137 [1/2] Measure V Stabil. 1 min Fuel: L.P.G. V: 150.0 l Test gas: Volume manual Press OK to 150.0 l save V ► Measure V Restart Start Restart Start Start tightness test (allows to repeat the volume measurement) (see chapter 9.4.2)
- Page 32 05/03/19 10:00 UNI 11137 [2/2] ► Calculate V Start 05/03/19 10:00 UNI 11137 [1/2] Stabil. 1 min Fuel: L.P.G. Test gas: Volume manual 100.6 l ► Measure V Start Start Start tightness test (see chapter 9.4.2). POMX010000SE 034389 010420...
-
Page 33: Tightness Test Performance According To Standard Uni 11137
9.4.2 TIGHTNESS TEST PERFORMACEACCORDING TO STANDARD UNI 11137 05/03/19 10:00 05/03/19 10:00 UNI 11137 WARNING ► Stabil. 2 min Fill the system Fuel: L.P.G. to a Test gas: Start pressure of Volume <18 l 30.00 h Press OK to continue Start 05/03/19 10:00... -
Page 34: Measurements Menu→Measurements→Tightness Test →Result
Measurements menu→Measurements→Tightness test →Result 05/03/19 10:00 TIGHT. TEST ►New piping Exist. piping Result 05/03/19 10:00 TIGHT. TEST New piping Exist. piping ►Result 05/03/19 10:00 TEST UNI 11137 P ini 30.39 h P fin 30.38 h 0.01 h Print Qtest 13.32l/h Qref 14.45l/h Res:... -
Page 35: Measurements Menu→Measurements→Pressure
Measurements menu→Measurements→Pressure 05/03/19 10:00 DESCRIPTION PRESSURE Activate the related operations shown Press. 0.00 h on the display. ►Zero Performs the pressure sensor autozero. Returns to the previous screen. Save Print INTERACTIVE OPERATIONS DESCRIPTION Save Stores the measured pressure value. According to the setting made in the relative menu, it is possible to print or Print display the QR code. -
Page 36: Measurements Menu→Measurements→Temperature
Measurements menu→Measurements→Temperature 05/03/19 10:00 TEMPERATURE Temp. 26.1C Save Print DESCRIPTION Returns to the previous screen. INTERACTIVE OPERATIONS DESCRIPTION Save Stores in memory the measured temperature value. According to the setting made in the relative menu, it is possible to print or Print display the QR code. -
Page 37: Instrument Parameters
10.0 INSTRUMENT PARAMETERS 10.1 Parameters menu 05/03/19 10:00 DESCRIPTION MENU Returns to the previous screen. ► Memory Configuration Diagnostic Selects the available parameters. Info Service Enters in the selected parameter. PARAMETER FUNCTION This parameter allows to set the memory number on which to record the tightness test, the temperature measurement, etc. -
Page 38: Memory
11.0 MEMORY 11.1 Menu→Memory FUNCTION 11/12/17 10:00 MEMORY Activate the context keys shown on the ► Memory display. Status full Modifies the memory number and then Time 09:50 confirms the changed setting. When selecting the analysis, shows the Date 05/03/19 detail of the evidenced analysis. - Page 39 1. Visualization of the memory content 05/03/19 10:00 05/03/19 10:00 05/03/19 10:00 UNI 7129 MEMORY MEMORY ► Tight. test P ini 98.48 h ► Memory Pressure P fin 98.94 h Status Full Temperature 0.46 h Time 09:50 Select Ris: tight Date 05/03/19 Print...
-
Page 40: Configuration
12.0 CONFIGURATION 12.1 Menu→Configuration 05/03/19 10:00 FUNCTION CONFIGURATION Enters in the selected parameter. ► Measure units Instrument Print Selects the available parameters. Language Restore Returns to the previous screen. SUB MENU FUNCTION In this submenu you have the possibility to change the analysis parameters unit Measure unit of measurement according to use. -
Page 41: Menu→Configuration→Measurement Unit
12.2 Menu→Configuration→Measure units 05/03/19 10:00 MEASURE UNITS ► Press. Measurement unit can be set as: hPa - Pa - mbar - mmH O - mmHg - inH O - psi Temp. °C Measurement unit can be set as: °C - °F FUNCTION Enters the modify mode for the selected parameter, then confirms the modification. -
Page 42: Menu→Configuration→Instrument
12.3 Menu→Configuration→Instrument 05/03/19 10:00 FUNCTION INSTRUMENT Enters in the selected parameter. ► Display Clock Bluetooth Selects the available parameters. Returns to the previous screen. SUB MENU FUNCTION With the arrow keys it is possible to increase or decrease the brightness and the Display contrast of the display. -
Page 43: Menu→Configuration→Instrument→Display
12.3.1 Menu→Configuration→Instrument→Display 05/03/19 10:00 DISPLAY ► Brightness Contrast FUNCTION When pressed in modify mode cancels the selection made, otherwise returns to the previous screen. The arrows select each line displayed. In edit mode, it scrolls through the suggested values. Enters the modify mode for the selected parameter, then confirms the modification. -
Page 44: Menu→Configuration→Instrument→Clock
12.3.2 Menu→Configuration→Instrument→Clock 05/03/19 10:00 CLOCK ► Time 10:00 Time, in the chosen format Date 11/12/17 Date, in the chosen format Mode Date format: EU (Europe) or USA (America) Mode Time format: 24h or 12h FUNCTION When pressed in modify mode cancels the selection made, otherwise re- turns to the previous screen. -
Page 45: Menu→Configuration→Instrument→Bluetooth
12.3.3 Menu→Configuration→Instrument→Bluetooth 05/03/19 10:00 BLUETOOTH Status Bluetooth status: On or Off Device ID 008025CE0E6E Device MAC address FUNCTION Activate the context keys shown on the display. Goes back to the previous screen. INTERACTIVE OPERATIONS DESCRIPTION ® Turns off Bluetooth ® Turns on Bluetooth POMX010000SE 034389 010420... -
Page 46: Menu→Configuration→Print
QR code generation: ON: pushing the button related to the interactive function “Print” the instrument generates a QR code, which can be read with the Seitron App “SMARTFLUE LITE MOBILE” allows to download the acquired data related to the tightness test, pressure and temperature. -
Page 47: Menu→Configuration→Print→Ir Printing
12.4.1 Menu→Configuration→Print→IR Printing WARNING! Place the IR printer and the instrument according to the diagram shown on the left. The IR interfaces should be one in front of the other and far apart not more than 30 cm for a good communication result. POMX010000SE 034389 010420... -
Page 48: Menu→Configuration→Print→Pairing
12.4.2 Menu→Configuration→Print→Pairing 1. When the Bluetooth printer is set, start the following procedure: 05/03/19 10:00 05/03/19 10:00 05/03/19 10:00 PAIRING BT PAIRING BT PRINT Turn on the Printer Copy number detection in printer and Printer Start progress ... start searching QR Code ►... -
Page 49: Menu→Configuration→Language
12.5 Menu→Configuration→Language 05/03/19 10:00 05/03/19 10:00 LANGUAGE LANGUAGE ► Italiano √ ► Polski English Slovenskému Pусский Română Español Français Hrvatski Deutsch FUNCTION Sets the selected language. Scrolls through the available languages. Returns to the previous screen. Example: 05/03/19 10:00 05/03/19 10:00 LANGUAGE LANGUAGE... -
Page 50: Menu→Configuration→Restore
12.6 Menu→Configuration→Restore 05/03/19 10:00 05/03/19 10:00 RESTORE RESTORE Clear memory data and restore Factory factory settings? settings restored Press OK to continue FUNCTION Starts the factory data reset phase. Exits the current screen without resetting. POMX010000SE 034389 010420... -
Page 51: Diagnostic
13.0 DIAGNOSTIC 13.1 Menu→Diagnostic 05/03/19 10:00 FUNCTION DIAGNOSTIC Enters in the selected parameter. ► Hardware Selects the available parameters. Returns to the previous screen. SUB MENU DESCRIPTION In case of malfunction, before contacting the Assistance center prepare and/or send the data Hardware shown in this menu. -
Page 52: Menu→Diagnostic→Hardware
13.2 Menu→Diagnostic→Hardware FUNCTION 05/03/19 10:00 HARDWARE Enters in the selected parameter. ► Memories Calibration Voltages Selects the available parameters. ADC channels Returns to the previous screen. INTERACTIVE OPERATIONS DESCRIPTION Shows the values in mV. Shows the values in Bit. Note: the memory and calibration parameters are not accessible if their condition is OK. Display examples: 05/03/19 10:00... -
Page 53: Info Service
05/03/19 10:00 INFO SERV [1/2] Seitron spa Tel:+39 0424 567842 Fax:+39 0424 567849 www.seitron.it 05/03/19 10:00 INFO SERV [2/2] Mod. GAS T ONE N.S. 1006 Ver. FW 1.00 N.P. FW Ver. HW Rev. Boot 1.00 Rev. FUNCTION Returns to the previous screen. -
Page 54: Maintenance
It is advised, at least once a year, to send the instrument to a SERVICE CENTER for a calibration check. SEITRON highly qualified staff is always at your disposal and will provide you with all the sales, technical, application and maintenance details required. -
Page 55: Firmware Update
Instructions to update the tightness test instrument with new firmware: 1. Log in to the website www.seitron.com and download the firmware file available in the "DOWNLOAD - Software e firmware - GAS T ONE" section or at the following link: http://seitron.it/en/content/gas-t-one-software-e-firmware... -
Page 56: Troubleshooting
6 hrs. c. The battery pack is old. Aging can cause the batteries to reduce their capacity. If the autonomy has become unacceptable change the internal battery with an original part SEITRON. d. Verify measured voltage values “Menu→Diagnostic→Hardware→Voltages”:... -
Page 57: Spare Parts And Servicing
AA UA01 Adapter cable USB-A / USB-B AA SA08 TcK external air temperature sensor, 200 mm length and 2 meters cable 17.3 Service Centers Seitron S.p.A. a socio unico Via del Commercio, 9/11 36065 Mussolente (VI) Tel.: +39.0424.567842 Fax.: +39.0424.567849 E-mail: info@seitron.it... -
Page 58: Annex A - Smart Flue Mobile
Qref 0.00l/h Res: compliant Save Print SCAN THE QR CODE USING SEITRON APP “SMARTFLUE LITE MOBILE”, TO DOWNLOAD THE ACQUIRED DATA. THE ACQUIRED DATA ARE SAVED IN THE INSTRUMENT MEMORY. APP settings. Insert a default email address. Select the data separation mode: comma (,) or semicolon (;). - Page 59 Select one of the two modes of data sharing. Select the file format to share. Select the application to use for sending. Example of the exported csv file and imported in an excel file: GAS T ONE Serial number 1234 Date 11/03/2019 Time 9:43 Stab.
-
Page 61: Annex B - Declaration Of Conformity
APPENDIX B POMX010000SE 034389 010420... -
Page 63: Warranty Certificate
The GAS T ONE tightness test kit is guaranteed for 24 months from purchasing document date. Seitron undertakes to repair or replace, free of charge, those parts that, in its opinion, are found to be faulty during the warranty period. The products which are found defective during the above mentioned periods of time have to be delivered to Seitron Laboratories carriage paid. - Page 65 NOTES POMX010000SE 034389 010420...
- Page 66 NOTES POMX010000SE 034389 010420...
Need help?
Do you have a question about the GAS T ONE and is the answer not in the manual?
Questions and answers