Table of Contents
Advertisement
Quick Links
Advertisement
Table of Contents

Related Manuals for Seitron NOVO


Summary of Contents for Seitron NOVO
- Page 1 USE AND MAINTENANCE Combustion Analyzer...
-
Page 3: Table Of Contents
TABLE OF CONTENTS IMPORTANT INFORMATION Information about this manual Danger levels and other symbols SAFETY Safety check Intended purpose Improper use of the product Precautions for the usage of the Li-Ion battery package GENERAL OVERVIEW DESCRIPTION OF THE PRODUCT Working principle Measurement sensors CO dilution (if the configuration allows it) Autozero... - Page 4 END OF ANALYSIS 8.7.1 Checking the water trap / smoke filtering unit OPERATOR 10.0 MEASUREMENTS 10.1 Draft measurement 10.2 Black smoke measure 10.3 Ambient CO measaure 10.4 Temperature measure 10.5 Pressure measure 10.6 “P gas” Measures network gas pressure 10.7 Ventilation measurement 10.8 Tightness test...
- Page 5 18.1 Spare parts 18.2 Accessories 18.3 Service Centres ANNEX A - Seitron Smart Analysis APP ANNEX B - Report ANNEX C - Optional measures list ANNEX D - Coefficients of the fuels and Formulas WARRANTY CERTIFICATE TROUBLESHOOTING J100000000SE 038161 191121...
-
Page 6: Important Information
IMPORTANT INFORMATION Information about this manual ◊ This manual describes operation, features and maintenance of this Combustion Analyzer. ◊ Read this operation and maintenance manual before using the device. The operator must be familiar with the manual and follow the instructions carefully. -
Page 7: Safety
Improper use of the product The use of Novo in application areas other than those specified in Section 2.1 “Intended use of the product” is to be considered at the operator’s risk and the manufacturer assumes no responsibility for the loss damage or costs that may result. It is compulsory to read and pay attention to the instructions in this use and maintenance manual. -
Page 8: General Overview
- Connectivity with a smartphone through Bluetooth®. Once the specific APP “SEITRON SMART ANALYSIS” available on Google play-store is installed on the device, the user can start remote analysis of combustion and/or view real-time data of the analysis in progress. - Page 9 - Black smoke (with the use of the external manual pump) - Gas pressure in the piping, pressure in the burning chamber and check of the pressure switches, using the measurement range up to 200hPa. - Combustion air measurement - Auxiliary temperatures - Air speed for air or flue gas leaving the chimney with the use of Pitot tube - Tightness test Maintenance...
-
Page 10: Description Of The Product
DESCRIPTION OF THE PRODUCT Working principle The gas sample is taken in, through the smoke probe, by a membrane pump inside the instrument. The probe is featured with a sliding fitting-cone that allows the probe itself to be inserted into holes with a diameter from 11 mm to 16 mm, and to set the immersion depth: the smoke pick-up point must approximately correspond to the center of the satck. -
Page 11: Autozero
If the instrument does not include the printer module, this can be installed at a later time by sending the instrument to a Seitron service center. -
Page 12: Tightness Test
“Seitron Smart Analysis” APP available on Google Play store. - PC with Microsoft Windows 7 or later operative system and Bluetooth® connection after installing the proper software “Seitron Smart Analysis” which can be downloaded from the web site www.seitron.com. -
Page 13: Mechanical Description
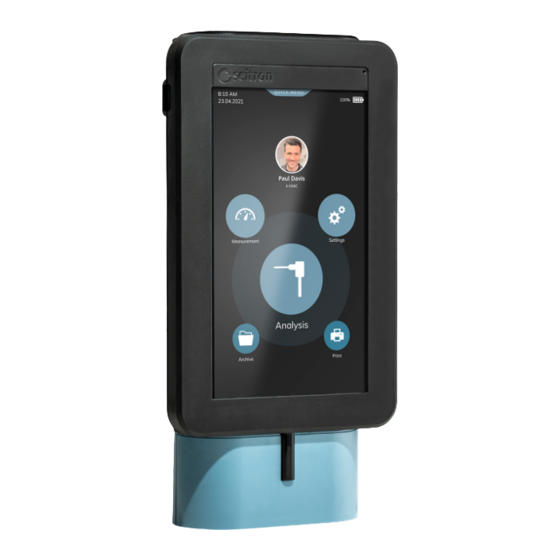
MECHANICAL DESCRIPTION Front view Printer module On / Off button Lid to access the paper socket of the printer Inputs USB type C interface, for connecting the instrument to a personal computer or to the battery charger. User interface * This component is present only if the instrument model is featured with the internal printer module. J100000000SE 038161 191121... -
Page 14: Back View
Back view Magnets Water trap low level notch Water trap /smoke filtering unit Water trap high level notch Gas output J100000000SE 038161 191121... -
Page 15: Inputs
Inputs (T1) Female connector Tc-K (T2) Tc-K female connector Tc-K input male connector for the smoke Ingress for combustion probe Tc-K male probe. connector. (P3) Male pneumatic connector Female pneumatic connector for water trap/ Pneumatic input for gas valve pressure smoke filtering input. -
Page 16: Using The Flue Gas Analyser
Remove the instrument from its packing and check it for damage. Make sure that the content corresponds to the ordered items. If signs of tampering or damage are noticed, notify that to the SEITRON service center or agent immediately and keep the original packing. -
Page 17: Use With External Power Pack
6.2.2 Use with external power pack The instrument can work with the batteries fully drained by connecting the external power pack provided. WARNING! THE POWER SUPPLY/BATTERY CHARGER IS A SWITCHING TYPE ONE. THE APPLICABLE INPUT VOLTAGE RANGES BETWEEN 90Vac AND 264Vac. INPUT FREQUENCY: 50-60Hz. - Page 18 6.3.1 Home Page dello strumento Once the instrument has been switched on, the display shows the home page screen. Carry out the complete combustion analysis. Also, access the analysis configuration menu; the user can set the different reference parameters of the instrument to carry out the combustion analysis. FOR ALL DETAILS, REFER TO CHAPTER 8.0.
-
Page 19: Warning
Warning • Use the instrument with an ambient temperature between -5 and +45°C. WARNING! IF THE INSTRUMENT HAS BEEN KEPT AT VERY LOW TEMPERATURES (BELOW OPERATING TEMPERATURES) WE SUGGEST WAITING A WHILE (1 HOUR) BEFORE SWITCHING IT ON TO HELP THE SYSTEM’S THERMAL BALANCE AND TO PREVENT CONDENSATE FORMING IN THE PNEUMATIC CIRCUIT. -
Page 20: Positioning Of The Instrument During Operation
Firmato digitalmente Firmato digitalmente Data : 23/07/2021 Data : 23/07/2021 elettronico) senza l'autorizzazione scritta di SEITRON S.p.A. a socio unico elettronico) senza l'autorizzazione scritta di SEITRON S.p.A. a socio unico Modello 3D : WC3D00705 D : WC3D00705 J100000000SE 038161 191121... -
Page 21: Connection Diagram
CONNECTION DIAGRAM Smoke probe and cobustion air temperture probe connection diagram Part # AASA08 Part # AJSJ01 Part # AJPT-- J100000000SE 038161 191121... -
Page 22: Probe Connection For Simultaneous Pressure, O2, Pollutants Measurement And Efficiency Calculation
Probe connection for simultaneous pressure, O2, pollutants measurement and efficiency calculation Part # AJTB01 Part # AJSJ01 Part # AJPT-- J100000000SE 038161 191121... -
Page 23: Pitot Tube Connection
Pitot tube connection - Connect the Pitot tube (accessory) to inputs P1 and P3 (which are normally used for the differential pressure measurement) - Connect the Tc-K thermocouple cable from the flue gas probe to connector T1 of the instrument. WARNING! When a Pitot tube integrated to a Tc-K thermocouple is used, remember to connect the thermocouple connector to T1 input at instrument side. -
Page 24: Instrument Tightness Test Kit Connection
Instrument tightness test kit connection Codice # AJTB01 Part # AAKT05 J100000000SE 038161 191121... -
Page 25: Leak Detection Probe Connection
Leak detection probe connection Part # AASG01 J100000000SE 038161 191121... -
Page 26: Pc Connection
PC connection J100000000SE 038161 191121... -
Page 27: Flue Gas Analysis
FLUE GAS ANALYSIS To perform complete flue gas analysis, follow the instructions below. Warnings WARNING! FOR A CORRECT ANALYSIS NO AIR MUST FLOW INTO THE PIPE FROM OUTSIDE DUE TO A BAD TIGHTENING OF THE CONE OR A LEAK IN THE PIPELINE. THE GAS PIPE MUST BE CHECKED IN ORDER TO AVOID ANY LEAKAGES OR OBSTRUCTIONS ALONG THE PATH. -
Page 28: Inserting The Smoke Probe In The Stack
Inserting the smoke probe in the stack In order for the probe to be inserted at the right point within the stack, its distance from the boiler has to be twice the diameter of the stack pipe itself or, if this is not possible, must comply with the boiler manufacturer’s instructions. In order to position the probe correctly, a reliable support must be provided by drilling a 13/16 mm hole in the manifold (unless already present) and screwing in the positioning cone provided with the probe - in this way no air is drawn from the outside during sampling. -
Page 29: Setting The Main Analysis Parametrs
Setting the main analysis parametrs After inserting the smoke probe in the stack and, if necessary, set up any probe to measure the combustion air temperature in the special pick-up manifold, you can proceed, if not previously done, to the configuration alla configurazione of the analysis mode setting the requested data: J100000000SE 038161 191121... -
Page 30: Analysis Parameters
8.4.1 Analysis parameters Through this menu the user can configure the available parameters for a proper combustion analysis. PARAMETER FUNCTION Lets the user select the type of fuel to be used during analysis. By selecting the sub menu Fuel coefficients the user can view the characteristics of Fuel the fuels used in the calculation of performance The burner efficiency figure when condensation takes place is influenced by... - Page 31 The CO sensor is protected by a pump which, in case of need, can inject clean air in the gas path in order to dilute the gas concentration measured by the sensor. This function can be either triggered by the overcoming of a CO concentration threshold which can be set by the user or, in case it is known that the flue gases contain high CO concentration, kept enabled any time, independently of CO concentration.
-
Page 32: Start And End Of The Combustion Analysis In Manual Mode
Start and end of the combustion analysis in manual mode Turns on / off the smoke probe. If the pump is switched off, the refresh of the current measures is freezed. Pressed for the first time it starts the analysis; at this time, the first sample is already stored. When it is pressed afterwards, at each press acquires the next measure. -
Page 33: Starting The Combustion Analysis On Automatic Mode (Uni10389 And Data Logger)
Starting the combustion analysis on automatic mode (UNI10389 and Data Logger) Turns on / off the smoke probe. If the pump is switched off, the refresh of the current measures is freezed. Starts the combustion analysis in accordance with the set analysis parameters. Pause the current analysis. -
Page 34: Ending The Combustion Analysis On Automatic Mode (Uni10389 And Data Logger)
8.6.1 Ending the combustion analysis on automatic mode (UNI10389 and Data Logger) Turns on / off the smoke probe. If the pump is switched off, the refresh of the current measures is freezed. Starts the combustion analysis in accordance with the set analysis parameters. LAST ANALYSIS: Date and time of the last performed analysis. -
Page 35: End Of Analysis
END OF ANALYSIS - At the end of the combustion analysis, carefully remove the sample probe and remote air temperature probe, if used, from their relative ducts, taking care not to get burnt. - Switch off the instrument by pressing the On/Off key. At this point, if the instrument has detected a high concentration of CO and/or NO, a self-cleaning cycle will be initiated during which the pump will draw fresh outside air until the gas levels drop below acceptable values. -
Page 36: Operator
It will be the customer’s responsibility to match the operator’s name to the relevant avatar in the menu. It is possible to add/modify one or more operator’s name, who uses the instrument, exclusively through the PC installing the special software “Seitron Smart Analysis” which can be downloaded from the website www.seitron.com. Daniel Seig... -
Page 37: 10.0 Measurements
10.0 MEASUREMENTS This combustion analyzer is able to perform several other measurements, accessible from the home page of the instrument in the “Measurements” menu. MEASURE REFERENCE CHAPTER Draft 10.1 Black smoke 10.2 Ambient CO 10.3 Temperature 10.4 Pressure 10.5 “P gas” gas network pressure 10.6 Ventilation test 10.7... -
Page 38: Draft Measurement
10.1 Draft measurement This menu allows you to measure the stack draft. WARNING! The measurement may not be accurate due to condensation inside the gas probe. Should you notice an inaccurate or unstable reading on the instrument, it is advisable to disconnect the gas probe from the instrument itself, and purge pipes by blowing with a compressor. -
Page 39: P Gas" Measures Network Gas Pressure
10.6 “P gas” Measures network gas pressure It is possible, using an external tube, to connect to P3 input and measure the inlet pressure of the network gas within the range set on P3 at chapter 18 “Measurement and accuracy ranges. 10.7 Ventilation measurement The menu VENTILATION allows to perform the test of the ventilation openings correct operation, through the measurement of the static... -
Page 40: Tightness Test
10.8 Tightness test The analyzer can perform the system tightness test, which system uses combustible gas; the test is divided for New/re-newed plants or Existing plants. The tightness test results, which execution modes are listed below, they can be saved in memory and / or printed. 10.8.1 New piping With this menu it is possible to perform a tightness test on new systems or systems that have been restored after a repair. - Page 41 During the tightness test phase the following values are displayed: Pressure measured at the beginning of the test. Pressure actually measured by the instrument. ∆P: Pressure variation with respect to the initial value. In case the actual pressure is lower than the initial value (pressure is decreasing) this value has a negative sign.
-
Page 42: Existing Piping
10.8.2 Existing piping With this menu it is possible to perform a tightness test on existing systems. Details of the test: This test requires to charge the piping up to the test pressure, then wait for an unspecified stabilization time until the thermal effects caused by the test gas compression are nulled, and then calculate the amount of the possible leakage from the measure of the pressure decays in 1 minute time. - Page 43 Table volumes: Examples relating to the various lengths of indoor systems, capacity approximately corresponding to 18dm , depending on the material and the diameter of the fuel gas adduction pipe. Steel Copper / Multilayer/ Polyethylene Diameter length (m) Internal diameter (mm) length (m) 1/2”...
- Page 44 Non compliant (not suitable for operation): in this situation the measured leakage is such that the piping is not suitable for operation and must immediately placed out of order. Once the leakage problem has been fixed the piping must tested again for its tightness according to the new plant procedure. Operator: if the Δ...
-
Page 45: 11.0 Settings
11.0 SETTINGS The configuration menu is featured with all the reference parameters of the instrument, the information about the instrument status and the diagnostic, in order to check any anomalies. PARAMETER REFERENCE CHAPTER Instrument 11.1 Operator 11.2 Information 11.3 Diagnostic 11.4 Autozero 11.5... -
Page 46: Instrument Configuration
11.1 Instrument configuration 11.1.1 Bluetooth® Through this sub menu the user can turn on and off the instrument Bluetooth® wireless and visualization of the MAC address of the instrument. When Bluetooth® is on, the icon “ “ appears on the screen. WARNING! WHEN THE INSTRUMENT BLUETOOTH INTERFACE IS TURNED ON, THE BATTERY LIFE IS REDUCED DOWN TO 10 HOURS. -
Page 47: Diagnostic
11.4 Diagnostic The user, through this menu, can check any instrument anomalies. 11.4.1 FW update This menu is not accessible by the user because it is strictly reserved for the assistance centers. 11.4.2 Maintenance The parameters in this menu are not accessible to the user as they are for the exclusive use of the assistance centers. 11.4.3 Pump In this submenu the user can temporarily turn the gas suction pump on or off. -
Page 48: Gas Probe
11.4.6 Gas probe Tests the tightness of the gas probe pneumatic path. To proceed with the leak test of the smoke probe, proceed as indicated in the following points: 1. Connect the flue gas sampling probe and filter unit assembly to the instrument; 2. -
Page 49: 12.0 Print
12.0 PRINT The analyzer can print a report ticket with the results of all the preformed measures, according to the settings made in this menu. The printing is carried out with the internal printer module, if the instrument is provided with it, or using an external printer with Bluetooth® communication. -
Page 50: Printer
12.1 Printer Allows to choose the kind of printer, internal (Int) or external (Ext) with Bluetooth® communication. If you choose the external printer will be necessary to perform the pairing procedure to pair the Bluetooth® printer to the instrument. 12.1.1 Pairing BT Through this sub menu, the user can access to the association procedure between the instrument and a Bluetooth®... -
Page 51: Measures List
12.3 Measures list In this submenu it is possible to show the list of the measures which the instrument can perform and which will be printed on the tickets, if enabled. If a measurement is disabled it will not be printed even if acquired in the combustion analysis phase. Another important function available in this submenu, is sorting the list of measurements using the appropriate interactive function. -
Page 52: 13.0 Archive
13.0 ARCHIVE All the performed combustion analyses/measures are saved in the instrument archive. J100000000SE 038161 191121... -
Page 53: Archive Organization
13.1 Archive organization Select the folders visualization mode in the Example of viewing the archive by customer archive. name. Memory Usage: The yellow bar indicates "Search" function: search by text or by date. the used memory space. Change the archive view to: CUSTOMER: Folders are displayed per customer. -
Page 54: Maintenance
At least once a year send the instrument to a SERVICE CENTRE for a complete overhaul and thorough internal cleaning. SEITRON’s highly qualified staff is always at your disposal and will provide you with all the sales, technical, application and maintenance details required. -
Page 55: Cleaning The Smoke Probe
2. Six seals on the connector of the smoke sampling probe and on the connector of the related extension. 3. Two seals present on the tip attachment of the smoke sampling probe. 14.2.2 Cleaning the smoke probe When you have finished using the smoke probe, before storing it inside its case it is a good rule to clean it as described below: - Unplug the smoke probe. -
Page 56: Maintenance For The Water Trap / Smoke Filtering Unit
14.2.3 Maintenance for the water trap / smoke filtering unit Through the side opening, it is possible to verify the level of the water trap, by checking the notches on the side of the analyzer and the condition of the dust filter. Particulate filter Upper notch... - Page 57 To perform maintenance, it is necessary to remove the entire water trap / smoke filter unit from the instrument, as indicated below: 1. The instrument must be switched off. 2. Using the special flaps, turn left the water trap unit. 3.
- Page 58 Replacing the dust filter If the dust filter is black or dirty, especially on the outer surface, or clogged with humidity it is necessary to replace it immediately: 7. Turn right the filter holder. 8. Pull off the filter. 9. Clean with just water and dry all the plastic parts of the case holding the filter, separating it before the water collector (see point 4).
-
Page 59: Instrument Internal Parts Access
TUTTI I DIRITTI RISERVATI. N° di Pr Nessuna parte di questo documento può essere riprodotta in alcuna forma (compresa la copia fotostatica o la memorizzazione su qualsiasi supporto Firmato J100000000SE 038161 191121 elettronico) senza l'autorizzazione scritta di SEITRON S.p.A. a socio unico... -
Page 60: Sensor Replacement
Sensor replacement The only sensor which the user can replace on his own is the Oxygen sensor. In order to replace all the other sensors, it is necessary to send the instrument to an assistance center authorized Seitron. 14.2.6 Replacing the Oxygen sensor... - Page 61 Firmato digitalmente Data : 04/05/2021 Nessuna parte di questo documento può essere riprodotta in alcuna forma elettronico) senza l'autorizzazione scritta di SEITRON S.p.A. a socio unico (compresa la copia fotostatica o la memorizzazione su qualsiasi supporto Firmato digitalmente Data : 04/05/2021 elettronico) senza l'autorizzazione scritta di SEITRON S.p.A.
-
Page 62: Battery Replacement
14.2.7 Battery replacement In order to replace the battery package proceed as described below: 1. Remove the battery connector. 2. Remove the battery pack. 3. Insert the new battery; in order to close back the instrument, reverse the operations described above. J100000000SE 038161 191121... - Page 63 14.2.8 Replacing the paper roll of the internal printer (if provided) To replace the printer paper roll, follow the operations described below. 1. Open the paper roll compartment lid, pulling upward the two sockets indicated by the arrows: 2. Fully raise the entire lid lock. 3.
-
Page 64: Instrument Expandability
3. Open the software “Seitron Smart Analysis” and make the login with e-mail address and password; if you are at the first access you need to register. If the software is not installed on the PC, it is necessary to download it from the website www.seitron.it at the section “Download - App and Software”. -
Page 65: 15.0 Gas Sensors
Sensor characteristics diminish as the reagents are consumed and when these have been used up completely the sensor must be replaced. The sensors must be recalibrated on a regular basis to assure measuring accuracy: recalibration can only be performed by a qualified SEITRON service centre. -
Page 66: Co2 Sensor For Carbon Dioxide Measurement In Combustion Processes
15.2 CxHy sensor for measurement of the unburnt hydrocarbons The unburnt hydrocarbons are chemicals produced by an incomplete combustion of molecules (hydrocarbons) made of Carbon and Hydrogen. These are usually named as HC or (better) CxHy: when this is filled with the actual values for the number of C and H atoms, the actual type of fuel is exactly defined. -
Page 67: 16.0 Technical Specifications
16.0 TECHNICAL SPECIFICATIONS Autozero: Automatic autozero cycle with probe inserted in the stack. Dilution (where required): Measure range expansion system of the CO sensor up to 100.000ppm (10,00%) programmable as simple protection of the CO sensor, user programmable intervention threshold. Gas measurement sensors: Up to 4 configurable sensors: electrochemical, NDIR and pellistors. -
Page 68: Analyzer Dimensions
16.1 Analyzer dimensions 16.2 Case size J100000000SE 038161 191121... -
Page 69: 17.0 Measurement And Accuracy Ranges
17.0 MEASUREMENT AND ACCURACY RANGES MEASUREMENT RANGE RESOLUTION ACCURACY RESPONSE TIME RECALIBRATION AVERAGE POSITION LIFE 0.1% vol ±0.2% vol Yearly 48 months S4 0-25% Vol. Yearly 48 months S1 1 ppm ±10 ppm 0…200 ppm 0-8000 ppm ±5% m.v. 201…2000 ppm compensated H2 ±10% m.v. - Page 70 MEASUREMENT RANGE RESOLUTION ACCURACY RESPONSE TIME RECALIBRATION AVERAGE POSITION LIFE Pressure (P3) -100.0 .. 500.0 hPa 0.01 hPa ±1% m.v. -2.01 .. -100.0 hPa ±0.02 hPa -2.00 .. +2.00 hPa ±1% m.v. +2.01 .. +500.00 hPa Air index 0.00 .. 9.50 0.01 Excess air (“e”) 0 ..
-
Page 71: 18.0 Spare Parts And Servicing
Plastic case AJ TA01 Water trap / smoke filtering unit AAC FA01 Anti dust filter (1 piece) AA RC10 Thermal paper roll for integrated printer; size 57x35mm Novo O2-LL sensor, pre-calibrated and interchangeable 18.2 Accessories CODE DESCRIPTION AAST04 Bluetooth® printer... -
Page 72: Service Centres
18.3 Service Centres Seitron S.p.A. a socio unico Via del Commercio, 9/11 36065 Mussolente (VI) Tel.: +39.0424.567842 Fax.: +39.0424.567849 E-mail: info@seitron.it http://www.seitron.it Seitron Service Milano Via Leonardo da Vinci, 1 20090 Segrate (MI) Tel. / Fax: +39.02.836.476.71 E-mail: service.milano@seitron.it J100000000SE 038161 191121... -
Page 73: Annex A - Seitron Smart Analysis App
ANNEX A - Seitron Smart Analysis APP Data Management with “SEITRON SMART ANALYSIS” APP. SCAN THE QR CODE USING SEITRON APP “SEITRON SMART ANALYSIS”, TO DOWNLOAD THE ACQUIRED DATA. Novo THE ACQUIRED DATA ARE SAVED IN THE INSTRUMENT MEMORY. APP settings. - Page 74 Louis C. Novo S1500-NP REFERENCE SETTING Insert an email address if different from the default one. Select one of the two modes of data sharing. Select the file format to share. Select the application to use for sending. Example of the exported csv file and imported in an excel file:...
-
Page 75: Annex B - Report
Eff. cond 0.0 % 14 ppm Eff. tot 90.0 % 15 ppm Oper.: John Smith 23 ppm Ref. O2: 0.0 % Model: Novo 14 ppm CO ref 92 ppm Serial: 999989 15 ppm Ref. O2: 0.0 % Ref. O2: 0.0 %... - Page 76 Example of Synthetic Paper print-out. COMPANY Ltd. Date: 05/05/2021 Park Road, 9 Time: 10.30 Tel.02/12345678 Fuel: Natural gas Oper.: John Smith Altitude: 0 m Model: Novo R.H. air: 50 % Serial: 999989 15.7 % Sign.: ______________ 2.9 ppm 4.01 Date: 05/05/2021 T flue 95.4 °C...
- Page 77 Park Road, 9 Park Road, 9 Park Road, 9 Tel.02/12345678 Tel.02/12345678 Tel.02/12345678 Oper.: John Smith Oper.: John Smith Oper.: John Smith Model: Novo Model: Novo Model: Novo Serial: 999989 Serial: 999989 Serial: 999989 Sign.: ______________ Sign.: ______________ Sign.: ______________ Date: 05/05/2021...
-
Page 78: Annex C - Optional Measures List
ANNEX C - Optional measures list MEASURE DEFINITION λ, n (l,n) Air index (defined as λ, sometimes also indicated as n). Air excess. E (Exc. Air) Expressed as a percentage according to the formula in the appendix B, is the ratio between the volume of air actually entering the combustion chamber and the one theoretically needed. - Page 79 MISURA DEFINIZIONE CO (REF) CO quantity measurement with O2 reference. Measurement units: ppm - mg/m3 - mg/kWh - g/GJ - g/m3 - g/kWh - % - ng/J CO amb. ext. Measure of the outer CO level when using the external CO probe. Measurement unit: ppm.
-
Page 80: Annex D - Coefficients Of The Fuels And Formulas
ANNEX D - Coefficients of the fuels and Formulas The following chart lists the coefficients of the memorised fuels, used for calculating losses and efficiencies. Coefficients for calculating combustion efficiency Fuel CO2t M aria M H2O V gas dry (KJ/Kg) (KJ/Kg) (Kg/Kg) (Kg/Kg) -
Page 81: Warranty Certificate
48 months from purchasing date. Seitron undertakes to repair or replace, free of charge, those parts that, in its opinion, are found to be faulty during the warranty period. The products which are found defective during the above mentioned periods of time have to be delivered to Seitron Laboratories carriage paid. The following cases are not covered by this warranty: accidental breakage due to transport, inappropriate use or use that does not comply with the indications in the product’s instruction leaflet. - Page 82 J100000000SE 038161 191121...
-
Page 83: Troubleshooting
TROUBLESHOOTING SYMPTOM PROBABLE CAUSES AND REMEDIES The instrument does not work at all. a. Keep the On/Off key depressed for at least 3 seconds. When the On/Off pushbutton is pressed the instrument does not come b. The battery is low; connect the battery charger to the instrument. c. - Page 84 The built-in printer of the instrument does not print correctly. a. Check the type of paper you are using as it should only be thermal paper. b. Check the direction of the paper roll. c. If the paper is not dragged, check the closure of the printer door and the integrity of the feed roller.
- Page 85 J100000000SE 038161 191121...
- Page 86 Seitron S.p.A. a socio unico Via del Commercio, 9/11 - 36065 - MUSSOLENTE (VI) ITALY Tel. 0424.567842 - info@seitron.it - www.seitron.com...
Need help?
Do you have a question about the NOVO and is the answer not in the manual?
Questions and answers