Table of Contents
Advertisement
Available languages
Available languages
Quick Links
Advertisement
Table of Contents

Related Manuals for Scheppach Forsa 3.0


Summary of Contents for Scheppach Forsa 3.0
- Page 1 Forsa 3.0 1901706901 230 V 1901706902 400 V Forsa 3.1 1901707901 230V 1901707902 400V 1901706851 | 06/2016 Formatkreissäge Original-Anleitung Circular panel sizing saw Translation of the original operating instructions...
- Page 3 Formatkreissäge Circular panel sizing saw...
- Page 4 Schaltplan / Wiring diagram 230V Schaltplan / Wiring diagram 400V...
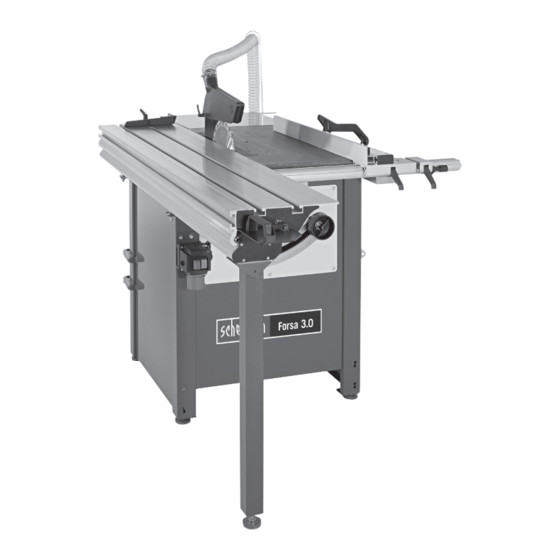
- Page 5 Maschinenteile 1. Schlauchhalter 2. Tischverlängerung 3. Spaltkeil 4. Besäumanschlag 5. Schutzhaube 6. Sägeblatt 7. Querschneidlehre 8. Schiebetisch 9. Stützfuß 10. Ein-/Ausschalter und Elektrischer Anschluss 11. Handrad-Höhenverstellung 12. Längsanschlag 13. Handrad Winkelverstellung 14. Feineinstellung-Längsanschlag 15. Absaugschlauch 16. Schiebestock 17. Schiebegriff...
-
Page 6: Technische Daten
Hersteller scheppach Fabrikation von Holzbearbeitungsmaschinen GmbH D-89335 Ichenhausen Lieferumfang Formatkreissäge Forsa 3.0 - Teilmontiert Sägeblatt Ø 270 mm Längsanschlag Querschneidlehre Besäumanschlag Tischverlängerung Schiebestock Schiebegriff Montagewerkzeug Montagezubehör Bedienungsanweisung Technische Daten Maschinendaten Forsa 3.0 Forsa 3.0 Artikelnummer 1901706901 1901706902 Technische Daten Gesamtlänge... -
Page 7: Allgemeine Hinweise
Das geforderte Mindestalter ist einzuhalten. Neben den in dieser 3. Reparaturen durch Dritte, nicht autorisierte Fachkräfte. Bedienungsanweisung enthaltenen Sicherheitshinweisen und den Einbau und Austausch von ,,Nicht Original scheppach Ersatz- besonderen Vorschriften lhres Landes sind die für den Betrieb von teilen“. - Page 8 Werkzeug gefordert, abgesaugt. Dies spart Strom und reduziert den • Es dürfen nur Original scheppach Werkzeuge und Zubehör Lärm. Die Absauganlage Iäuft nur während die Arbeitsma- eingesetzt werden. Je nach Schnitt- und Holzart (Massivholz, schine betrieben wird. Für Arbeiten im gewerblichen Bereich Sperrholz oder Spanplatten) das erforderliche Sägeblatt nach...
-
Page 9: Aufstellen Und Justieren
Tragen Sie beim Arbeiten mit der Formatkreissäge immer eine Schutzbrille und Gehörschutz! Aufstellen und justieren Achten Sie beim Aufstellen der Maschine, dass Ihnen ausreichend Platz zur Verfügung steht. Forsa 3.0: 3800 mm Forsa 3.1: 4800 mm Foras 3.0: 2000 mm Forsa 3.1: 2300 mm... -
Page 10: Schutzhaube Montieren
Befestigen der Maschine Befestigen Sie die Maschine am Boden, insbesonders, wenn Sie beson- derst große Werkstücke bearbeiten. • Befestigen Sie die Maschine am Boden. Hierzu sind an allen vier Gestell- füßen Bohrungen (1) angebracht, dies ermöglicht das Verschrauben der Maschine am Boden. Montieren Sämtliche Montage- und Umrüstarbeiten dürfen nur bei gezogenem Netzstecker erfolgen. - Page 11 • Stecken Sie die Schlossschraube (2) durch das Vierkantloch in der Schutz- haube (1). • Führen Sie die in der Schutzhaube (1) montierte Schlossschraube (2) in die Nut des Spaltkeils (3) schlagen Sie diese nach hinten an. • Setzen Sie die Scheibe (2) auf die Schlossschraube. •...
-
Page 12: Tischverlängerung Montieren
Längsanschlag Montieren • Setzen Sie den Längsanschlag (1) auf die Führungsschiene und sichern Sie diesen mit den Klemmhebeln (2). Tischverlängerung Montieren Benötigte Teile: 1x Tischplatte 1x Stützwinkel rechts 1 1 1 1 1 1x Stützwinkel links 6x Sechskantmutter M8 10x Scheibe 8 1x Schlauchhalter 11x Sechskantschraube M8x16 1x Halteplatte... - Page 13 • Schrauben Sie die Halteplatte (1) mit 1 Sechskantschraube M8x16 (2) und einer Sechskantmutter M8 an der Tischplatte (3) an. • Schrauben Sie den Schlauchhalter (4) in die vordere Bohrung der Halteplat- te (1) und sichern Sie diese mit der Scheibe A6,4 (5) und mit der Sechs- kantmutter M6 (6).
-
Page 14: In Betrieb Nehmen
Transportieren Sichern Sie vor dem Transport alle Teile gegen verrutschen. • Benutzen Sie zum Transport der Maschine einen Hubwagen oder die Fahrvorrichtung aus dem scheppach Zubehör. • Heben Sie die Maschine nicht am Tisch hoch. Inbetriebnehmen Beachten Sie vor der Inbetriebnahme die Sicherheitshinweise Sämtliche Schutz- und Hilfseinrichtungen müssen montiert sein. - Page 15 Sägeblattwechsel WICHTIG: Nur gut geschärfte, rissfreie, nicht verformte Original scheppach Sägeblätter einsetzen Es dürfen nur Sägeblätter mit einem Durchmesser von 250 mm - 270 mm eingebaut werden. Bei ausgeschlagenem Sägespalt die Tischeinlage erneuern. ACHTUNG! Bei Sägeblattwechsel Netzstecker ziehen! Ziehen Sie den Formatschiebetisch (1) zum Bedienplatz hin. Soweit, dass •...
-
Page 16: Spaltkeil Einstellen
• Lösen Sie die Sechskantmutter (2) mithilfe des Schlüssels (1), der im Liefer- umfang enthalten ist. • Halten Sie mit dem Festhaltedorn die Sägewelle fest. • Ziehen Sie den Sägeblatt-Spannflansch (3) von der Sägewelle. • Entnehmen Sie das Sägeblatt (4) (Achtung! Schnittgefahr, tragen sie Handschuhe!) •... - Page 17 • Stellen Sie den Spaltkeil so ein, dass der Abstand Zwischen Spaltkeil und Sägeblatt mindestens 3 mm aber nur höchstens 8 mm beträgt. • Stellen Sie den Spaltkeil nie tiefer als die Zahngrundhöhe des obersten Sägezahns ein. • Stellen Sie den Spaltkeil auf max. 2 mm unter der obersten Sägezahnspitze ein.
-
Page 18: Wichtige Hinweise
Anschlagschiene ......................... Art.Nr. Werkstückspanner ........................Art.Nr. Weitere Informationen finden Sie unter: www. scheppach.com oder bei Ihrem scheppach-Fachhändler Elektrischer Anschluss m Der installierte Elektromotor ist betriebsfertig angeschlossen. Der Bei Überlastung des Motors schaltet dieser selbsttätig ab. Anschluss entspricht den einschlägigen VDE- und DIN-Bestim- Nach einer Abkühlzeit (zeitlich unterschiedlich) lässt sich der... -
Page 19: Wartung Und Reparatur
Drehstrommotor Lebensgefährlich. Der Elektromotor 400 V / 50 Hz ist für Betriebsart S6/40% ausgeführt Elektrische Anschlussleitungen regelmäßig auf Schäden überprü- • Die Netzspannung muss 400 Volt – 50 Hz betragen. fen. Achten Sie darauf, dass beim Überprüfen die Anschlusslei- • Netzanschluss und Verlängerungsleitung müssen 5adrig sein tung nicht am Stromnetz hängt. -
Page 20: Fehlerbehebung
Einstellen Spaltkeil fluchtet nicht mit Sägeblatt Spaltkeileinstellung nicht richtig Spaltkeil neu einstellen Bei Fehlern, die Sie nicht selbst beheben können, wenden Sie sich bitte an den Service der Firma scheppach. E-Mail: service@scheppach.com Telefon: 00 49/82 23/40 02-99... -
Page 21: Original Eg-Konformitäts- Erklärung
Wir, die scheppach Fabrikation von Holzbearbeitungsmaschinen GmbH erklären, dass die nachfolgend beschriebene Maschine Formatkreissäge Forsa 3.0, ab Seriennummer 1001, Artikel Nr. 1901706901, Artikel Nummer 1901706902 Formatkreissäge Forsa 3.1, ab Seriennummer 1001, Artikel Nr. 1901707901, Artikel Nummer 1901707902 allen Einschlägigen Anforderungen der EG-Maschinenrichtlinie 2014/35/EU entspricht. -
Page 22: Machine Parts
Machine parts 1. Hose bracket 2. Table extension 3. Riving knife 4. Trimming stop 5. Protective cover 6. Saw blade 7. Transverse cutting gauge 8. Sliding table 9. Support feet 10. On/off switch and electrical connection 11. Handwheel height adjustment 12. -
Page 23: Scope Of Delivery
Manufacturer scheppach Fabrikation von Holzbearbeitungsmaschinen GmbH D-89335 Ichenhausen Scope of delivery Panel sizing saw Forsa 3.0 - Part assembled Saw blade Ø 270 mm Lengthwise aligning stop Transverse cutting gauge Trimming stop Table extension Push rod Push grip Assembly tool... -
Page 24: General Information
5. With accessories as well as wearing parts and replacement economic operation of the machine, for avoiding danger, for mini- parts use only original scheppach parts. Replacement mising repair costs and downtimes and for increasing the reliability parts can be obtained from your dealer. -
Page 25: Protective Clothing
For ext- • The scheppach panel sizing saw is defined as a machine per racting the wood chippings or sawdust a suitable scheppach EN 1870/-1. suction system should be employed. The flow speed at the •... -
Page 26: Setup And Calibration
Always wear safety goggles and hearing protection when working with the panel sizing saw! Setup and calibration When setting up the machine ensure that there is sufficient space available. Forsa 3.1: 4800 mm Forsa 3.0: 3800 mm Forsa 3.0:2000 mm Forsa 3.1: 2300 mm Forsa 3.0... -
Page 27: Assembling The Sliding Table
Fastening the machine Fasten the machine to the ground, especially if particularly large workpie- ces will be processed. Fasten the machine to the ground. Holes are provided on all four feet (1) to • enable the machine to be bolted to the floor. Assembling All installation and refitting work may only be carried out with the mains plug removed. - Page 28 • Insert the coach bolt (2) through the square hole in the protective hood (1). • Guide the coach bolt (2) installed in the protective hood (1) into the groove in the clamping wedge (3) and drive this towards the rear. •...
- Page 29 Assembling the lengthwise aligning stop • The lengthwise aligning stop has already been completely fitted. • Place the lengthwise aligning stop (1) on the guide rail and secure it with the clamping levers (2). Assembling the table extension Parts required: 1x tabletop 1x support bracket, right 1 1 1 1 1...
- Page 30 • Screw the retaining plate (1) to the tabletop (3) with 1 hexagonal screw M8x16 (2) and a hexagonal nut M8. • Screw the hose bracket (4) into the front hole of the retaining plate (1) and secure it with the washer A6.4 (5) and with the hexagonal nut M6 (6). •...
-
Page 31: Saw Blade Height Adjustment
Transportation Secure all parts to prevent them sliding before transportation. • Use a pallet truck or the transport device from the scheppach accessories to transport the machine. • Do not lift the machine by the table. Start up Observe the safety instructions before the start up All safety devices and aids must be installed. -
Page 32: Saw Blade Replacement
Saw blade replacement IMPORTANT: Only use well-sharpened, crack-free, non-deformed original scheppach saw blades Only saw blades with a diameter of 250 mm - 270 mm may be installed. Renew the table insert if the sawing gap has become worn. ATTENTION! Pull out the mains plug before replacing the saw blade! •... -
Page 33: Adjusting The Riving Knife
• Loosen the hexagonal nut (2) with the help of the spanner (1), which is included in the scope of delivery. • Hold the sawing shaft in position with the locking mandrel. • Pull the saw blade clamping flange (3) away from the sawing shaft. •... - Page 34 • Set the riving knife such that the distance between the riving knife and the saw blade is a minimum of 3 mm but not more than 8 mm. • Never set the riving knife deeper than the tooth base height of the upper- most saw tooth.
-
Page 35: After Use
• Use the push grip to slide small specially shaped workpieces. You can make your own custom wooden push blocks and fasten them to the push grip. • Use the push grip to slide small workpieces. You can make your own cus- tom wooden push blocks and fasten them to the push grip. -
Page 36: Maintenance And Repair
Stop rail ............................Art.Nr. Workpiece clamp......................... Art.Nr. You can find further information at: www. scheppach.com or from your scheppach dealer Electrical connection m The electrical motor installed is connected and ready for opera- power when checking for damage. tion. The connection complies with the applicable VDE and DIN Electrical connection cables must comply with the applicable VDE provisions. -
Page 37: Belt Tension
• Occasionally, clean wood residues and sawdust from the guard casing of the saw. • Occasionally, oil all moveable parts. • Always keep the machine table free from resin. • required, using dry lubricant, treat the surface of the guide rail as well as the underneath of it. - Page 38 Riving knife not aligned with saw blade Riving knife not set properly Readjust riving knife In the event of faults that you are unable to rectify yourself, then please contact the scheppach customer service department. E-Mail: service@scheppach.com Tel.: 00 49/82 23/40 02-99...
-
Page 39: Ec Declaration Of Conformity
We, scheppach Fabrikation von Holzbearbeitungsmaschinen GmbH hereby declare that the machine described below Circular panel sizing saw Forsa 3.0, from serial number 1001, item no. 1901706901, item no. 1901706902 Cirvular panel sizing saw Forsa 3.1, from serial number 1001, item no. 1901707901, item no. 1901707902 complies with the applicable provisions of the EU Machinery Directive 2014/35/EU. -
Page 40: Ersatzteile / Spare Parts
Ersatzteile / Spare parts... - Page 41 02144005 02144005 02093364 ohne Skala 1901706018 54600073 05007101 02144005 1901706016 02093367 05005306 54630189 1901706002 mit Skala 02093405 02902108 1901706017 54720266 (Forsa 3.0) 02091262 54720267 54720268 (Forsa 3.1) 02093602 02098506 02902109 02091334 02148105 02902109 54720269 02093406 79641114 02144006 05006017 02091262 54720267...
- Page 43 05006201 05006311 02734905 53000068 02734904 02060318 54720420 54720421 54720228 02060325 54007016 02093406 53000071 02798122 05009501 53206207 53007302 05006311 02091237 02144004 02144004 05020204 02798509 54107210 54107212 54700088 54700133 01147213 01209301 54600071 54700133 54107214 54107217 01209306 54600076 01209301 01734636 54107214...
- Page 44 54700400 02031620 54630164 53205008 02093364 02093404 02144005 53205012 02093405 02093365 02902106 02093405 1901706023 02144005 02093405 1901706024 53206507 53206208 02093401 79631103 6 mm=01091107 5 mm=01091106 4 mm=01091105 01089406 01089410...
- Page 47 Deutschland Slovakia Nur für EU-Länder Len pre štáty EÚ Werfen Sie Elektrowerkzeuge nicht in den Hausmüll! Elektrické náradie nevyhadzujte do komunálneho odpadu! Gemäß europäischer Richtlinie 2002/96/EG über Elektro- und Elektronik- Podía európskej smernice 2002/96/EG o nakladani s použitými Altgeräte und Umsetzung in nationales Recht müssen verbrauchte elektrickými a elektronickými zariadeniami a zodpovedajúcich ustanovení...
- Page 48 Vidare kan garantikrav omkostningar, men kunden står för installationen. Vår garanti täcker endast orginal scheppach-delar. Anspråk på garanti öreligger inte för: endast ställas för maskiner som inte har reparerats av tredje part.
Need help?
Do you have a question about the Forsa 3.0 and is the answer not in the manual?
Questions and answers