Table of Contents
Advertisement
Advertisement
Table of Contents

Related Manuals for Koso RX2N


Summary of Contents for Koso RX2N
- Page 1 INSTRUCTION wh015ba013 CDI & F I...
-
Page 2: Table Of Contents
The button function instruction CDI & FI The screen switch instruction Thank you for purchasing KOSO RX2N GP style meter , before operating the unit, please read the instruction thoroughly and retain it for the future Select button function instruction reference. -
Page 3: Auto-Checking Screen
Auto-checking screen Meter size Check 5 Check 1 Check 6 Check 2 Check 7 11 mm 26.5 mm 32.5 mm 38.42 mm 135.7 mm 52 mm Check 3 Check 8 Check 4 It will enter the setting screen automatically when the first time you start it. CDI &... -
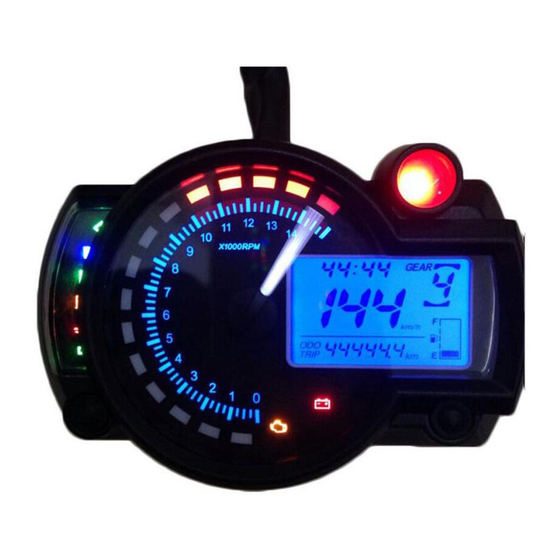
Page 4: Overview
Overview The max RPM recall indicator light Tachometer (10,000 RPM) The RPM shift light (10,000 RPM) Pre-Shift light The indicator light will move Display range: 0~10,000 RPM. Setting range: 1,000~10,000 RPM. Setting range: -500~-3,000 RPM according to the current RPM. Display unit: 250 RPM. -
Page 5: Function, Setting Instruction
Function, setting instruction Display range: 0~360 km/h (0~225 MPH) Over heat warning light Speedometer Setting range: 60~250 C (140~482 F) Display unit: km/h & MPH for alternative (Water & oil temperature) Setting unit: 1 C ( F) Display internal Top temperature record <0.5 second Display range: 0~250 C (32~482 F) Display range: 0~99999.9 km (mile),... -
Page 6: The Button Function Instruction
The button function instruction The screen switch instruction Select button In the setting screen, press down the Select button for 3 seconds to back to the main screen. 1.In main screen, press the Select button to choose the display of clock, water temperature or oil temperature. -
Page 7: Select Button Function Instruction
Adjust button function instruction Select button function instruction In main screen, press the Select button to choose In ODO function, press the Adjust button one the function combination you want to display on time to switch to the trip A function. the screen. -
Page 8: The Setting Screen Instruction
The setting screen instruction Adjust button The displayed odometer setting The real odometer record setting The backlight brightness setting The perpetual calendar setting In main screen, press down the Select & Adjust button at the same time for 3 seconds to enter the setting screen. -
Page 9: Speeding Warning Light Setting
Speeding warning light setting Press the Select button to return to a 1 setting In a 1 screen, press the Select button to enter screen. the speeding warning light setting screen. EX. Now the speeding warning light setting is EX. Now the setting is changed from 60 km/h 60 km/h. -
Page 10: The Rpm Shift Light Setting
The RPM shift light setting In a 2 screen, press the Select button to enter P.S. P.S. the RPM shift light setting screen. EX. Now the RPM shift light setting is 7,000 RPM. The yellow color pre-shift light will light on according to the shift light setting number. - Page 11 The RPM shift light setting Over heat warning light (Water temperature) setting Press the Adjust button to select the other In a 3 screen, press the Select button to enter setting screens. the over heat warning light (Water temperature) setting screen. If you just want to make this function setting, you could press down the Select button for 3 seconds to back to EX.
-
Page 12: Over Heat Warning Light (Water Temperature) Setting
Over heat warning light (Water temperature) setting Over heat warning light (Oil temperature) setting Press the Select button to return to a 3 setting In a 4 screen, press the Select button to enter screen. the over heat warning light (Oil temperature) EX. -
Page 13: Over Heat Warning Light (Oil Temperature) Setting
Over heat warning light (Oil temperature) setting The target speed timer / target distance timer setting Press the Select button to return to a 4 setting In a 5 screen, press the Select button to enter screen. the target speed timer and target distance EX. -
Page 14: The Target Speed Timer / Target Distance Timer Setting
Tire circumference and sensor point setting The target speed timer / target distance timer setting Now the target distance value is flashing! In a 6 screen, press the Select button to enter the tire circumference and sensor point setting The target distance timer setting range: screen. -
Page 15: Tire Circumference And Sensor Point Setting
Tire circumference and sensor point setting Press the Adjust button to choose the setting Press the Select button to return to a 6 setting value. screen. EX. Now the sensor point setting is changed from 1 to 6. When you leave this screen, the setting is finished. -
Page 16: Rpm Input Pulse & Signal Impulse Setting
RPM input pulse & signal impulse setting In a 7 screen, press the Select button to enter Press the Select button to enter the signal the RPM input pulse setting screen. impulse setting screen. EX. Now the RPM input pulse setting is 1 (4 Stroke, EX. -
Page 17: The Fuel Gauge Resistance And Insufficient Fuel Warning
The fuel gauge resistance and insufficient fuel warning setting In a 8 screen, press the Select button to enter Press the Select button to enter the insufficient the fuel gauge resistance and insufficient fuel fuel warning setting screen. warning setting screen. EX. -
Page 18: The Clock Setting
The clock setting Press the Select button to return to a 9 setting In a 9 screen, press the Select button to enter screen. the clock setting screen. EX. Now the time is 0:00. EX. Now the setting is changed from 0 to 5. When you leave this screen, the setting is finished. -
Page 19: The Perpetual Calendar Setting
5-10 The perpetual calendar setting The year setting range : 2000~2099. In a 10 screen, press the Select button to enter When you adjust the year and date, the the perpetual calendar setting screen. day will adjust automatically. EX. Now the perpetual calendar setting is 2000/01/01 Saturday. -
Page 20: The Backlight Brightness Setting
5-10 5-11 The perpetual calendar setting The backlight brightness setting Press the Adjust button to choose the setting In a 11 screen, press the Select button to enter value. the backlight brightness setting screen. EX. Now the backlight brightness is 5 (The brightest setting). -
Page 21: The Real Odometer Record Setting
5-12 5-13 The displayed odometer setting The real odometer record setting The real odometer record is for you to check In a 13 screen, press the Select button to enter how long the meter already worked. the displayed odometer setting setting screen. In a 12 screen, press the Adjust button to EX. -
Page 22: The Displayed Odometer Setting
5-13 The displayed odometer setting The power test screen instruction Press the Adjust button to select the other In main screen, press the Select & Adjust setting screens. button one time to enter the power test screen. If you just want to make this function setting, you could press down the Select button for 3 seconds to back to the main screen. -
Page 23: Target Speed Timer Test
Target speed timer test WARNING! P.S. P.S. 0 km/h 3 km/h Speed up 110 km/h Please use this function at racetrack to avoid traffic accidents. The timer is automatic, so when In power test screen, press the Select button your bike start to move the one time to enter the target speed timer test timer will start to count the time screen. -
Page 24: Target Distance Timer Test
Target distance timer test WARNING! P.S. P.S. Please use this function at racetrack to avoid Speed up traffic accidents. The timer is automatic, so when In power test screen, press the Select button your bike start to move the 2 times to enter the target distance timer test timer will start to count the time screen. -
Page 25: The Top Speed Test
The top speed test WARNING! P.S. P.S. Please use this function at racetrack to avoid traffic accidents. Speed up 0 km/h 3 km/h 180 km/h 179 km/h The timer is automatic, so When the speed In power test screen, press the Select button 3 when your bike start to decreases, times to enter the top speed test screen. -
Page 26: Trouble Shooting
Trouble shooting The following situation do not indicate malfunction of the meter. Please check the following before taking it in for repair. Trouble Check item Trouble Check item The meter doesn't work The power doesn't supply to the meter. The clock is incorrect. It is possible that the positive wire is when the power is on.
Need help?
Do you have a question about the RX2N and is the answer not in the manual?
Questions and answers
Where should I set the speed sensor
The speed sensor for the Koso RX2N should be set about 2 mm from the rotor. However, if the sensor is too close to the pickup, the speed reading may drop to zero at higher speeds. To avoid this, it is recommended to move the sensor as far from the pickup as possible while still maintaining a reliable signal.
This answer is automatically generated
There is no magnet with this item how do l set up the speedometer