Table of Contents
Advertisement
Available languages
Available languages
Owner's Manual
3000 Watt
AC Generator
Model No.
580.329120
Generator
Customer Helpline
1 - 8 0 0 - 2 2 2 - 3 1 3 6
HOURS: Mon. - Fri. 8 a.m. to 5 p.m. (CT)
CAUTION:
Before using this product, read this
manual and follow all its Safety Rules
and Operating Instructions.
Sears, Roebuck and Co., Hoffman Estates, IL 60179
Visit our Craftsman website: www.sears.com/craftsman
Part No. 186956 Draft 1 (07/11/2001)
• Safety
• Assembly
• Operation
• Maintenance
• Parts
• Español
Advertisement
Chapters
Table of Contents

Related Manuals for Craftsman 580.329120


Summary of Contents for Craftsman 580.329120
- Page 1 • Safety manual and follow all its Safety Rules • Assembly and Operating Instructions. • Operation • Maintenance Sears, Roebuck and Co., Hoffman Estates, IL 60179 • Parts Visit our Craftsman website: www.sears.com/craftsman • Español Part No. 186956 Draft 1 (07/11/2001)
-
Page 2: Table Of Contents
HOW TO ORDER PARTS ..BACK PAGE WARRANTY LIMITED WARRANTY FOR CRAFTSMAN GENERATORS SEARS warrants to the original purchaser that the alternator and engine for its portable generator will be free from defects in materials or workmanship for the items and period set forth below from the date of original purchase. -
Page 3: Safety Rules
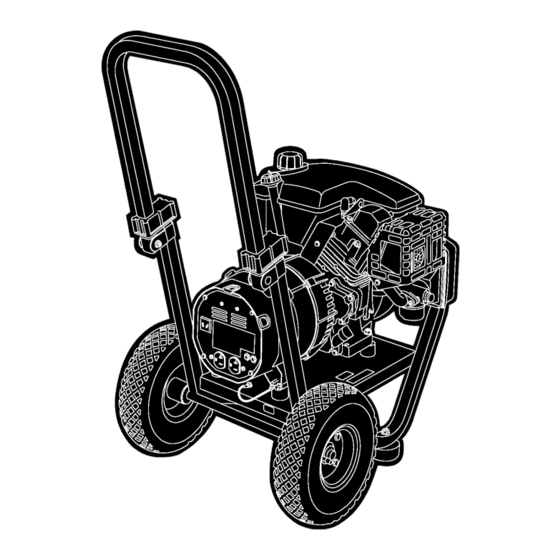
SAFETY RULES • Never operate the generator: WARNING: in rain; in any enclosed compartment; when connected electrical devices overheat; if electrical The engine exhaust from this product output is lost; if engine or generator sparks; if flame contains chemicals known to the State of or smoke is observed while unit is running;... - Page 4 KNOW YOUR GENERATOR Read the owner’s manual and safety rules before operating your generator. Compare the illustrations with your generator to familiarize yourself with the locations of various controls and adjustments. Save this manual for future reference. Fuel Tank Recoil Starter Oil Fill Cap/Dipstick Run/Stop...
-
Page 5: Assembly
ASSEMBLY TO REMOVE GENERATOR FROM ADJUST GUIDE HANDLE CARTON Your generator is equipped with a wheel kit for easy maneuvering. After you remove the generator from the • Slice two corners at end of carton from top to carton, adjust the guide handle. Use the following bottom so the panel can be folded down flat, then steps: remove all packing material. - Page 6 HOW TO USE YOUR GENERATOR Although multi-viscosity oils (5W30, 10W30, etc.) improve starting in cold weather, these oils will result If you have any problems operating your generator in increased oil consumption. Check your engine oil after reading the manual, please call the generator level more frequently to avoid possible damage from helpline at 1-800-222-3136.
- Page 7 To Start The Engine Stopping the Engine • Unplug all electrical loads from the generator • Unplug all electrical loads from the unit. Never start receptacles before starting the engine. Never start or stop the engine with electrical devices plugged or stop the engine with electrical devices in and turned on.
- Page 8 Charging a Battery • Connect battery charge cable connector plug to panel receptacle identified by the words WARNING! “12 VOLT D.C.” Storage batteries emit explosive gas while charging that remains around a • Connect battery charge cable clamp with red battery for a long time after it has been charged.
- Page 9 DON’T OVERLOAD THE • If the appliance, tool or motor does not give wattage, multiply volts times ampere rating to GENERATOR determine watts (volts x amps = watts). Overloading a generator in excess of its rated wattage • Some electric motors, such as induction types, capacity can result in damage to the generator and to require about three times more watts of power for connected electrical devices.
-
Page 10: Specifications
MAINTENANCE MAINTENANCE SCHEDULE Follow the hourly or calendar intervals, whichever occurs first. More frequent service is required when operating in adverse conditions noted below. 20 Hours or 50 Hours or 100 Hours or Maintenance Operation Every 5 Hours Every Season Every Season Every Season Check oil level... - Page 11 To Clean the Generator: • Check electrode gap with wire feeler gauge and set spark plug gap to 0.030 inch (0.76mm) if • Use a damp cloth to wipe exterior surfaces clean. necessary. • A soft bristle brush may be used to loosen caked on dirt, oil, etc.
-
Page 12: Storage
Clean and inspect the spark arrester as follows: Spark • Remove the screw that attaches the spark arrester Arrester screen. Muffler • Inspect the screen and replace if torn, perforated or otherwise damaged. Do Not use a defective screen. If screen is not damaged, clean it with commercial solvent. -
Page 13: Troubleshooting
TROUBLESHOOTING Problem Cause Correction One of the circuit breakers is open. Reset circuit breaker. Fault in generator. Contact Sears service facility. Engine is running, but Poor connection or defective cord set. Check and repair. no AC output is Connected device is bad. Connect another device that is in available. - Page 14 SCHEMATIC DIAGRAM...
-
Page 15: Schematic/Wiring Diagram
WIRING DIAGRAM... -
Page 16: Replacement Parts
PARTS CRAFTSMAN 3000 Watt AC Generator 580.329120 Main Unit — Exploded View... - Page 17 CRAFTSMAN 3000 Watt AC Generator 580.329120 Main Unit — Parts List Item Part # Qty. Description Item Part # Qty. Description B187358 HANDLE 67022 GROMMET, Rubber B186974 BASE 87962 BREAKER, Circuit, 10A 12Volt 85652 MOUNT, Vibration Alt. 26850 WASHER, M6 1/4 Shakeproof...
- Page 18 CRAFTSMAN 4 Cycle Engine 143.016005 Engine Exploded View...
- Page 19 CRAFTSMAN 4-Cycle Engine 143.016005 Engine Exploded View...
- Page 20 CRAFTSMAN 4-Cycle Engine 143.016005 Engine Parts List Item Part # Qty. Description Item Part # Qty. Description 37120B Cylinder (Incl. 2, 20 & 72) 650914 Nut, 1/4-28 26727 Dowel Pin 36629 Push Rod 651052 Washer 35626 Rocker Arm Cover Gasket...
- Page 21 CRAFTSMAN 4-Cycle Engine 143.016005 Carburetor Exploded View and Parts List Item Part # Qty. Description 640135A Carburetor 632762 Throttle Shaft & Lever Assembly 632763 Throttle Return Spring 631184 Dust Seal Washer 631183 Dust Seal (Throttle) 631036 Throttle Shutter 650506 Shutter Screw...
- Page 22 CRAFTSMAN 4-Cycle Engine 143.016005 Recoil Starter Exploded View and Parts List Item Part # Qty. Description 590748 Recoil Starter 590599A Spring Pin (Incl. 4) 590600 Washer 590679 Retainer 590601 Washer 590678 Brake Spring 590680 Starter Dog 590412 Dog Spring 590681 Pulley &...
- Page 23 NOTES...
-
Page 24: Emission System Warranty
EMISSION CONTROL SYSTEM WARRANTY CALIFORNIA & US EPA EMISSION Warranty Service can be arranged by contacting either a Tecumseh Authorized Service Outlet or by contacting CONTROL WARRANTY STATEMENT Tecumseh Products Co., c/o Service Manager, Engine and The U.S. Environmental Protection Agency (“EPA”), the Transmission Group Service Division, 900 North Street, California Air Resources Board (“CARB”) and Tecumseh Grafton, WI 53024-1499. - Page 25 B. General Emissions Warranty Coverage: Tecumseh 5. The owner shall not be charged for diagnostic labor Products Co. warrants to the original, end-use purchaser of which leads to the determination that a part covered the new engine or equipment and to each subsequent by the ECS Warranty is in fact defective, provided that purchaser that each of its small off-road engines is: such diagnostic work is performed at a Tecumseh...
-
Page 26: Español
ESPECIFICACIONES ........... 34 GARANTIA GARANTIA LIMITADA GENERADORES CRAFTSMAN SEARS le garantiza al comprador original que el alternador y el motor de su generador portátil estará libre de defectos en materiales y mano de obra en los componentes y por el período de tiempo establecido a continuación a partir de la fecha de compra original. -
Page 27: Reglas De Seguridad
REGLAS DE SEGURIDAD combustible podría rebosarse y caer sobre el motor ADVERTENCIA: caliente y ocasionar un INCENDIO o una EXPLOSION. • Nunca opere el generador: El escape del motor de este producto contiene en la lluvia; en espacios encerrados; si la velocidad del elementos químicos, los cuales son reconocidos en motor varía;... - Page 28 CONOZCA SU GENERADOR Lea este manual del propietario y las reglas de seguridad antes de operar su generador. Compare las ilustraciones con su generador para familiarizarse con la ubicación de los diferentes controles y ajustes. Conserve este manual para referencias futuras. Tanque de Combustible Arranque de Retroceso...
-
Page 29: Montaje
MONTAJE PARA RETIRAR EL GENERADOR AJUSTE LA MANIJA GUIA DE LA CAJA Su generador está equipado con un juego de ruedas para un manejo fácil. Después de retirar el generador de la caja, • Corte dos esquinas en el extremo de la caja de la parte deberá... - Page 30 COMO USAR SU GENERADOR • Coloque la generador en una superficie nivelada. • Limpie el área alrededor del llenado de aceite. SI TIENE PROBLEMAS operando su generador después de • Retire el tapón del orificio de llenado y la varilla de medición. leer el manual, por favor llame a la línea de ayuda para generadores al 1-800-222-3136.
- Page 31 Para Darle Arranque al Motor Parado del Motor • Desconecte todas las cargas eléctricas de los • Desconecte todas las cargas eléctricas de los tomacorrientes tomacorrientes del generador antes de darle arranque al del panel del generador. Nunca le de arranque o detenga el motor.
- Page 32 Procedimiento de Carga de la Bateria • Si la batería está equipada con tapas de desfogue, asegúrese de que están instaladas y apretadas. ¡ADVERTENCIA! Las baterías de acumuladores • Conecte el enchufe conector del cable de carga de la batería producen gas explosivo cuando son cargadas, el cual al tomacorrientes del panel identificado con las palabras permanece alrededor de la batería por un período de...
- Page 33 NO SOBRECARGUE EL • Si el aparato especial, herramienta o motor no suministra el vatiaje, multiplique los voltios por la clasificación de GENERADOR amperaje para determinar los vatios (voltios x amperios = vatios). Sobrecargar el generador más allá de su capacidad de vatiaje puede ocasionar daños al mismo y a los dispositivos •...
-
Page 34: Mantenimiento
MANTENIMIENTO PROGRAMA DE MANTENIMIENTO Siga los intervalos horarios o de calendario, lo que ocurra primero. Se requiere de servicio con mayor frecuencia cuando opere la unidad en las condiciones adversas descritas a continuación. Operación de Mantenimiento Cada 5 horas 20 horas o 50 horas o 100 horas o cada estación... - Page 35 Para Limpiar el Generador: • Reemplace la bujía si los electrodos están picados, quemados o si la porcelana está rota. Para su • Utilice un trapo húmedo para limpiar las superficies reemplazo, únicamente utilice Champion RC12YC o una exteriores. de tipo equivalente. •...
-
Page 36: Almacenamiento
Limpie e inspeccione el apagachispas de la siguiente manera: Silenciador Apagachispas • Retire el tornillo que sujeta la pantalla del apagachispas. • Inspeccione la pantalla y reemplácela si está rota, perforada o en general dañada. No use pantallas defectuosas. Si la pantalla no está dañada, límpiela con un disolvente comercial. -
Page 37: Reparacion De Averias
DIAGNÓSTICO Y REPARACIÓN DE AVERÍAS Problema Causa Solución Uno de los cotacircuitos está abierto. Reajuste el cortacircuito. Falla en el generador. Póngase en contacto con la Planta de Servicio de Sears. El motor está funcionando Mala conexión o juego de cordones Revise y repare. -
Page 38: Garantia Del Sistema De Control De Emisiones
GARANTIA DEL SISTEMA DE CONTROL DE EMISIONES DECLARACION DE LA GARANTIA Co. podría negarle cubrimiento de garantía si su equipo de servicio, césped y jardín, o cualquier parte, ha fallado DEL CONTROL DE EMISIONES debido a abuso, negligencia, mantenimiento incorrecto o modificaciones no aprobadas. - Page 39 GARANTIA DEL SISTEMA DE bajo la Garantía ECS, estará garantizada por el tiempo restante del período de la Garantía ECS antes del primer CONTROL DE EMISIONES punto de reemplazo programado para dicha parte relaciona con las emisiones. Garantía del Sistema de Control de Emisiones (“Garantía ECS”) para motores de equipo de servicio, césped y jardín años 1995 4.
- Page 40 For in-home major brand repair service: Call 24 hours a day, 7 days a week 1-800-4-MY-HOME (1-800-469-4663) Para pedir servicio de reparación a domicilio - 1-800-676-5811 In Canada for all your service and parts needs call - 1-800-665-4455 Au Canada por tout le service ou les pièces For the repair or replacement parts you need: Call 7 am - 7 pm, 7 days a week 1-800-366-PART...
Need help?
Do you have a question about the 580.329120 and is the answer not in the manual?
Questions and answers