Table of Contents
Advertisement
Quick Links
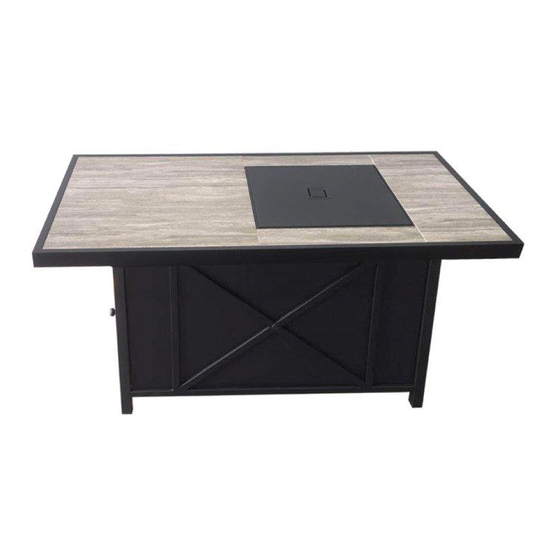
48" Gas Fire Pit
Item# 258364
Model# SRGF11811B
Owner's Manual
Read the instructions before use. This
appliance must be installed in accordance
with such regulations as are in force.
Questions, problems, missing / replacement parts? Before returning to your retailer,
call our customer service department at 1-866-814-0585, 8 a.m. - 8 p.m., EST
Monday-Friday.
DANGER
FIRE OR EXPLOSION HAZARD
If you smell gas:
Shut off gas to the appliance.
●
Extinguish any open flame.
●
If odor continues, leave the area
●
immediately.
After leaving the area, call your gas
●
supplier or fire department.
Failure to follow these instructions
could result in fire or explosion,
which could cause property damage,
personal injury, or death.
WARNING
Do not store or use gasoline or
other flammable vapors and liquids
in the vicinity of this or any other
appliance.
An LP-cylinder not connected for use
shall not be stored in the vicinity of
this or any other appliance.
WARNING:For Outdoor Use Only.
Installation and service must be
performed by a qualified installer,
service agency, or the gas supplier.
INSTALLER: Leave this manual with
the appliance.
CONSUMER: Retain this manual for
future reference.
Advertisement
Table of Contents

Related Manuals for Four Seasons Courtyard SRGF11811B


Summary of Contents for Four Seasons Courtyard SRGF11811B
- Page 1 DANGER FIRE OR EXPLOSION HAZARD If you smell gas: Item# 258364 Shut off gas to the appliance. ● Model# SRGF11811B Extinguish any open flame. ● If odor continues, leave the area ● immediately. After leaving the area, call your gas ●...
-
Page 2: Carbon Monoxide Hazard
If you cannot reach your gas supplier, call the fire department. Installation and service must be performed by a qualified installer, service agency or gas supplier. Gas Fire Pit SRGF11811B Input 50,000 Btu/h (14.65kW) Propane 20-lb. LP - gas cylinder Min. -
Page 3: Warnings And Cautions
WARNINGS AND CAUTIONS IMPORTANT SAFETY INFORMATION The installation must conform with local codes or, in the absence of local codes, with either the Natural Gas and Propane Installation Code, CSA B149.1, or the Propane Storage and Handling Code, CSA B 149.2. This appliance requires 20 lb (9 kg) LP gas supply cylinder. - Page 4 WARNINGS AND CAUTIONS NOTE: PLEASE READ THE FOLLOWING SAFETY RULES: Perform a leak test with a soapy solution: 1. To check gas connections. 2. After connecting a new cylinder. 3. Upon re-assembly after disassembly. This appliance is designed to operate with a standard 20 Ib propane cylinder with Approved Cylinder Connection.
-
Page 5: Exploded View
EXPLODED VIEW Please check the contents of the packaging to ensure all parts are included. If missing parts please contact customer service. -
Page 6: Tools And Parts
TOOLS AND PARTS Part Description Picture Quantity Cover Lid Lava Rocks 1 bag Ceramic Tile 2 Ceramic Tile 3 Ceramic Tile 1 Tabletop Frame Gas Control Set Control Board Fixing Plate Back Panel Side Panel Door Front Panel Cylinder Locking Bolt Cylinder Holder Assembly Protecting Bar Door Knob... - Page 7 ASSEMBLY INSTRUCTIONS Choose a clear area for assembly, and a soft surface or cardboard to protect from damages. 2 person assembly recommended. Step 1 Step 1 Put tabletop frame (F) upside down on soft, horizontal land, attach gas control set (F1) to tabletop frame (F) with control boarding fixing plate (F2) and 4 pcs M5x25 bolt with washers (DD) per image.
- Page 8 ASSEMBLY INSTRUCTIONS Step 3 Step 3 Keep the tabletop frame (F) face down, attach the back panel (G) to it with 8 pcs M6 x 14 bolts (AA) as illustrated. Hardware Used M6 x 14 bolt 8 pcs Step 4 Step 4 Attach the front panel (J) to the table top frame (F) with 8 pcs M6 x 14 bolts...
- Page 9 ASSEMBLY INSTRUCTIONS Step 5 Step 5 Attach the side panel (H) to the front panel (J) and the back panel (G) with 4 pcs M6 x 14 bolts (AA) as illustrated. Hardware Used M6 x 14 bolt 4 pcs Step 6 Step 6 Attach the protecting bar (M) to the front panel (J) and the back panel (G) with 2...
- Page 10 ASSEMBLY INSTRUCTIONS Step 7 Step 7 Attach the cylinder holder assembly (L) to front panel (J) and the back panel (G) with 4 pcs M6 x 14 bolts (AA) as illustrated. Attach the cylinder locking bolt (K) to cylinder holder assembly (L). Hardware Used M6 x 14 bolt 4 pcs...
- Page 11 Step 9 Step 9 Peel and stick the crash pads (O) on each edge of the metal frame as illustrated, totalling 22 crash pads. Note: Before applying the adhesive crash pads, be sure to wipe down the metal surface and make sure it is free of any dust or debris.
- Page 12 Step 11 Step 11 Place the lava rocks (B) into the burning area of the table top. Place the cover lid (A) onto the table top when the gas fire pit is not used. Note: To avoid ignition failure, do not cover the flame orifice with lava rocks.
-
Page 13: Installation Instructions
INSTALLATION INSTRUCTIONS Two or more people are recommended for easier installation. on a flat, Please make sure the regulator & hose going through under the protecting bar LAVA rocks (7.7lbs) Open the door (I) cylinder holder For you safety, please make sure the regulator &... -
Page 14: Operation
OPERATION WARNING: DO NOT ATTEMPT TO OPERATE THE APPLIANCE UNTIL YOU HAVE READ AND UNDERSTAND ALL PRECAUTIONS . FAILURE TO DO SO CAN RESULT IN PROPERTY DAMAGE, SERIOUS INJURY, OR DEATH. WARNING!!! WARNING Do not use an open flame to check for leakage. FOR YOUR SAFETY: Do not smoke during testing. - Page 15 OPERATION WARNING:DO NOT ATTEMPT TO OPERATE THIS HEATER UNTIL YOU HAVE READ AND UNDERSTAND ALL PRECAUTIONS. FAILURE TO DO SO CAN RESULT IN ATION PROPERTY DAMAGE,SERIOUS INJURY,OR DEATH. Before Lighting The gas fire pit should be thoroughly inspected before each use, and by a qualified service person at least annually.
- Page 16 OPERATION CAUTION:AVOID INHALING FUMES EMITTED FROM THE GAS APPLIANCE'S FIRST USE. SMOKE AND ODOR FROM THE BURNING OF OILS USED IN MANUFACTURING WILL APPEAR. BOTH SMOKE AND ODOR WILL DISSIPATE AFTER APPROXIMATELY 30 MINUTES.THE GAS APPLIANCE SHOULD NOT PRODUCE THICK BLACK SMOKE. NOTE: The burner may be noisy when initially turned on.
-
Page 17: Troubleshooting
58” 36” 36” TROUBLESHOOTING PROBLEM POSSIBLE CAUSE CORRECTIVE MEASURES OBSERVED Gas odor Gas leak Check all gas connections Check gas supply pressure Low gas pressure Clean burner parts--see manual Delayed ignition Clogged or dirty burner ports "CLEANING AND MAINTENANCE" section Incorrect burner Incorrect gas supply or pressure Check gas supply pressure... -
Page 18: Maintenance & Storage
MAINTENANCE/STORAGE CLEANING AND MAINTENANCE : To enjoy years of outstanding performance from your WARNING: gas fire pit, make sure you perform the following FOR YOUR SAFETY ; maintenance activities on a regular basis: DO NOT touch or move gas appliance for at least 45 minutes after use. -
Page 19: Maintenance And Storage
MAINTENANCE AND STORAGE NOTE: Store the fire pit indoors during the winter if it will be subjected to Wait until the appliance is freezing temperatures. cool before covering. Disconnect and remove the cylinder from the appliance before the appliance can be stored indoors. STORAGE Turn the control knob to "OFF"... - Page 20 Warranty Information 2019 2019 Need help? call our toll free number at: 1 (866)-814-0585 e-mail us at: Shinerichgroup...
Need help?
Do you have a question about the SRGF11811B and is the answer not in the manual?
Questions and answers
Burner will fire but won't hold flame
@Mary Hodges
The burner on the Four Seasons Courtyard SRGF11811B may not hold flame due to several possible causes:
1. Low Gas Pressure – Check the gas supply pressure and ensure the LP cylinder has enough gas.
2. Gas Leak – Inspect all gas connections for leaks.
3. Clogged or Dirty Burner Ports – Clean the burner parts as instructed in the manual.
4. Incorrect Gas Supply or Pressure – Verify that the gas supply matches the required specifications.
Perform troubleshooting steps such as checking gas connections, ensuring proper gas pressure, and cleaning the burner to resolve the issue.
This answer is automatically generated
Broken pieces need replaced please
The available replacement parts for the Four Seasons Courtyard SRGF11811B include:
- A: Cover Lid (1)
- B: Lava Rocks (1 bag)
- C: Ceramic Tile 2 (2 pieces)
- D: Ceramic Tile 3 (1 piece)
- E: Ceramic Tile 1 (1 piece)
- F: Tabletop Frame
- F1: Gas Control Set (1)
- F2: Control Board Fixing Plate (1)
- G: Back Panel
- H: Side Panel (1)
- I: Door (1)
- J: Front Panel (1)
- K: Cylinder Locking Bolt (1)
- L: Cylinder Holder Assembly (1)
- M: Protecting Bar (1)
- N: Door Knob (1)
- O: Crash Pad (22 pieces)
Hardware included:
- AA: M6 x 14 Bolt (24)
- BB: M4 x 12 Screw (2)
- CC: M5 x 14 Bolt (1)
- DD: M5 x 25 Bolt with washer (4)
This answer is automatically generated