Cisco ASR 1000 Series Replacing
Removing and replacing frus from the routers
Hide thumbs
Also See for ASR 1000 Series:
- Software configuration manual (602 pages) ,
- Configuration manual (442 pages) ,
- Common criteria operational user guidance and preparative procedures (72 pages)
Table of Contents
Advertisement
Removing and Replacing FRUs from the Cisco
ASR 1000 Series Routers
This chapter describes procedures for removing and replacing field-replaceable units (FRUs) from Cisco ASR
1000 Series Routers:
•
•
•
•
•
•
•
•
•
•
•
•
•
•
•
•
Removing and Replacing Cisco ASR 1000 Series Route
Processors
Keep in mind the following points before you remove and replace a Cisco ASR 1000 Series route processor:
• The Cisco ASR 1002 Router and the Cisco ASR 1002-F Router support only the integrated Cisco
• If you have two Cisco ASR 1000 Series route processors in the Cisco ASR 1006 or Cisco ASR 1013
Removing and Replacing Cisco ASR 1000 Series Route Processors, on page 1
page 47
Removing and Replacing Cisco ASR 1000 Series Router SPAs and SPA Interface Processors, on page
53
Repacking the Router, on page 119
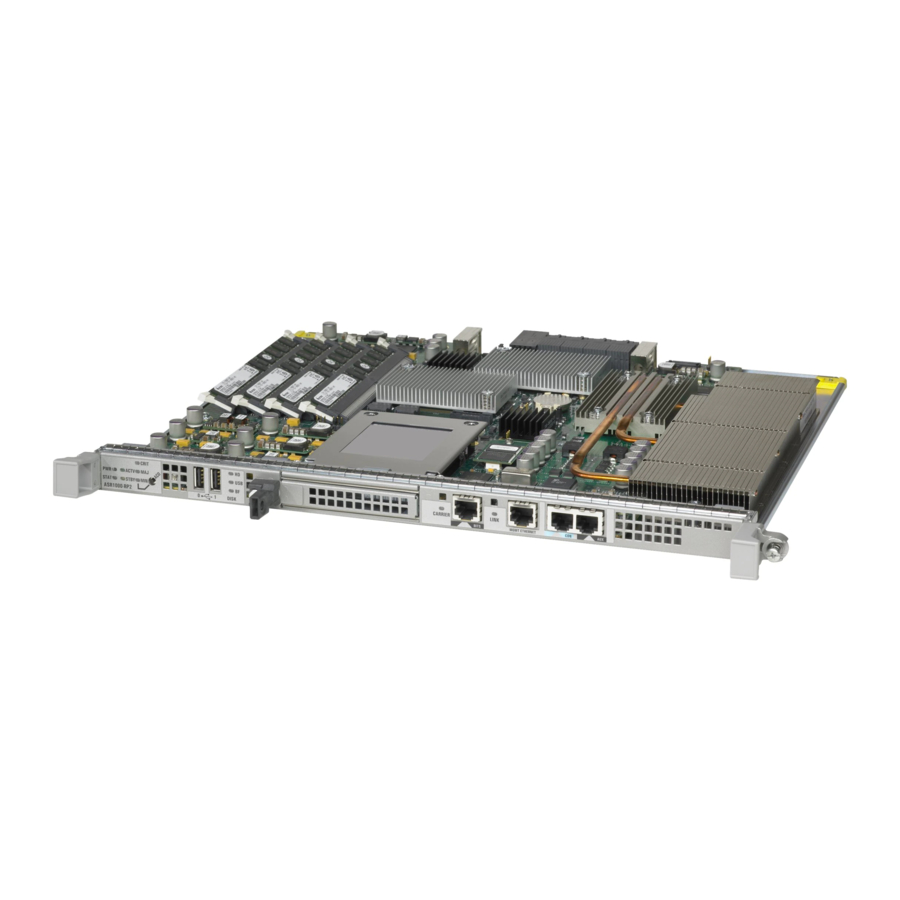
ASR1002-RP1.
router and you want to remove one, do not power down the router. Remove the route processor and insert
Removing and Replacing FRUs from the Cisco ASR 1000 Series Routers
1
Advertisement
Table of Contents

Related Manuals for Cisco ASR 1000 Series


Summary of Contents for Cisco ASR 1000 Series
-
Page 1: Table Of Contents
ASR1002-RP1. • If you have two Cisco ASR 1000 Series route processors in the Cisco ASR 1006 or Cisco ASR 1013 router and you want to remove one, do not power down the router. Remove the route processor and insert... - Page 2 Removing and Replacing FRUs from the Cisco ASR 1000 Series Routers Removing the Cisco ASR 1000 Series Route Processor from the Cisco ASR 1006, Cisco ASR 1004, and Cisco ASR 1013 Routers a new one because high availability provides for the other route processor to take on the processing tasks for the router.
- Page 3 Remove the new Cisco ASR 1000 series route processor from its static shielding bag. Step 3 Using both hands, grasp the Cisco ASR 1000 Series route processor by its metal carrier edges and orient the it so that its printed circuit board components are upward.
-
Page 4: Removingandreplacingciscoasr1000Seriesrouteprocessor Internal Hard Drive
The Cisco ASR 1000 Series route processor (RP1) contains an internal hard drive disk that provides nonvolatile storage in the form of an internal flash disk. The Cisco ASR 1000 Series RP1 module can be configured with either a 40 GB or a 32 GB disk. Both components are field-replaceable on the Cisco ASR 1006 Router and... - Page 5 Removing the Cisco ASR1000-RP1 Internal Hard Drive the Cisco ASR 1004 Router (there is no hard disk in the Cisco ASR 1002 Router). On the front panel of the Cisco ASR 1000 Series RP, the DISK HD LED indicates activity on the hard drive.
- Page 6 Removing the Cisco ASR1000-RP1 Internal Hard Drive Figure 1: Cisco ASR1000RP1 Module Internal Hard Drive Unit The following figure shows the Cisco ASR1000-RP1 module with the hard drive cover removed. Figure 2: Cisco ASR1000-RP1 Module Hard Drive Cover and Screw Fastener...
- Page 7 Inspect the existing cables and replace them only if they are damaged. If you do not need to replace them, leave the connection to the Cisco ASR 1000 Series Route Processor 1 in place and only remove the connection to the internal hard drive.
- Page 8 4. Replace the cover by aligning the tabs in the slot and tightening the screw fasteners. 5. With two hands, grab the handles on the Cisco ASR1000-RP1 module and slide it back into its slot in the Cisco ASR 1000 Series Router and tighten the captive screw.
- Page 9 Replace the cover by aligning the tabs in the slot and tightening the screw fasteners. Step 5 With two hands, grab the handles on the Cisco ASR1000-RP1 module and slide it back into its slot in the Cisco ASR 1000 Series Router and tighten the captive screw.
- Page 10 Before you begin, read the following important notices: • The form-factor internal hard drive is accessible from the front panel of the Cisco ASR1000-RP2 and supports the online insertion and removal feature (OIR) using the following CLI commands for the standby and active RP2: •...
- Page 11 Removing and Replacing FRUs from the Cisco ASR 1000 Series Routers Removing the Cisco ASR1000-RP2 Internal Hard Drive Figure 6: Cisco ASR1000-RP2 Front Panel Internal hard drive fastener screw Internal hard drive Step 4 Pull the internal hard drive out as shown in the following figure.
- Page 12 4. Verify the disk is working by running: dir harddisk DETAILED STEPS Step 1 Carefully slide the internal hard drive unit into the Cisco ASR1000-RP2 faceplate slot. The component is keyed for easy insertion. Step 2 Tighten the fastener screw on the front panel.
-
Page 13: Removing And Replacing The Hard Drive On The Cisco Asr 1002-X Router
Removing and Replacing the Hard Drive on the Cisco ASR 1002-X Router Removing and Replacing the Hard Drive on the Cisco ASR 1002-X Router The Cisco ASR 1002-X Router supports an optional removable hard drive. This section explains how to remove and replace this hard drive. Warning During this procedure, wear grounding wrist straps to avoid ESD damage to the card. - Page 14 Removing and Replacing FRUs from the Cisco ASR 1000 Series Routers Removing the Hard Drive from the Cisco ASR 1002-X Router Figure 8: Cisco ASR1002-X Router Front Panel Internal hard drive fastener screw Internal hard drive Step 4 Pull the hard drive out as shown in xref Figure 14-7.
- Page 15 You have successfully removed the hard drive from the Cisco ASR 1002-X Router. Replacing the Hard Drive on the Cisco ASR 1002-X Router To insert or replace the hard drive on the Cisco ASR 1002-X Router, follow this procedure: SUMMARY STEPS 1.
-
Page 16: Removing And Replacing The Hard Drive On The Cisco Asr 1001 Router
Removing and Replacing the Hard Drive on the Cisco ASR 1001 Router Removing and Replacing the Hard Drive on the Cisco ASR 1001 Router The Cisco ASR 1001 Router supports an optional removable hard drive. This section explains how to remove and replace this hard drive. Warning During this procedure, wear grounding wrist straps to avoid ESD damage to the card. - Page 17 Removing and Replacing FRUs from the Cisco ASR 1000 Series Routers Removing the Hard Drive from the Cisco ASR 1001 Router Figure 10: Cisco ASR1001 Router Front Panel Internal hard drive fastener screw Internal hard drive Step 4 Pull the hard drive out as shown in xref Figure 14-7.
- Page 18 You have successfully removed the hard drive from the Cisco ASR 1001 Router. Replacing the Hard Drive on the Cisco ASR 1001 Router To insert or replace the hard drive on the Cisco ASR 1001 Router, follow this procedure: SUMMARY STEPS 1.
-
Page 19: Removing And Replacing The Cisco Asr 1000 Series Dimm Memory Modules
Router and the Cisco ASR 1013 Router The Cisco ASR 1006 Router and the Cisco ASR 1013 Router have redundant RPs. The following is an overview of the steps to remove and replace the DIMM memory modules on these routers: SUMMARY STEPS 1. - Page 20 DETAILED STEPS Step 1 Remove the standby RP by performing the procedure described in the xref “Removing the Cisco ASR 1000 Series Route Processor from the Cisco ASR 1006, Cisco ASR 1004, and Cisco ASR 1013 Routers” section. Step 2 Remove the DIMM memory module from the standby RP by performing one of the following procedures: •...
- Page 21 Note The Cisco ASR 1000 Series RP memory spares are sold as pairs. For example, the 2 GB memory spare (M-ASR1K-RP1-2GB=) is sold as a pair of 1 GB modules and the 4 GB memory spare (M-ASR1K-RP1-4GB=) is sold as a pair of 2 GB modules. Memory repairs or upgrades must utilize the complete memory pairs as shipped from Cisco.
- Page 22 Step 3 Press both spring latches outward to release the DIMM. The following figure shows the Cisco ASR 1000 Series RP DIMM module spring latches. Figure 12: Cisco ASR 1000 Series RP DIMM Module Spring Latches Removing and Replacing FRUs from the Cisco ASR 1000 Series Routers...
- Page 23 To install the DIMM memory card, locate the notches and align the DIMM with the socket before inserting it. The following figure shows the Cisco ASR 1000 Series RP DIMM module alignment. Removing and Replacing FRUs from the Cisco ASR 1000 Series Routers...
- Page 24 DIMM. The following figure shows how the Cisco ASR 1000 Series RP DIMM module must not be handled. Removing and Replacing FRUs from the Cisco ASR 1000 Series Routers...
- Page 25 . Note Make sure you perform steps 3 thru 11 for both DIMMs on the RP 1 before you replace the Cisco ASR1000-RP1 in the system. Replace the Cisco ASR1000-RP1. All DIMMS must be replaced; not just one. What to do next This completes the procedure for replacing a DIMM memory module on the Cisco ASR1000-RP1.
- Page 26 (since vendors may have multiple versions of the DIMM). The following table shows the slots that are supported for inserting memory DIMMs in Cisco ASR1000-RP2 Table 3: Cisco ASR1000-RP2 Supported Slots for Inserting Memory DIMMs...
- Page 27 SUMMARY STEPS 1. With a wrist strap on, loosen the two captive screws on the faceplate of the Cisco ASR 1000 Series RP. 2. Using the handles on both sides of the module, with two hands gently slide the module out of the chassis slot.
- Page 28 Removing and Replacing FRUs from the Cisco ASR 1000 Series Routers Replacing the Cisco ASR1000-RP2 DIMMs What to do next This completes the steps for removing the Cisco ASR1000-RP2 DIMMs from the module. Replacing the Cisco ASR1000-RP2 DIMMs This section lists the steps to replace the Cisco ASR1000-RP2 DIMMs.
- Page 29 What to do next This completes the procedure for replacing Cisco ASR1000-RP2 DIMMs. After you have correctly installed the Cisco ASR1000-RP2 DIMMs and reinstalled the route processor, the system should reboot properly. If the system fails to boot properly or if the console terminal displays a checksum or memory error after you...
- Page 30 Warning Do not install power supplies with the Cisco ASR 1001 chassis cover off. The following table shows the slots that are supported for inserting memory DIMMs in the Cisco ASR1001 Router. Table 4: Cisco ASR1001 Router Supported Slots for Inserting Memory DIMMs...
- Page 31 Removing the Cisco ASR 1001 Router DIMMs Note When upgrading memory from 4 GB to 8 GM, remove all existing memory DIMMS in the Cisco ASR 1001 Router, and then populate the DIMM Slots with the new 8 GB memory upgrade kit.
- Page 32 The chassis cover cannot be removed until the power supplies are removed from the chassis. For instructions about how to remove the AC and DC power supplies from the Cisco ASR 1001 Router, see: xref Removing AC Power Supply from the Cisco ASR 1001 Router...
- Page 33 Step 5 Pull down the lever on the DIMM socket to release the corresponding DIMM from the socket. See the following figure. Figure 22: DIMM Socket Release Lever to Remove the DIMM from the Cisco ASR 1001 Router Step 6 When one end of the DIMM is released from the socket, grasp each end of the DIMM with your thumb and forefinger and pull the DIMM completely out of the socket.
- Page 34 Removing and Replacing FRUs from the Cisco ASR 1000 Series Routers Replacing the Cisco ASR 1001 Router DIMM 9. Install the power supplies into the chassis. See: xref Installing AC Input Power to Cisco ASR 1001 Router, xref Installing DC Input Power on the Cisco ASR 1001 Router...
- Page 35 Tighten the top surface screws and then the three screws on the front faceplate. Step 9 Install the power supplies into the chassis. See: xref Installing AC Input Power to Cisco ASR 1001 Router, xref Installing DC Input Power on the Cisco ASR 1001 Router What to do next This completes the procedure for replacing the Cisco ASR 1001 Router DIMMs.
- Page 36 To ensure vendor and MPN compatibility during memory upgrades, remove the installed DIMMs and replace them with the DIMMs provided in the upgrade kit. This section describes how to remove and then replace the Cisco ASR 1002-X Router DIMMs (see xref Figure 14-16).
- Page 37 Removing the Cisco ASR1002-X Router DIMMs SUMMARY STEPS 1. With a wrist strap on, loosen the two captive screws on the faceplate of the Cisco ASR 1002-X Router module. 2. Using the handles on both sides of the module, with two hands gently slide the module out of the chassis slot.
- Page 38 Replacing the Cisco ASR1002-X Router DIMMs What to do next This completes the steps for removing the Cisco ASR1002-X DIMMs from the module. Replacing the Cisco ASR1002-X Router DIMMs This section lists the steps to replace the Cisco ASR1002-X Router DIMMs.
- Page 39 Removing and Replacing FRUs from the Cisco ASR 1000 Series Routers Replacing the Cisco ASR1002-X Router DIMMs Figure 27: Handling the Cisco ASR1000-RP2 DIMM Step 5 Align the DIMM with the socket, and insert the connector edge into the socket. Note the two notches (keys) on the connector edge of the DIMM.
-
Page 40: Removing And Replacing Cisco Asr 1000 Router Eusb Devices
ASR1000-RP2 supports a 2 GB eUSB on the Cisco ASR 1006 Router and the Cisco ASR 1004 Router. The Cisco ASR 1001 Router has only one eUSB on the chassis. It is located at the eUSB connector P26, as shown in xref figure. To replace this component, you must remove a screw on the mounting hole. - Page 41 Place the Cisco ASR1000-RP module on an antistatic surface with its printed circuit board components facing upward. f) Locate the eUSB device on the ASR1000 Series RP board. The following figure shows the location of the eUSB component on the Cisco ASR1000-RP1 and xref figure shows the location of the eUSB component on the Cisco ASR1000-RP2 route processor.
- Page 42 1. Align the replacement eUSB device over the connector and standoff. The device fits over the threaded post that sticks up off the board and accepts a screw to hold the eUSB firmly to the Cisco ASR 1000 Series RP board.
- Page 43 Align the replacement eUSB device over the connector and standoff. The device fits over the threaded post that sticks up off the board and accepts a screw to hold the eUSB firmly to the Cisco ASR 1000 Series RP board.
- Page 44 2. Remove the power supplies from the chassis before you remove the chassis cover. For instructions about how to remove the AC and DC power supplies from the Cisco ASR 1001 Router, see: xref sections. 3. After the power supplies are removed, remove the chassis top cover and follow theses steps: 4.
- Page 45 5. Restore the backup copy of the startup-config and the boot image to the eUSB device: 6. Verify that the Cisco ASR 1001 Router is operating properly. Check whether the internal hard drive LED (labeled as DISK HD) is flashing green. To check if the LED is flashing green, from the ROMMON or IOS prompt, run the following command: 7.
- Page 46 With the chassis cover removed, align the replacement eUSB device over the connector and standoff. The device fits over the threaded post that sticks up off the board and accepts a screw to hold the eUSB firmly to the Cisco ASR 1001 chassis base.
-
Page 47: Removing And Replacing Cisco Asr 1000 Series Router 1 Gb Usb Flash Token Memory Stick
The Cisco ASR1000-RPs contain ports for a 1 GB flash token memory stick to store configurations or Cisco IOS XE consolidated packages. The following figure shows the USB port 0 or 1 connector on the Cisco ASR 1000 Series route processor for the 1 GB flash token memory stick. - Page 48 Step 2 To replace a Cisco USB Flash memory stick, simply insert the module into the USB port 0 or 1 port as shown in the following figure. The Flash memory module can be inserted only in one way, and can be inserted or removed regardless of whether the router is powered up or not.
-
Page 49: Minimum Requirements Of Eusb Devices Supported On Cisco Asr 1000 Series Routers
Corrective Action Required If the eUSB device is of less capacity and is not compatible as indicated in the Cisco IOS message then you need to contact Cisco System Inc. and get the eUSB replaced. Prolonged use of routers with less capacity eUSB devices would result in unpredictable behavior. -
Page 50: Removing And Replacing Cisco Asr 1000 Series Embedded Service Processors
Type 13RU-RP2 When the system is started, Cisco IOS Software detects the capacity of the eUSB device currently used on the system. If the eUSB device matches the minimum value of the eUSB capacity as specified above then no messages are displayed at the Cisco IOS console. - Page 51 Cisco ASR 1000 Series Embedded Services Processor. 2. Using the handles on both sides of the module, with two hands gently slide the Cisco ASR 1000 Series Embedded Services Processor (ESP5, ESP10, ESP20, ESP40) out of the chassis slot.
- Page 52 ASR 1000 Series Embedded Services Processor. Step 2 Using the handles on both sides of the module, with two hands gently slide the Cisco ASR 1000 Series Embedded Services Processor (ESP5, ESP10, ESP20, ESP40) out of the chassis slot. Note Handle the Cisco ASR1000-ESP5, Cisco ASR1000-ESP10, Cisco ASR1000-ESP20, or Cisco ASR1000-ESP40 by the carrier edges only;...
- Page 53 Align the left and right edges of the Cisco ASR1000-ESP printed circuit board between the Cisco ASR1000-ESP slot guides. Step 5 Gently slide the Cisco ASR1000-ESP all the way into its chassis slot until you feel the connectors seat with the router midplane. Step 6 Seat the Cisco ASR1000-ESP in the router midplane by tightening its captive installation screws with a number 2 Phillips or a 3/16-inch flat-blade screwdriver.
- Page 54 Removing and Replacing FRUs from the Cisco ASR 1000 Series Routers Electrostatic Discharge Prevention If you need additional equipment, contact a service representative for ordering information. Electrostatic Discharge Prevention Electrostatic discharge (ESD) damages equipment and impairs electrical circuitry. ESD occurs when printed circuit boards are improperly handled and results in complete or intermittent failures.
- Page 55 ASR 1000 Series SPA Interface Processor. Step 2 Using the handles on both sides of the module, with two hands gently slide the Cisco ASR 1000 Series SPA Interface Processor out of the chassis slot. Handle the Cisco ASR1000-SIP10 by the card edges only; never touch the printed circuit board components Note or connector pins.
- Page 56 Removing and Replacing FRUs from the Cisco ASR 1000 Series Routers Removing a Shared Port Adapter from a SIP SUMMARY STEPS 1. Before inserting a SIP, make sure that the chassis is grounded. 2. To insert the SIP, carefully align the edges of the SIP between the upper and lower edges of the router slot.
-
Page 57: Removing And Replacing The Cisco Asr 1006 Router Power Supplies
Removing and Replacing a AC Power Supply in Cisco ASR 1006 Router This section provides information about removing and replacing an AC power supply in the Cisco ASR 1006 Router. Removing and Replacing FRUs from the Cisco ASR 1000 Series Routers... - Page 58 Because of the power supply redundancy, there is no need to power off the Cisco ASR 1006 Router before removing one of the AC power supplies. The Cisco ASR 1006 Router has two of the same type power supplies in power supply slot 0 and power supply slot 1.
- Page 59 Replace the AC power supply within five minutes. What to do next This completes the procedure for removing the AC power supply from the Cisco ASR 1006 chassis. Replacing the AC Power Supply in Cisco ASR 1006 Router This section provides information about installing an AC power supply in the Cisco ASR 1006 Router.
- Page 60 DB-25 alarm connector on both the AC and DC power supplies, in order to comply with FCC/EN55022/CISPR22 Class A emissions requirements. The following figure shows the ASR1013/06-PWR-AC power supply of the Cisco ASR 1006 Router. AC power supply fan AC power inlet DB-25 alarm connector...
- Page 61 This completes the procedure for installing the AC power supply in the Cisco ASR 1006 Router. Removing and Replacing a DC Power Supply in Cisco ASR 1006 Router This section provides information about removing and installing a DC power supply in the Cisco ASR 1006 Router.
- Page 62 Removing and Replacing FRUs from the Cisco ASR 1000 Series Routers Removing and Replacing a DC Power Supply in Cisco ASR 1006 Router Figure 39: Cisco ASR 1006 Router DC Power Supply (ASR1006-PWR-DC) DC power supply ground studs DB-25 alarm connector*...
- Page 63 Removing the DC Power Supply from Cisco ASR 1006 Router Before you can remove a DC power supply from the Cisco ASR 1006 Router, you must remove power from the power supply. Follow these steps to remove power and the DC power supply from the chassis.
- Page 64 Step 4 Locate the terminal block on the rear of the chassis on the power supply. The following figure shows the DC power supply terminal block for the ASR1006-PWR-DC power supply of the Cisco ASR 1006 Router. Figure 41: Cisco ASR 1006 Router DC Power Supply (ASR1006-PWR-DC) Terminal Block and Plastic Cover...
- Page 65 The following figure shows the DC power supply terminal block for the ASR1013/06-PWR-DC power supply of the Cisco ASR 1006 Router. Figure 42: Cisco ASR 1006 Router DC Power Supply (ASR1013/06-PWR-DC) Terminal Block and Plastic Cover Negative lead Protective sleeving around the stud and cable...
- Page 66 The following figure shows the DC power supply terminal block with cables connected for the ASR1013/06-PWR-DC power supply of the Cisco ASR 1006 Router. Figure 44: Cisco ASR 1006 Router DC Power Supply (ASR1013/06-PWR-DC) Terminal Block Cable Connections Negative lead...
- Page 67 Step 10 Replace the DC power supply within five minutes. What to do next This completes the procedure of removing a DC power supply from the Cisco ASR 1006 Router. Replacing the DC Power Supply in Cisco ASR 1006 Router Note The color coding of the DC input power supply leads depends on the color coding of the DC power source at your site.
- Page 68 You must wrap the positive and negative power cables with sleeving. Take each wire and cover the area from the lug to the wire with heavy shrink sleeving. The following figure shows the terminal block ground lugs for the ASR1006-PWR-DC power supply of the Cisco ASR 1006 Router.
- Page 69 Positive lug and wire with sleeving wrapped around the wire and end of lug Ground stud and cable The following figure shows the terminal block ground lugs for the ASR1013/06-PWR-DC power supply of the Cisco ASR 1006 Router. Figure 46: Cisco ASR 1006 Router DC Power Supply (ASR1013/06-PWR-DC) Ground Lug Installation...
- Page 70 (use the screwdriver to tighten the screw to a torque of 5 in-lbs / 1 per). See the following figure. Figure 47: Cisco ASR 1006 Router DC Power Supply Terminal Block Plastic Cover and Switch DC power supply On/Off switch...
-
Page 71: Removing And Replacing The Cisco Asr 1004 Router Power Supplies
Because of the power supply redundancy, there is no need to power off the Cisco ASR 1004 Router before removing one of the AC power supplies. The Cisco ASR 1004 Router has two of the same type power supplies in power supply Slot 0 and power supply Slot 1. See the following figure. - Page 72 FCC/EN55022/CISPR22 Class A emissions requirements. Following these steps to remove an AC power supply from the Cisco ASR 1004 Router. SUMMARY STEPS 1. Slip on the ESD-preventive wrist strap that was included in the accessory kit.
- Page 73 This completes the procedure for installing the AC power supply in the Cisco ASR 1004 Router. Removing and Replacing a DC Power Supply in Cisco ASR 1004 Router This section provides information about removing and installing a DC power supply in the Cisco ASR 1004 Router.
- Page 74 Warning Installation of the equipment must comply with local and national electrical codes. Statement 1074 The following figure shows the DC power supply and components for the Cisco ASR 1004 Router. Figure 49: Cisco ASR 1004 Router DC Power Supply...
- Page 75 Removing the DC Power Supply from the Cisco ASR 1004 Router Before you can remove a DC power supply from the Cisco ASR 1004 Router, you must remove power from the power supply. Follow these steps to remove power and the DC power supply from the chassis.
- Page 76 Removing and Replacing FRUs from the Cisco ASR 1000 Series Routers Removing the DC Power Supply from the Cisco ASR 1004 Router Negative terminal Ground stud Positive terminal Terminal block plastic cover screws a) Loosen and remove the two #10 screws from the plastic cover. The plastic cover has slots that help to slide it out towards the right.
- Page 77 Removing and Replacing FRUs from the Cisco ASR 1000 Series Routers Removing the DC Power Supply from the Cisco ASR 1004 Router Figure 50: Cisco ASR 1004 Router DC Power Supply Terminal Block Lead Wire Connection Ground stud and wire...
- Page 78 Step 9 Replace the DC power supply within five minutes. What to do next This completes the procedure of removing a DC power supply from the Cisco ASR 1004 Router. Replacing the DC Power Supply in Cisco ASR 1004 Router Note The color coding of the DC input power supply leads depends on the color coding of the DC power source at your site.
- Page 79 Switch the power supply circuit breaker switch to the On (|) position. What to do next This completes the procedure for connecting the DC power supply in the Cisco ASR 1004 Router. Removing and Replacing FRUs from the Cisco ASR 1000 Series Routers...
-
Page 80: Removing And Replacing The Cisco Asr 1002 Router Power Supplies
You must have both power supplies installed in the Cisco router. The Cisco ASR 1002 Router has two of the same type power supplies in power supply slot 0 and power supply slot 1. The following figure shows the Cisco ASR 1002 Router AC power supply. - Page 81 Replace the AC power supply within five minutes. What to do next This completes the procedure for removing the AC power supply from the Cisco ASR 1002 chassis. Replacing the AC Power Supply in Cisco ASR 1002 Router This section provides information about installing an AC power supply in the Cisco ASR 1002 Router.
- Page 82 Tighten the captive screws. Replacing the AC Power Supply in Cisco ASR 1002 Router To connect AC power to the Cisco ASR 1002 Router, follow these steps: SUMMARY STEPS 1. At the rear of the router, check that the power switch is in the Off (O) position.
- Page 83 Make sure the power cord is hanging loosely so that it cannot be disconnected from the AC power inlet (see the following figure). Figure 53: Cisco ASR 1002 Router AC Power Cord Through AC Power Supply 0 and 1 Do not run the AC power cord through the either power supply handles as shown in the following figure.
- Page 84 This completes the procedure for installing the AC power supply in the Cisco ASR 1002 Router. Removing and Replacing a 48 VDC Power Supply in Cisco ASR 1002 Router This section provides information about removing and installing a –48 VDC power supply in the Cisco ASR 1002 Router.
- Page 85 Positive lead Negative lead Removing the 48 VDC Power Supply from Cisco ASR 1002 Router Before you can remove a –48 VDC power supply from the Cisco ASR 1002 Router, you must remove input power going to the power supply. Caution Make certain that the chassis ground is connected before you begin removing and installing the power supply.
- Page 86 Removing and Replacing FRUs from the Cisco ASR 1000 Series Routers Removing the 48 VDC Power Supply from Cisco ASR 1002 Router 4. Remove the leads from the terminal block in the following order. 5. Unscrew all of the power supply captive screws.
- Page 87 The connection order is negative (–), positive (+), and GND. The recommended branch circuit breaker for the Cisco ASR 1002 Router –48 VDC power supply is 30 A. Use an AWG #10 gauge wire on the 30 A circuit.
- Page 88 Insert the stripped end of the ground lead all the way into the ground lead receptacle on the –48 VDC input power supply, and tighten the receptacle screw using a 3.5 mm flat-blade screwdriver (see the following figure). Figure 57: Cisco ASR 1002 Router 48 VDC Power Supply Terminal Block Lead Wire Connection Ground lead wire with service loop...
- Page 89 Removing and Replacing a +24 VDC Power Supply in Cisco ASR 1002 Router This section provides information about removing and replacing a +24 VDC power supply in the Cisco ASR 1002 Router. Before you begin, read the following notices: •...
- Page 90 — — Removing the +24 VDC Power Supply from Cisco ASR 1002 Router Before you can remove a +24 VDC power supply from the Cisco ASR 1002 Router, you must remove input power going to the power supply. Caution Make certain that the chassis ground lead wire is connected before you begin removing and installing the power supply.
- Page 91 Replace the +24 VDC power supply within five minutes. What to do next This completes the procedure of removing a +24 VDC power supply from the Cisco ASR 1002 Router. Replacing the +24 VDC Power Supply in Cisco ASR 1002 Router The +24 VDC power supply uses a spring-loaded terminal block.
- Page 92 — — This section describes how to connect the +24 VDC power supply in the Cisco ASR 1002 Router. Note The color coding of the +24 VDC input power supply leads depends on the color coding of the +24 VDC power source at your site.
- Page 93 When you install the unit, the ground connection must always be made first and disconnected last. Statement 1046 To connect +24 VDC power supply in the Cisco ASR 1002 Router, follow these steps: SUMMARY STEPS At the rear of the router, check that the power Standby switch is in the Standby position.
- Page 94 Removing and Replacing FRUs from the Cisco ASR 1000 Series Routers Replacing the +24 VDC Power Supply in Cisco ASR 1002 Router Figure 60: Wire Strip and Lead for the +24 VDC Terminal Block Lead wire stripped area — —...
- Page 95 Removing and Replacing FRUs from the Cisco ASR 1000 Series Routers Replacing the +24 VDC Power Supply in Cisco ASR 1002 Router Figure 62: Cisco ASR 1002 Router +24 VDC Power Supply Lead Wire Inserted into the Terminal Block Lead wire insulation...
- Page 96 Repeat Steps 5 through Step 10 for each lead wire. The following figure shows the leads wires installed in the terminal block. Figure 65: Cisco +24 VDC Power Supply Terminal Block with Lead Wires Installed Positive lead wire Ground lead wire Negative lead wire —...
- Page 97 Place the power supply standby switch to the On (|) position. The power supply LEDs light when power is supplied to the router. What to do next This completes the steps for installing the +24 VDC power supply in the Cisco ASR 1002 Router. Removing and Replacing FRUs from the Cisco ASR 1000 Series Routers...
-
Page 98: Removing And Replacing The Cisco Asr 1013 Router Power Supplies
Because of the power supply redundancy, there is no need to power off the Cisco ASR 1013 Router before removing one of the AC power supplies. The Cisco ASR 1013 Router has two of the same type power supplies in power supply slot 0 and power supply slot 1. - Page 99 Unscrew the power supply captive screws. Note The Cisco ASR 1013 router has two power zones, each containing two power supplies for a redundant system. Power supplies must be installed in the chassis at all times to ensure sufficient cooling. The system fans are inside the power supply units and must spin for cooling.
- Page 100 This completes the procedure for installing the AC power supply in the Cisco ASR 1013 Router. Removing and Replacing a DC Power Supply in Cisco ASR 1013 Router This section provides information about removing and installing a DC power supply in the Cisco ASR 1013 Router.
- Page 101 Warning Installation of the equipment must comply with local and national electrical codes. Statement 1074 The following figure shows the DC power supply and components for the Cisco ASR 1013 Router. Figure 68: Cisco ASR 1013 Router DC Power Supply...
- Page 102 Removing the DC Power Supply from Cisco ASR 1013 Router Before you can remove a DC power supply from the Cisco ASR 1013 Router, you must remove power from the power supply. Follow these steps to remove power and the DC power supply from the chassis.
- Page 103 Removing and Replacing FRUs from the Cisco ASR 1000 Series Routers Removing the DC Power Supply from Cisco ASR 1013 Router Figure 69: Cisco ASR 1013 Router DC Power Supply Terminal Block and Plastic Cover Negative terminal Plastic cover slotted area...
- Page 104 Step 8 Replace the DC power supply within five minutes. What to do next This completes the procedure of removing a DC power supply from the Cisco ASR 1013 Router. Replacing the DC Power Supply in Cisco ASR 1013 Router Note The color coding of the DC input power supply leads depends on the color coding of the DC power source at your site.
- Page 105 Removing and Replacing FRUs from the Cisco ASR 1000 Series Routers Replacing the DC Power Supply in Cisco ASR 1013 Router Locate the ground stud on the DC power supply for the GND connection which must be installed first and follow these steps: Attach the other end of the ground cable to the site ground associated to the DC power supply system that you are working on.
- Page 106 Removing and Replacing FRUs from the Cisco ASR 1000 Series Routers Replacing the DC Power Supply in Cisco ASR 1013 Router b) Ground lug with positive wire c) Kepnut screw The following figure shows the DC power supply terminal block with the order of installing the screws and washers on the ground lug.
-
Page 107: Removing And Replacing The Cisco Asr 1001 Router Power Supplies
Note The Cisco ASR 1001 Router can support either two AC or two DC power supplies. Do not mix the AC and DC power supply units in the same chassis. Removing and Replacing FRUs from the Cisco ASR 1000 Series Routers... - Page 108 Removing and Replacing the Cisco ASR 1001 Router Power Supplies The following figure shows both the AC and DC power supplies for the Cisco ASR 1001 Router. Figure 73: Cisco ASR 1001 Router AC Power Supply and DC Power Supply...
- Page 109 Installing the AC Power Supply into Cisco ASR 1001 Router The Cisco ASR 1001 Router has two AC power supplies at the rear of the chassis. The input receptacle is an IEC60320 C14 type of filtered AC Inlet. The current rating on the connector is 10 A. The following figure shows the ASR 1001 Router AC power supply.
- Page 110 Installing the AC Power Supply into Cisco ASR 1001 Router Figure 75: Cisco ASR 1001 Router AC Power Supply Standby Switch Cisco ASR 1001 Router AC power supply Standby switch. This switch does not disconnect power from the power source.
- Page 111 Removing AC Power Supply from the Cisco ASR 1001 Router This section describes how to remove an AC power supply from the Cisco ASR 1001 Router. The Cisco ASR 1001 Router has two power supply slots, slot 1 next to the Standby switch and power supply slot zero (PS0) to the left.
- Page 112 1. The Cisco ASR 1001 power supplies are long and narrow. It is recommended that while you pull the power supply out of the chassis, support the power supply from the bottom with the other hand.
- Page 113 Note Two types of DC connector plugs are supported for use with the DC power supply for the Cisco ASR 1001 Router. In one type of connector plug, the screw holes are raised above the connector plug body. In the second type, the screw holes are not raised above the connector plug body.
- Page 114 Wiring the DC Input Power Source The Cisco ASR 1001 Router DC power supply has a connector plug that is installed into the power supply terminal block header. The following figure shows a view of a DC power supply with a DC connector plug inserted (no wires installed) into the power supply block header in power supply PS0 (on the left) and the other power supply with no connector plug inserted into power supply PS1 (on the right).
- Page 115 Removing and Replacing FRUs from the Cisco ASR 1000 Series Routers Wiring the DC Input Power Source Figure 80: Cisco ASR 1001 Router DC Power Supply Terminal Block With a Connector Plug in Slot PS01 and Without a Plug in PS0 Note The color coding of the DC input power supply leads depends on the color coding of the DC power source at your site.
- Page 116 Removing and Replacing FRUs from the Cisco ASR 1000 Series Routers Wiring the DC Input Power Source length of wire because doing so could leave the wire exposed from the terminal block plug. The following figure shows a stripped DC input power source wire.
- Page 117 Removing and Replacing FRUs from the Cisco ASR 1000 Series Routers Wiring the DC Input Power Source a) Ground lead wire (right) b) Positive (+) lead wire (middle) c) Negative (–) lead wire (left) The following figure shows the DC power supply with lead wires.
- Page 118 Removing and Replacing FRUs from the Cisco ASR 1000 Series Routers Wiring the DC Input Power Source Figure 83: Torquing the DC Power Supply Terminal Block Plug Screws Torque is from 0.5 Nm (4.425 lbf in. to 0.6 Nm (5.310 lbf in.)
-
Page 119: Repacking The Router
1. Place the bottom packing material section inside the bottom of the shipping container. 2. Use at least two people to place the Cisco ASR 1000 Series Router inside the container. Be sure that the chassis is positioned correctly before you lower it inside the container. - Page 120 Place the bottom packing material section inside the bottom of the shipping container. Step 2 Use at least two people to place the Cisco ASR 1000 Series Router inside the container. Be sure that the chassis is positioned correctly before you lower it inside the container.
Need help?
Do you have a question about the ASR 1000 Series and is the answer not in the manual?
Questions and answers