
Related Manuals for Shure A710-FM Series


Summary of Contents for Shure A710-FM Series
- Page 1 A710-FM Flush Mount Kit for MXA710 Microphones User guide for the A710-FM flush mount kit for MXA710 microphones. Learn how to install the 2-foot or 4-foot mic to sit flush in walls, tables, or ceilings. Version: 3.0 (2020-G)
- Page 2 Shure Incorporated Table of Contents Installing the MXA710 Flush Mount A710-FMFlush Mount Kit for MXA710 Microphones Removing the Microphone from the Flush Mount IMPORTANT SAFETY INSTRUCTIONS Contact Customer Support MXA710 Flush Mount Kit 2/11...
- Page 3 Shure Incorporated A710-FM Flush Mount Kit for MXA710 Microphones IMPORTANT SAFETY INSTRUCTIONS READ these instructions. KEEP these instructions. HEED all warnings. FOLLOW all instructions. DO NOT use this apparatus near water. CLEAN ONLY with dry cloth. DO NOT block any ventilation openings. Allow sufficient distances for adequate ventilation and install in accordance with the manufacturer’s instructions.
-
Page 4: Installing The Mxa710 Flush Mount
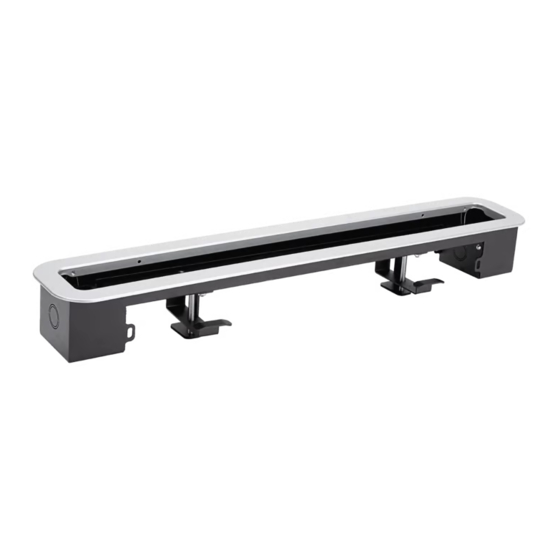
Shure Incorporated This symbol indicates that dangerous voltage constituting a risk of electric shock is present within this unit. This symbol indicates that there are important operating and maintenance instructions in the literature accom panying this unit. MXA710 Flush Mount Kit The A710-FM Flush Mount Kit allows the MXA710 Linear Array to be mounted flush within a table, wall, or hard ceiling surface for an improved appearance while maintaining acoustic performance. - Page 5 Shure Incorporated To get started, you will need: • Jigsaw or other cutting tool • Flush mount • Flush mount frame • Mounting template • Screwdriver • Cat5e (or better) Ethernet cable Attach the mounting template to the surface. Use the template as a guide to cut an opening in the surface: ◦...
- Page 6 Shure Incorporated 3. Tighten the 2 screws until the flush mount is securely attached. As you tighten the screws, the clamping brackets rotate to hold the flush mount in place. 6/11...
- Page 7 Shure Incorporated 4. Thread the Ethernet cable through the opening on the bottom of the flush mount and attach it to the microphone. Leave enough slack in the cable so that you can lift the microphone out of the flush mount in the future.
- Page 8 Shure Incorporated 5. Align the holes on the bottom of the microphone with the raised posts on the flush mount. The metal tab on the flush mount also aligns with a square cutout on the bottom of the microphone. Place the microphone in the flush mount and slide it into place.
- Page 9 Shure Incorporated 6. The flush mount frame has 4 clips that fit into slots at the corners of the flush mount. Squeeze each clip to fit it into the slot. It's easiest to hook one side of the clip into the slot at a time.
- Page 10 Shure Incorporated 10/11...
-
Page 11: Removing The Microphone From The Flush Mount
Shure Incorporated Removing the Microphone from the Flush Mount Remove the flush mount frame by squeezing each clip together. Pull frame away so the tape releases and lift it out of the slot. Using a screwdriver or other tool, press the metal tab under the microphone.