Table of Contents
Advertisement
Available languages
Available languages
Quick Links
Advertisement
Table of Contents

Subscribe to Our Youtube Channel
Related Manuals for PNI Hunting 2C 8MP


Summary of Contents for PNI Hunting 2C 8MP
- Page 1 Camera vanatoare PNI Hunting 2C 8MP Manual de utilizare...
-
Page 2: Panou Frontal
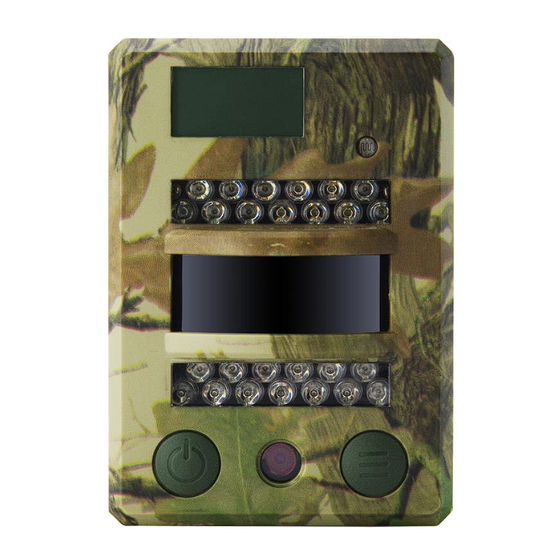
1. Imagine de ansamblu si descriere camera Panou frontal Senzor de lumina Ecran LCD zi/noapte Indicator stare 13 leduri IR 13 leduri IR Senzor PIR Lentile Buton pornire-oprire/navigare Buton Menu/OK Port USB / alimentare DC in Slot card SIM (Nefunctional pentru acest model) Slot card MicroSD Suruburi... - Page 3 Afisare ecran (Interfata principala Mod Test) Interfata Mod Foto Mod Foto ora/min/sec Rezolutie foto Multi Shot Number 0001: numarul fisierului foto & video 9998: numarul estimativ de fisere disponibile bazat pe spatiul ramas liber pe cardul de memorie Mod Video Interfata Mod Video Video FPS Rezolutie Video...
-
Page 4: Meniu Principal
2. Introducere meniu camera 1) Meniu principal Inapoi la pagina Foto Video Foto+Video Setari Stergere ID camera anterioara 2) Meniu nivelul 2: Setari Foto Video Timer Interval Inregistrare Sunet camera Intarziere Stampila de itmp ciclica Sensibilitate Data/Ora GPRS ON/OFF Parola Reset Inapoi la pagina anterioara 3) Meniu nivelul 3... - Page 5 3. Operatiuni de baza 1. Deschideti capacul de pe spatele camerei si introduceti cardul SIM si bateriile; Porniti Camera 2. Tineti apasat butonul Power/Navigare timp de 3 secunde; camera va intra in modul PIR Auto dupa ce indicatorul led va clipi de 5 ori; 3.
- Page 6 Descriere mod operare camera Tineti apasat butonul Power / Navigare timp PIR Auto de 3 sec; camera va intra in modul PIR Auto dupa ce indicatorul led clipeste de 5 ori; Camera ON/OFF (PIR Auto, TEST, OFF) Mod TEST In modul PIR Auto, apasati o data butonul Menu / OK pentru a deschide ecranul si pentru a intra in Modul Test;...
- Page 7 Note: 1) Pentru a va asigura functionarea corecta a camerei, va rugam sa setati ora corecta; 2) Va rugam nu activati in acelasi timp functia Time Lapse si Delay 3) Camera poate fi oprita oricand tinand apasat butonul 4. Setari avansate Moduri camera (Setari implicite) ID camera Foto...
- Page 8 b. Fotografiere Tineti apasat butonul timp de 3 sec. pentru a va intoarce la Modul test. Apoi apasati pentru a face o fotografie. a. Setari Apasati pentru a intra in Modul Video; pictograma apare partea dreapta ecranului Video b. Inregistrarea Tineti apasat butonul pentru 3 sec.
- Page 9 Setari Foto (Setari implicite) Dimensiune imagine 2M Fotografiere in rafala 1P Daca pictograma dorita nu apare pe ecranul LCD, apasati de mai multe ori butonul Setari Apasati pentru a intra in pagina de configurari, apasati pentru a alege dimensiunea dorita a Dimensiune imagine fotografiei;...
- Page 10 apasati pentru a confirma setarile. (Suporta 5~60 secunde) Set up Apasati pentru a intra in pagina de configurare, apasati pentru a alege numarul dorit de cadre pe secunda; apasati Cadre pe secunda pentru a confirma setarile. (Optional 15FPS si 30FPS) Setari Apasati pentru a intra in pagina de configurare, apasati...
- Page 11 Reset Daca pictograma dorita nu apare pe ecranul LCD, apasati de mai multe ori butonul a. Setari 1) Apasati pentru a intra in pagina de configurare, apasati si alegeti ON; apasati din nou pentru a seta timer-ul; 2) Apasati pentru a alege numarul dorit, apasati pentru a confirma si pentru a trece la numarul Timer urmator;...
- Page 12 a. Setari Apasati pentru a intra in pagina de configurare, apasati pentru a alege ON/OFF; apasati pentru a confirma setarea. SD Cycle Recording b. Cum functioneaza? (Inregistare ciclica) Daca selectati “ON”, camera va continua sa inregistreze fotografii sau clipuri video stergand inregistrarile mai vechi de pe cardul SD.
-
Page 13: Actualizare Software
b. Cum functioneaza? Activeaza protejarea camerei cu parola; camera suporta parole de maxim 6 caractere. a. Setari Apasati pentru a intra in pagina de configurare, apasati Reset pentru a alege DA/NO; apasati pentru a confirma. (Intoarcerea la b. Cum fintioneaza? setarile din fabrica) Daca alegeti Da (Da), camera se restabili setarile din fabrica. -
Page 14: Microsd Card Selection & Battery Life Test Report
b. Conexiune PC pentru a citi cardul SD Pe ecranul camerei apare interfata de mai jos. Acum puteti citi continutul cardului SD pe PC. Apasand din nou camera va deveni o camera PC; apasati din nou pentru a iesi. Scoateti cablul de alimentare pentru a opri camera si a reporniti-o. 5. - Page 15 Teste durata baterie Conditii de test: ecran LCD stins. Mod: “Pornit” Monitorizare automata PIR Baterii alcaline 4AA Foto pe zi Timp de lucru Video pe zi Timp de lucru IR LEDs On 100 foto 26 zile 320× 240 10 sec 10 clipuri 47 zile 100 foto...
-
Page 16: Specificatii Tehnice
6. Specificatii tehnice Inregistrare Format Video .avi 720P (1280*720) Rezolutie Video D1 (640*480) CIF (320*240) Cadre pe secunda 15 / 30 FPS; programabil Lungime video 5-60sec. programabil Format imagine JPEG 2MP (1920x1080) Rezolutie imagine 5MP (2560x1920) 8MP(3264x2448) Numar declansari 1~7 foto/declansare (programabil) Volum baterie Faza lunii Temperatura... - Page 17 Limba English Tip senzor PIR (Passive Infrared) 12~15m; 50 feet Raza senzor Viteza senzor 0.8-1 sec 150mA Consum (+1380mA: 940nm IR LEDs on) (+1080mA: 850nm IR LEDs on) Alerta baterei descarcata Durata de functionare in 4 luni (4 baterii AA) stand-by Temperatura de lucru (-20 ~ 60) °C...
- Page 18 USER’S MANUAL Scouting Trail Camera PNI Hunting 2C 8MP - 16 -...
-
Page 19: Whole View And Details Of Camera
7. Whole View and Details of Camera Front View of Camera Light Sensor LCD Screen day/night Indicator Light 13 IR LEDs 13 IR LEDs PIR Sensor Lens Power/Navigation Button Menu/OK Button USB Port/ DC in SIM Card Slot Invalid Currently MicroSD Card Slot Screw Slot Battery Slot... - Page 20 Camera Screen Display (Test Mode Main Interface) Photo Mode Interface Photographing hour/min/sec Photo Resolution Multi Shot Number 0001: recorded file number of photos & video clips 9998: estimated available file number based on left memory space in memory card Video Recording Video Mode Interface Video FPS Video Resolution...
-
Page 21: Camera Menu List Introduction
8. Camera Menu List Introduction 4) First Navigation Menu Camera ID Back to Photo Video Photo+Video Settings Delete Previous Page 5) Second Navigation Menu: Settings : Photo Video Timer Time Lapse Delay Stamp SD Cycle Camera Sound Back to GPRS ON/OFF PIR Sensitivity Reset Date/Time... -
Page 22: Quick Start
9. Quick Start 9. Open back cover to insert MicroSD Card and batteries; Power On Camera 10. Press and hold Power/Navigation button for 3 sec; camera will enter PIR Auto Working mode after indicator flashes 5 times; 11. Press Menu/OK button once to wake up camera LCD screen to enter TEST Mode;... -
Page 23: Camera Operation Flow Chart
Camera Operation Flow Chart Press and hold Power / Navigation button PIR Auto 3 sec; camera will enter PIR Auto Working mode Working Mode after indicator flashes 5 times; ON/OFF Camera In PIR Auto Working Mode, press Menu / OK (PIR Auto, TEST, OFF) TEST Mode button... -
Page 24: Detail Setups
10. Detail Setups Camera Modes (Default Settings) Camera ID Photo Video VGA (640*480) Photo+Video Settings Delete Back to Previous Page If wanted setting icon is not showing on camera LCD screen, press repeatedly until it appears. c. Set up 4) Press to enter configuration page, press to choose ON;... -
Page 25: Photo Settings (Default Settings)
d. Start Recording Press and hold button for 3 seconds to return back to TEST Mode main interface; then press to take a video clip; press again to stop recording. c. Set up Press to enter Photo + Video mode; icon OK appears at right bottom of interface Photo + Video d. -
Page 26: Video Settings(Default Settings)
Set up Press to enter configuration page, press choose desired Photo Burst number; press Multi-shot confirm setting. (Support 1~7 photos per burst/ trigger.) Video Settings(Default Settings) Video Size Video Length Video Frame 30FPS Frequency 50Hz Audio Recording If wanted setting icon is not showing on camera LCD screen, press repeatedly until it appears. - Page 27 Camera Settings (Default Settings) Timer Time Lapse Delay Stamp SD Cycle Recording Camera Sound PIR Sensitivity High Time/Date GPRS Switch Camera Password Reset If wanted setting icon is not showing on camera LCD screen, press repeatedly until it appears. c. Set up 7) Press to enter configuration page, press choose ON;...
- Page 28 4) Press again after all numbers are selected to Exit. b. How does this work? Camera will take photos/ videos automatically upon the interval user set. c. Set up 3) Press to enter configuration page, press choose ON; press again to set Delay; 4) Press to choose wanted number, press confirm and move to next number;...
-
Page 29: Software Upgrade
c. Set up 4) Press to enter configuration page; 5) Press to choose, press to confirm wanted number and move to next number; 6) Press again to Exit after all numbers are selected. Time/Date d. How does this work? Date/Time; Date: “month/ date/ year”; Time: “hour/minute” Note: Plz adjust Time/Date when you turn on camera to ensure camera to function well as expected. -
Page 30: Usb Connection
Note: Don’t cut off power supply during software upgrade; otherwise, camera will not be able to be turned on again unless software upgrade via PC. USB Connection When camera is connected via USB, press and hold button , camera speaker emits one Beep Sound, and red indicator LED lights up;... -
Page 31: Microsd Card Selection & Battery Life Test Report
11. MicroSD Card Selection & Battery Life Test Report MicroSD Card Selection A memory card is required to operate the camera. When the camera is "ON" and no memory card is inserted, screen displays "No SD Card". Micro SD Card slot of camera supports up 32 GB memory card. -
Page 32: Specification
12. Specification Model 2.8C Recording Video Format .avi 720P (1280*720) Video Resolution D1 (640*480) CIF (320*240) Video Frame Rate 15 / 30 FPS; programmable Video Length 5-60sec. programmable Still Image Format JPEG 2MP (1920x1080) Still Image Resolution 5MP (2560x1920) 8MP(3264x2448) Shooting Numbers 1~7 photos/trigger(programmable) Battery left volume... - Page 33 Sensor Type PIR (Passive Infrared) Sensor Range 12~15m; 50 feet Sensor Trigger Speed 0.8-1 sec 150mA Power Consumption (+1380mA: 940nm IR LEDs on) (+1080mA: 850nm IR LEDs on) Low Battery Alert Stand-by Time 4 months (4 AA batteries) Operating Temperature (-20 ~ 60) °C Operation Humidity 5%-90%...
- Page 34 PNI Hunting 2C 8MP vadászkamera Használati útmutató - 15 -...
- Page 35 13. Összefoglalás és a kamera leírása Előlap Fényérzékelő LCD kijelző nappal/éjjel Állapotjelző 13 IR Ledek 13 IR LedekPIR érzékelő Lencsék Elindítási-leállítási gomb/navigálás Menu/OK gomb USB port/ DC táp Slot SIM kártya Slot kártya MicroSD (Nem funkcionális ennél a modellnél) Csavarok Elemtartó...
- Page 36 Kijelző (Mod Test Főinterfész) Fotó mód interfész Kép mód óra/perc/ms Fotófelbontás Multi Shot Number 0001: fénykép & video fájl száma 9998: a rendelkezésre álló fájlok becsült száma a memóriakártya megmaradt szabad helyén Mod Video Videó mód interfész Videó FPS Videó felbontás Év/hónap/dátum Az elem töltöttségi szintje Fotó...
- Page 37 14. Belépés a kamera menübe 7) Főmenü Fénykép Vissza az előző oldalra Fénykép Videó Beállítások Törlés ID kamera +Videó 8) 2-es menüszint: Beállítások Idő Fénykép Videó Timer Ciklikus Kamerahang Késés Pecsét Intervallum regisztráció Dátum/ GPRS ON/OFF Jelszó Reset Vissza az előző Óra érzékenység oldalra...
- Page 38 15. Alapműveletek 17. Nyissa fel a kamera hátán levő fedelet és helyezze be a SIM kártyát és az elemeket.; Kamerabeindítás Tartsa nyomva 3 másodpercig a Power/Navigáció gombot, a kamera a PIR Auto üzemmódba lép, miután a LED-jelzőfény ötször villog 19. Nyomja meg egyszer a Menu/OK gombot a kamera képernyőjének a megnyításához és a Test üzemmódba való...
- Page 39 A kamera üzemmódjának a leírása Tartsa nyomva 3 másodpercig a Power/Navigáció gombot, a kamera a PIR Auto üzemmódba lép, PIR Auto miután a LED-jelzőfény ötször villog Kamera ON/OFF Automatikus PIR módban nyomja meg egyszer a (PIR Auto, TEST, OFF) képernyő Mod TEST Menu/OK gombot...
-
Page 40: Speciális Beállítások
Megjegyzések: Annak érdekében, hogy a kamera megfelelően működjön, állítsa be a pontos időt; 8) Kérjük, ne kapcsolja be egyszerre a Time Lapse és Delay funkciókat; 9) A kamera bármikor megállítható a gomb megnyomásával. 16. Speciális beállítások Kamera módok (Alapértelmezett beállítások) ID Kamera Fotó... - Page 41 e. Beállítások Nyomja meg a gombot a Fénykép Módba való belépéshez; megjelenik az OK piktogram a képernyő alsó jobb oldalán. f. Fényképezés Tartsa lenyomva 3 másodpercig a gombot a Test Módba Fotó való visszatéréshez. Majd nyomja meg a gombot a fénykép készítéséhez e.
- Page 42 2)Ha minden fájl törölve van, a kamera automatikusan visszatér a teszt üzemmód fő felületéhez Kattintson a gombra a Teszt mód fő felületéhez való visszatéréshez. Fénykép beállítások (Alapértelmezett beállítások) A képméret 2M Sorozat fényképezés 1P Ha a kívánt pictogram nem jelenik meg az LCD képernyőn, nyomja meg többször a gombot.
- Page 43 Frekvencia 50Hz Audio rögzítés Ha az LCD képernyőn a kívánt piktogram nem jelenik meg, nyomja meg többször a gombot, amíg megjelenik. Beállítások Nyomja meg a gombot a konfigurációs oldal megnyitásához, nyomja meg a gombot a kívánt felbontás kiválasztásához; nyomja meg a gombot a Videófelbontás beállítások megerősítéséhez...
- Page 44 Időintervallum Késés Bélyegző Ciklikus rögzítés Kamerahang PIR érzékenység Magas Óra/Dátum GPRS Kamera jelszó Vissza Ha az LCD képernyőn a kívánt piktogram nem jelenik meg, nyomja meg többször a gombot, amíg megjelenik. e. Beállítások Nyomja meg a gombot a konfigurációs oldal megnyitásához, nyomja meg és válassza ki ON;nyomja meg újra...
- Page 45 c. Hogyan működik? A fényképezőgép képeket készít vagy időről időre rögzíti az előre beállított időtartamokat e. Beállítások Nyomja meg a gombot a konfigurációs oldal megnyitásához, nyomja meg és válassza ki ON;nyomja meg újra a kívánt késés beállításához; 7) Nyomja meg a a kívánt szám kiválasztásához, nyomja meg gombot a...
- Page 46 A nagy érzékenység jelentheti 1) érzékenyebb a kis tárgyak mozgására; 2) nagyobb észlelési távolság; 3) A fényképezőgép számára könnyebb észlelni a testhőmérséklet és a külső hőmérséklet közötti különbséget; 4) Könnyebben indíthatja a fényképezőgépet. Magas hőmérsékletű környezetben a fényképezőgép erősebben érzékeli a test és a környezeti hőmérséklet közötti különbséget, ezért javasoljuk, hogy a PIT érzékenységet a maximálisra állítsa e.
- Page 47 Csatlakoztassa az elemeket a fényképezőgépbe, vagy táplálja az áramforrást az USB kábel segítségével; Tartsa lenyomva a Power / Navigation gombot, a kamera hangjelzést Engedje el a gombot, amikor a LED villog; Nyomja meg és tartsa lenyomva a Menu / OK gombot Megjegyzés: A piros LED kijelző...
- Page 48 Távolítsa el a tápkábelt a kamera kikapcsolásához és újraindításához 17. MicroSD Card Selection & Battery Life Test Report MicroSD kártya kiválasztása A kamera használatához Micro SD kártyára van szükség. Ha a fényképezőgép be van kapcsolva, és nincs behelyezve kártya, akkor a kijelzőn a "No SD Card"...
-
Page 49: Műszaki Adatok
18. Műszaki adatok Rögzítés Videóformátum .avi 720P (1280*720) Videófelbontás D1 (640*480) CIF (320*240) Képkocka másodpercenként 15 / 30 FPS; programózható Videóhossz 5-60sec. programózható Képformátum JPEG 2MP (1920x1080) Képfelbontás 5MP (2560x1920) 8MP(3264x2448) Kattintás száma 1~7 foto/kattintás (programózható) Az elem töltöttségi szintje Holdállás megjelenítése Hőmérséklet Nyomtatás képre... - Page 50 Memória típus Micro SD kártya, 32G-ig Képernyő Képernyő B/W 1.0 inch B/W Nyelvezet Angol Szenzor típus PIR (Passive Infrared) Érzékelő sugara 12~15m; 50 feet Érzékelő sebessége 0.8-1 ms. 150mA Fogyasztás (+1380mA: 940nm IR LEDs on) (+1080mA: 850nm IR LEDs on) Figyelmeztetés a lemerült Igen elemről...
Need help?
Do you have a question about the Hunting 2C 8MP and is the answer not in the manual?
Questions and answers