
Related Manuals for PNI Hunting 400C


Summary of Contents for PNI Hunting 400C
- Page 1 PNI Hunting 400C 4G Hunting Camera / Camera vanatoare 4G User manual ..........Manual de utilizare ........
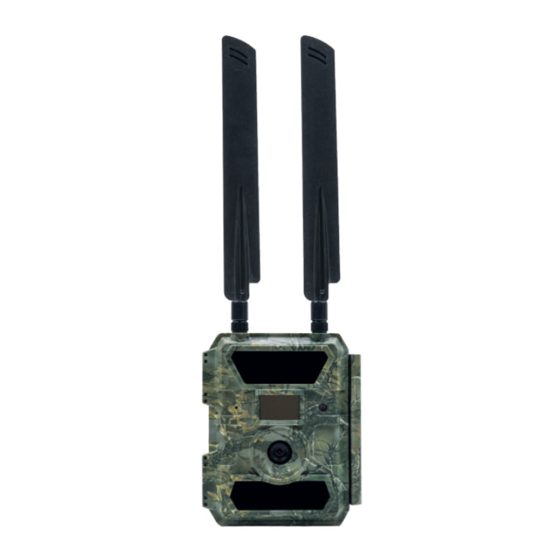
- Page 2 TRAILCAMERA APP FOR ANDROID SI IOS Scan the QR code below to download TrailCamera application to your smartphone: Android DEVICE DESCRIPTION Antenna connector 27 IR LED Indicator light / Light sensor (day/night) PIR sensor Lens 30 IR LED Power Micro USB Batteries compartment SD card slot User manual...
- Page 3 Antenna connector LCD screen Menu key Browse menu arrows ON/OFF/SETUP switch Battery compartment OK key GETTING CAMERA READY 1. Unplug the camera and insert 2. Insert the SD card in the slot 3. Insert the SIM into the 12 alkaline or Ni-MH AA batteries in the direction indicated on slot on the side of the respecting polarity.
- Page 4 CAMERA CONFIGURATION 1. Camera startup Turn on the camera by changing the ON/SETUP/OFF switch to the ON position. Under this mode, the camera enters motion detection/monitoring mode. The screen will not light up. If the camera’s default settings meet your needs, then you can mount the camera directly to the intended location.
- Page 5 VERY IMPORTANT WARNINGS • If you want to receive photo only by e-mail, disable MMS and FTP, and do not enter phone numbers in the “Send To” menu. • If you want to use the MMS function, make sure that you have the active MMS function on the SIM card and that you have previously tested the function in a phone (meaning, you can send and receive an MMS with this card).
- Page 6 FAST CONFIGURATION WITH TRAILCAMERA APP You can send basic settings to the camera, directly from the TrailCamera mobile application, to quickly configure it, or to receive emails. Just enter a SIM card with SMS, active Internet and no PIN (tested in a phone in advance) and turn on the camera (the switch is on ON position) and check as indicated above for a signal in the camera.
- Page 7 OFF/ON BATTERY SUPPLY PNI Hunting 400C works with 6 or 12 AA alkaline or rechargeable Ni-MH batteries. For better performance, we recommend using Ni-MH rechargeable batteries. In the “Battery type” menu, set the type of battery inserted into the camera.
- Page 8 SOLAR PANEL POWER SUPPLY PNI Hunting 400C works with most standard 12V/2A lithium batteries with solar panel. EXTERNAL POWER SUPPLY - for video security surveillance purpose You can also power the camera with an external 12V/2A DC adapter. When using external power, we recommend removing the batteries from the camera to avoid overloading.
- Page 9 SD card capacity 16GB 32GB Photos 3350 6935 13210 27920 2048 4205 8070 17061 12MP 1310 2701 5190 10965 Video (hours) 640x480 04:01:48 08:20:44 16:05:45 33:56:02 02:50:42 05:52:35 11:38:43 24:09:16 01:58:31 04:27:27 08:30:21 18:04:52 USB CONNECTION When the camera is connected via a USB cable, “MSDC” appears on the screen. Press the MENU key once, “MSDC”...
- Page 10 KEY FUNCTIONS • Shutter time of only 0.4 seconds • Lens 100°FOV, 100°PIR • Maximum resolution: photo - 12MP/video - 1080P @ 30FPS • Photo resolutions 5/8/12 MP • 57 IR LEDs offer a visibility of up to 20m (65 feet) at night •...
- Page 11 Press the “←” and “→” buttons to select, “Yes” to confirm, “No” to return to the previous menu. AUTO SHUT OFF In test mode, the camera will shut down automatically if no key is pressed within 3 minutes. Note: The camera will remain in the “Test” mode if the menu appears on the screen. MENU OPTIONS In Test mode, press the “Menu”...
- Page 12 All/Part Flash LED All: all 57 IR LEDs will light up in poor light conditions Part: only the 30 IR LEDs on the bottom will light up Image Size 5MP (2560*1920), 8MP (3264*2448), 12MP (4032*3024) Max range/Balanced/Min. blur 1. Max. Range: longer exposure time for longer IR illumination; less clear picture Night Mode 2.
- Page 13 High/Middle/Low Higher sensitivity to motion means: • Motion detection of small objects; • Motion detection over longer distances; • Easier for the sensor to detect the difference between Sensitivity human body temperature and ambient temperature • The camera shots more frequent If the ambient temperature is higher than the human body temperature, it is harder to detect the movement, so we recommend that you set the camera to high sensitivity.
- Page 14 Auto/Manual The camera will automatically enter the MMS and 4G settings when the SIM card is inserted; SIM Auto If “SIM Automatch failed, pls enter setups manually” appears on the Match screen, go to “SIM Auto Match” on “Manual” mode, and then enter the settings from your operator in the menu: “Manual Setup”...
- Page 15 Default/Manual/OFF The camera is equipped with default SMTP configurations; just type in receiving email accounts in “Send To” Please complete the settings below if you want to use your own SMTP server. 1. Mail server IP. Enter the mailbox IP server Example: Hotmail IP: smtp.live.com;...
- Page 16 Pic size/Multishot send Pic size SMTP and FTP sent photos have a selectable size: Small (640 * 480), or Bigger (1920 * 1440), or Original (5M / 8M / 12M depending on Image Size settings in the CAM menu Multishot Send: 1st/2nd/3rd/4th/5th Pic. Note: The Multishot feature (in the Cam-Multishot menu) must be set to 2, 3, 4 or 5 photos.
- Page 17 ON/OFF ON. Choose the ON option to set the time you want the camera to send you the daily report Note: When this option is enabled, the camera will no longer send photos Daily by e-mail. The only remaining active position is sending this report. Report What is the daily report: Device IMEI Number, CSQ (Signal Strength): 0 ~ 31, ID Camera, Temperature, Date &...
- Page 18 Other Language English… Auto/Manual Auto: the camera will synchronize the date and time after entering the time zone Date/Time Manual: set the date and time manually date : Month : year; hour : minute : second Note: Set the date / time of the camera to make certain functions work as expected.
- Page 19 TECHNICAL SPECIFICATIONS Image sensor 5 Mega Pixels Color CMOS Resolution 2560x1920 Day / Night Mode IR range IR LEDs Up: 27 LED/ Down: 30 LED Memory SD card slot (max 32 GB) Operational keys F=3.0; FOV=100°; Auto IR-Cut-Remove Lenses (at night) PIR angle 100°...
- Page 20 Wireless mode LTE Cat.4 modules Operating temperature -30°C to 60°C Waterproof IP66 Dimensions 148 x 117 x 78 mm Weight 448g IOS & Android TROUBLESHOOTING Photos do not capture subject of interest 1. Check the “Sensor Level” (PIR sensitivity) parameter setting. For warm environmental conditions, set the Sensor Level to “High”...
- Page 21 vision flash range; 4. High-quality 1.5V NiMH rechargeable AA batteries can also offer much better IR flash range; alkaline batteries cannot deliver enough amperage to power the illuminator consistently at night; 5. To ensure accuracy and quality of night time image, please mount camera to dark environment without any obvious light sources;...
- Page 22 APLICATIA TRAILCAMERA PENTRU ANDROID SI IOS Scanati codul QR de mai jos pentru a descarca in smartphone-ul dvs. aplicatia TrailCamera: Android DESCRIERE DISPOZITIV Conector antena 27 leduri IR Indicator luminos / Senzor lumina (zi/noapte) Senzor PIR Lentile 30 leduri IR Alimentare Micro USB Compartiment baterii...
- Page 23 Conector antena Ecran LCD Tasta meniu Sageti navigare meniu Comutator ON/OFF/SETUP Compartiment baterii Tasta OK (con rmare) PREGATIREA APARATULUI 1. Desfaceti aparatul si introduceti 2. Introduceti cardul SD in 3. Introduceti SIM-ul in 12 baterii AA alcaline sau Ni-MH directia indicata in fanta din fanta din partea laterala a respectand polaritatea.
- Page 24 CONFIGURARE CAMERA 1. Pornire camera Porniti camera schimband comutatorul ON/SETUP/OFF pe pozitia ON de monitorizare. In acest mod camera intra in modul de functionare/monitorizare/detectie miscare. In acest mod ON ecranul nu se va aprinde. Daca setarile implicite ale camerei satisfac necesitatile dvs., atunci puteti monta direct camera in locul destinat.
- Page 25 ATENTIONARI FOARTE IMPORTANTE • Daca doriti sa primiti foto doar pe e-mail, dezactivati functiile MMS si FTP, si nu introduceti numere de telefon in campul “Send To” (Trimite catre). • Daca doriti sa utilizati functia MMS, asigurati-va ca aveti functia MMS activa si functionala pe cartela SIM, si ca in prealabil ati testat functia intr-un telefon (puteti trimite si primi un MMS cu aceasta cartela).
- Page 26 CONFIGURARE RAPIDA DIN APLICATIA DEDICATA TrailCamera Puteti trimite setari de baza catre camera, direct din aplicatia de mobil TrailCamera, pentru o configurare rapida a acesteia sau pentru a primi imagini pe e-mail. Trebuie doar sa introduceti o cartela SIM cu SMS, internet activ si fara cod PIN (testata intr-un telefon in prealabil) si sa porniti camera (comutatorul sa fie pe ON ) si sa verificati conform indicatiilor de mai sus ca are semnal in camera.
- Page 27 Software/Module OFF/ON ALIMENTAREA CU BATERII PNI Hunting 400C functioneaza cu 6 sau 12 baterii AA alcaline sau reincarcabile Ni- MH. Pentru performante mai bune, recomandam folosirea bateriilor reincarcabile Ni-MH. Setati in meniul “Battery type” tipul de baterie introdus in camera.
- Page 28 10 secunde ALIMENTAREA CU PANOU SOLAR PNI Hunting 400C functioneaza cu majoritatea bateriilor standard cu Litiu 12V/minim 2A cu panoul solar. ALIMENTARE EXTERNA - in scop de supraveghere video de securitate Puteti de asemenea alimenta camera cu un adaptor extern 12V/2A DC. Cand folositi alimentarea externa, va recomandam sa scoateti bateriile din camera pentru a evita supraincarcarea.
- Page 29 Capacitate card 16GB 32GB Foto (numar foto) 3350 6935 13210 27920 2048 4205 8070 17061 12MP 1310 2701 5190 10965 Video (ore) 640x480 04:01:48 08:20:44 16:05:45 33:56:02 02:50:42 05:52:35 11:38:43 24:09:16 01:58:31 04:27:27 08:30:21 18:04:52 CONEXIUNE USB Cand camera este conectata printr-un cablu USB, pe ecran apare “MSDC“. Apasati tasta MENU o data, “MSDC“...
- Page 30 FUNCTII CHEIE • Timp de declansare de doar 0.4 secunde • Lentile 100° FOV, 100° PIR • Rezolutie maxima: foto - 12MP/video - 1080P@30FPS • Rezolutie foto selectabila 5/8/12 MP • 57 LED-uri IR ce ofera o vizibilitate de pana la 20m (65 feet) pe timp de noapte •...
- Page 31 FORMATARE CARD SD Format No: anuleaza formatarea cardului Yes: formateaza cardul SD (sterge tot ce este salvat pe card) Apasati butoanele “←” si “→” pentru selectare, “Yes” pentru confirmare, “No” pentru revenirea la meniul anterior. INCHIDERE AUTOMATA In modul test, camera se va inchide automat daca timp de 3 minute nu este apasata nici o tasta.
- Page 32 Photo, Video, PIC+VIDEO 1. Photo: camera va face doar fotografii atunci cand detecteaza miscare in functie de setarile de Multi-shot si Image size Cam Mode (dimensiune imagine) 2. Video: camera va face doar video in functie de setarile Video functionare Length/Size (Durata/Marime Video) 3.
- Page 33 Setari Optiuni programabile OFF/ON OFF: camera nu va face video sau foto la detectie miscare PIR Switch ON: camera va face video sau foto la detectie miscare chiar si cand Time Lapse este ON High/Middle/Low Sensibilitatea mai mare la miscare reprezinta: •...
- Page 34 OFF/ON Selectati “ON”, pentru a seta timpul de pornire si timpul de Timer 2 oprire a camerei (ora/minut); camera va functiona doar in Program functionare acel interval camera 2 Exemplu: setand intervalul 20:00 - 24:00, camera va functiona doar intre orele 20:00 si 24:00 Auto/Manual Camera va introduce automat setarile MMS si 4G cand este introdusa cartela SIM;...
- Page 35 ON/OFF Puteti alege pur si simplu sa permiteti trimiterea de foto catre numarul dvs. de telefon prin MMS prin activarea functiei MMS ON/OFF aici. Default/Manual/OFF Camera este dotata cu configuratii SMTP implicite; trebuie doar sa introduceti conturi de e-mail de primire in “Send To“ Va rugam finalizati setarile de mai jos daca doriti sa utilizati propriul server SMTP.
- Page 36 Pic size/Multishot send Pic size Fotografiile trimise prin SMTP si FTP au dimensiune selectabila: Small (640*480), sau Bigger (1920*1440), sau Original (5M/ 8M/ 12M in functie de setarile Image Size (Dimensiune imagine) in meniul CAM) Multishot Send: 1st/2nd/3rd/4th/5th Pic. Nota: Functia Multishot (in meniul Cam-Multishot) trebuie sa fie setata pe 2, 3, 4 sau 5 fotografii.
- Page 37 ON/OFF ON. Alegeti optiunea ON pentru a seta ora la care doriti camera sa va trimita raportul zilnic Nota: Cand este activata aceasta optiune, camera nu va mai trimite foto Daily pe e-mail. Singura functie ramasa activa este trimiterea acestui raport. Report Ce contine raportul zilnic: Device IMEI Number, CSQ (Signal Strength/ Nivel semnal): 0~31, Camera ID, Temperature, Date &...
- Page 38 Other Language English… Limba Auto/Manual Auto: camera va sincroniza data si ora dupa ce introduceti fusul orar Date/Time Manual: setati maual data si ora Data/Ora date : Month : year; hour : minute : second Nota: setati data/ora camerei pentru a va asigura ca unele functii functioneaza conform asteptarilor.
- Page 39 SPECIFICATII TEHNICE Senzor imagine 5 Mega Pixels Color CMOS Rezolutie 2560x1920 Mod Zi/Noapte IR range LED-uri IR Sus: 27 LED/ Jos: 30 LED Memorie Slot de card SD (max 32 GB) Taste operationale F=3.0; FOV=100°; Auto IR-Cut-Remove Lentile (at night) Unghi PIR 100°...
- Page 40 Temperatura functionare -30°C to 60°C Specificatii Waterproof IP66 Dimensiuni 148 x 117 x 78 mm Greutate 448g IOS & Android PROBLEME SI SOLUTII Fotografiile nu capteaza subiectul/obiectul vizat 1. Verificati parametrul “Sensor Level” (sensibilitate PIR). Pentru conditiile de mediu calde, setati Nivelul senzorului la “Ridicat” si pentru utilizarea in conditii de temperatura scazuta, setati senzorul pentru “Scazut”.
- Page 41 2. “Max. range” ofera cea mai buna iluminare IR. Avand in vedere ca valorile intervalelor IR, se bazeaza pe setarea intervalului maxim; astfel incat va rugam sa reglati modul de noapte la Max Range pentru o distanta mai buna de vizibilitate in timpul noptii; 3.
- Page 42 Declaración UE de conformidad simplificada SC ONLINESHOP SRL declara que el Camara de caza PNI Hunting 400C cumple con la Directiva EMC 2014/30/ EU y la Directiva RED 2014/53/EU. El texto completo de la declaración de conformidad de la UE está disponible en la siguiente dirección de Internet:...
Need help?
Do you have a question about the Hunting 400C and is the answer not in the manual?
Questions and answers