
Related Manuals for PNI Hunting 3C / 300C


Summary of Contents for PNI Hunting 3C / 300C
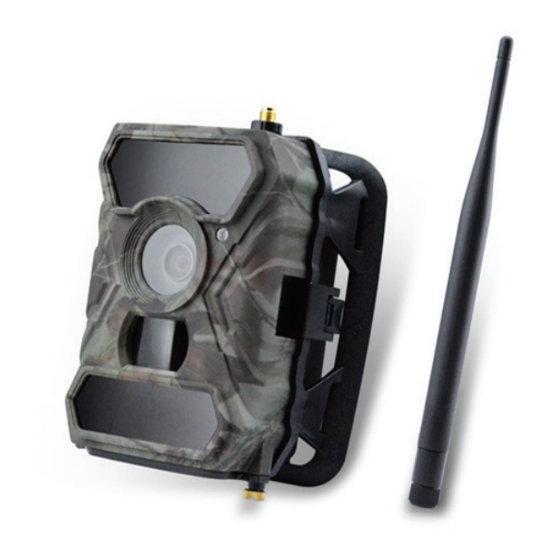
- Page 1 PNI Hunting 3C / 300C User manual / Manual de utilizare / Használati utasítás Instrukcja obsługi / Manuale dell’utente...
- Page 2 Scanati codul QR de mai jos pentru a descarca aplicatia Trail Camera (disponibila doar pentru modelul cu 3G) Android PORNIREA CAMEREI Pasul 1: Fixati antena Pasul 2: Introduceti bateriile Deschideti capacul din spatele camerei desfacand cele 2 cleme, apoi desfaceti suruburile din partea inferioara. Apasati capacul “PUSH”...
- Page 3 Pasul 4: Pornire camera Comutati butoanele 1 si 4 in pozitia “ON”, apoi apasati butonul “OK”; ecranul LED va fi luminat. Camera isi va cauta in mod automat semnal (operatiunea dureaza in jur de 30-40 secunde), dupa care veti vedea bara de semnal afisata in coltul din stanga sus al ecranului LED.
- Page 4 MENIUL CAMEREI - SETARILE DEFAULT DIN CAMERA SUNT MARCATE CU ROSU...
- Page 5 DESCRIEREA CAMEREI Figura 1: Vedere frontala a camerei 24 leduri IR Indicator luminos Senzor lumina (zi/noapte) Lentila Senzor PIR 31 leduri IR Figura 2: Vedere de jos a camerei Slot baterii Apasati usor pentru a deschide acest capac DC in SD card slot Port USB TV out...
- Page 6 Cartela SIM Figura 3: Vedere din interior (partea cu auriu in jos) Slot baterii FUNCTII TASTE & ALTE DETALII Buton pornire Buton Foto/Video Buton selectare Buton GPRS leduri IR 1) Comutare in sus: ON - pornire camera, ledul indicator rosu se aprinde de 5 ori inainte de a intra in modul automat de monitorizare la detectie miscare 2) Comutati pe “ON”...
-
Page 7: Functii Principale
FUNCTII PRINCIPALE Pe langa toate functiile pe care le au produsele similare de pe piata, aceasta camera digitala este conceputa sa ofere o utilizare foarte facila a produsului alaturi de caracteristici suplimentare cum ar fi: lentilele cu unghi larg de 100 grade, 56 LED-uri IR, timp de declansare de doar 0.4 sec, fotografiere consecutiva cu 1 foto/secunda (maxim 5 fotografii consecutive), meniu usor de utilizat, etc. - Page 8 Capacitate card SD 2 GB 4 GB 8 GB 16 GB 32 GB Rezolutie foto Foto (poze) 1631 3585 7492 15307 30936 8 MP 1041 2294 4798 9794 19795 12 MP 1613 3371 6887 13919 Video (ore) 640x480 00:05:27 00:10:13 00:22:28 00:46:57 01:35:56...
- Page 9 LISTA OPERATIUNI VIZUALIZARE FOTOGRAFII / INREGISTRARI SALVATE In modul Test apasati butonul “↑” pentru a intra in modul de vizualizarea al fisierelor salvate; apasati butoanele “←” si “→” pentru selectie, si “OK” pentru a vizualiza fisierul foto/video. Apasati “↑” din nou pentru a reveni in meniul anterior. Apasati butonul “M”...
- Page 10 Multi-shot 1/2/3/4/5 fotografii la fiecare declansare Foto multiple Video On Video Size 1280*720, 640*480, 1920*1080, Dimensiune video Video length 05~59 Secunde Lungime video • Setari Optiuni programabile High=Mare / Middle=Medie / Low=Mica Sensibilitatea mai mare la miscare reprezinta: Detectie miscari ale unor obiecte de dimensiuni mici; Detectie miscare pe distante mai mari;...
- Page 11 SIM Auto Match – Auto configurare SIM 1) Camera va introduce automat setarile MMS si 3G cand este introdusa cartela SIM; Daca "SIM Automatch failed, pls enter setups manually" apare pe ecran, treceti “SIM Auto Match” pe modul “Manual”, si introduceti apoi setarile de la operator in meniul: “Manual Setup”;...
- Page 12 SIM PIN Puteti ignora descrierea de mai jos daca SIM-ul dvs. a fost deja activat. (Faza " Pls input PIN-Code" nu va aparea dupa cautarea semnalului daca SIM-ul dvs. este initializat si nu are PIN activ.) Camera va verifica daca cartela SIM introdusa este activata in timpul cautarii semnalelor in modul "Test"; Daca SIM-ul nu este activat si are cod PIN activ , pe ecran va aparea "...
-
Page 13: Specificatii Tehnice
Language English… Limba Month : date : year; hour : minute : second Date/Time Nota: ajusteaza data / ora camerei pentru a va asigura ca unele functii functioneaza conform Data/Ora asteptarilor. Stamp Imprima ID-ul camerei programate, faza lunii, temperatura, data si ora pe fotografie Marcaj Alkaline/ NI-MH Battery Type... - Page 14 Interval declansare 4s-7s Inregistrare in bucla Alimentare Baterii: 8 buc AA/R6; Externa: adaptor 12V Tip baterii Alcaline sau acumulatori Li-Ion sau NiMH Inregistrare in bucla Tensiune alimentare Baterii: 12V; Alimentator DC: 12V Tip baterii 8AA R6 External DC Consum in Stand-by 0.173mA Timp de Stand-by 4~6 luni (4×AA~8×AA)
- Page 15 Distanta de iluminare IR nu satisface asteptarile 1. Verificati si asigurati-va ca bateriile sunt incarcate complet sau suficient de mult pentru functionare; 2. “Max. range” ofera cea mai buna iluminare IR. Avand in vedere ca valorile intervalelor IR, se bazeaza pe setarea intervalului maxim;...
-
Page 16: Quick Start
Pls scan QR codes below to download APP Trail Camera (for remote control functions of 3G model) Android QUICK START Step 1: Fix the antenna Step 2: Insert the batteries Open the latches on camera two sides slightly, then unscrewing the battery door at the bottom. Press the “PUSH” cover and put the first set 4AA batteries into camera in correct direction. - Page 17 Step 4: Get camera working Switch the 1st and 4th button to “ON”, then press “OK” button, LED screen will be lightened. Camera search signal automatically which takes around 30-40sec, then you will see the signal bar displayed in the top left corner of LED screen.
- Page 18 CAMERA MENU - CAMERA DEFAULT SETTINGS IN RED LETTER...
-
Page 19: Whole View And Details Of Camera
WHOLE VIEW AND DETAILS OF CAMERA Figure 1: Front view of camera 24 IR led Indicator light Light sensor (day/night) Lens PIR sensor 31 IR led Figure 2: Bottom view of camera Battery slot Push slightly to open this cover DC in SD card slot Port USB... - Page 20 SIM Card Figure 3: Internal, side and back view of camera (Golden Part Face Down) Battery slot KEYS FUNCTION & OTHER DETAILS Power switch Camera/Video switch IR LEDs Group GPRS switch switch Switch ON to enable camera to work; Note: indicator light flashes 5 times before camera starts to work on PIR (Auto Motion Detection Mode) Power Switch Switch ON, then press “OK”...
-
Page 21: Main Functions
MAIN FUNCTIONS In addition to all the features of similar products on the market, this digital camera is designed to provide a very easy use of the product along with additional features such as: 100-degree wide-angle lenses, 56 IR LEDs, time shutter speed of only 0.4 sec, continuous shooting with 1 photo / second (up to 5 consecutive shots), easy-to-use menu, etc. -
Page 22: Usb Connection
SD card capacity 2 GB 4 GB 8 GB 16 GB 32 GB Photo resolution Photo (pictures) 1631 3585 7492 15307 30936 8 MP 1041 2294 4798 9794 19795 12 MP 1613 3371 6887 13919 Video (hours) 640x480 00:05:27 00:10:13 00:22:28 00:46:57 01:35:56... -
Page 23: Format Of Sd Card
OPERATION LIST VIDEO/PHOTO PLAYBACK Switch ON “Power Switch”, Press “OK” once to enter Setup Mode, press arrow button “↑” to enter Playback; press “←” and “→” for selection, “OK” to play photo/video. Press button “↑” again to exit. In Playback Mode, press “Menu” button to delete files, or format SD card; press “Menu” again to exit. DELETE Delete one: delete selected photo/video;... - Page 24 Video On Video Size 1280*720, 640*480, 1920*1080, Video length 05~59 sec. • Settings Programmable Options High, Middle, Low Higher sensitivity is 1) more sensitive to movements by smaller subjects; 2) longer detection distance; Sensitivity 3) easier for sensor to detect difference between body heat and outdoor temperature; 4) easier to trigger camera to record.
- Page 25 Pls contact your operator for URL/ APN/ IP/ Port (Username & Password if required); and enter these infomation manually. (We’ll add the needed operator info into “SIM Auto Match” list whenever we’re informed with the detail MMS Setup effective information.) Note: 1.
- Page 26 Camera will check if inserted SIM card is activated during signal search in “Test” mode; If SIM is not activated, “Pls input PIN-Code” will pop up on screen after signal search; Then “SIM PIN” will turn to be configurable in “3G” page of Menu; Enter PIN code in “SIM PIN”...
-
Page 27: Technical Specifications
50HZ, 60HZ; improper setting may cause camera screen flicker; Frequency Incorrect frequency setting may cause the screen to flicker, depending on the environment. Select “ON”, press “OK”, camera will continue to record photos/videos by deleting earliest photos or SD Cycle video clips Reset Select “Yes”... -
Page 28: Troubleshooting
IR LEDs Off Photo: 120mA; Video: 110mA Wide lens Photo Max.Range: 850mA Power consumption IR LEDs On Balanced: 1050mA Min.Blur: 1250mA Video: 670mA Interface TV out/USB/SD Card/DC Port Operating temperature -30°C to 60°C Waterproof Specifications IP54 dimensions 131.42 x98.72 x77.44mm Weight 404g IOS &... - Page 29 Make sure you do not have other functions activated in the room and immediately turn them off: MMS, Timer, Delay, Time Lapse, Daily Report. Activating the MMS function without an active MMS service on the card can block sending pictures via MMS and e-mail.
-
Page 30: Gyors Útmutató
Olvassa el az alábbi QR-kódot a Camera Control alkalmazás letöltéséhez a Smartphone Trail Camera-ről (amely csak a 3G modell számára elérhető) Android GYORS ÚTMUTATÓ 1. lépés: Rögzítse az antennát 2. lépés: Helyezze be az elemeket Nyissa fel a fényképezőgép hátlapját úgy, hogy kissé kinyitja a 2 rögzítőelemet, majd csavarja le az elem ajtó alját. Nyomja meg a “PUSH”... -
Page 31: Fontos Figyelmeztetések
4 lépés: Kapcsolja be a fényképezőgépet Kapcsolja az 1 és 4 gombokat “ON” állásba, majd nyomja meg az “OK” gombot, a LED kijelző világít. Automatikus kamerajel keresés, amely kb. 30-40 másodpercet vesz igénybe, majd megjelenik a jelzőlámpa a LED-képernyő bal felső sarkában. FONTOS FIGYELMEZTETÉSEK •... - Page 32 KAMERA MENÜ - A FÉNYKÉPEZŐGÉP ALAPÉRTELMEZETT BEÁLLÍTÁSAI PIROS SZÍNŰEK...
- Page 33 A TELJES NÉZET ÉS A KAMERA LEÍRÁSA 1. Ábra: A kamera elonezete 24 IR led Fenyes jelado Feny erzekelo (nappal / éjszaka) Lencse PIR Erzekelo 31 IR led 2. Ábra: A kamera alulnézete Elemek Nyomja le óvatosan a fedelet DC in SD Kártya bemenet USB Port TV out...
- Page 34 SIM kártya 3. Ábra: Helyiség, később bal és jobb oldali nézet (rész arany lefelé) Akkumulátor töltő FUNKCIÓGOMBOK ÉS EGYÉB ADATOK Kapcsolja be/ki gomb Kamera / videó kapcsoló Az IR LED-ek GPRS gomb kiválasztása Felfelé kapcsoló: BE - a fényképezőgép elindítása, a piros jelzőfény 5 alkalommal világít, mielőtt automatizált megfigyelési módba lépne a mozgásérzékelés során Kapcsolja “BE”...
- Page 35 FŐ FUNKCIÓK A piacon megtalálható hasonló termékek mellett ez a digitális fényképezőgép a termék nagyon egyszerű használatát szolgálja, valamint további jellemzőket kínál: 100 fokos nagylátószögű lencsék, 56 IR LED, időzített zársebesség csak 0,4 másodperc, folyamatos felvétel 1 fénykép / mp-ig (legfeljebb 5 egymást követő felvétel), könnyen kezelhető menü stb. Ezenkívül valós idejű...
- Page 36 SD kártya kapacitása 2 GB 4 GB 8 GB 16 GB 32 GB Fényképfelbontás Photo (kepek) 1631 3585 7492 15307 30936 8 MP 1041 2294 4798 9794 19795 12 MP 1613 3371 6887 13919 Video (orak) 640x480 00:05:27 00:10:13 00:22:28 00:46:57 01:35:56 03:13:52...
- Page 37 MŰVELETI LISTA MENTETT FÉNYKÉPEK / FELVÉTELEK MEGTEKINTÉSE Kapcsolja be a “Power Switch” kapcsolót, nyomja meg egyszer az “OK” gombot a Setup módba való belépéshez, nyomja meg a nyílgombot a “↑” gombbal a lejátszás megadásához; nyomja meg a “←” és a “→” gombot a kiválasztáshoz, “OK” a fénykép / videó...
- Page 38 Min. Elmosódás: Rövid expozíciós idő a mozgás elmosódásának csökkentése érdekében, világosabb képet adva. Ez a lehetőség rövidebb távú IR megvilágítással rendelkezik Képméret Kiegyensúlyozott: az 1) és 3) lehetőségek közötti tökéletes kombináció) Max. Tartomány: hosszabb expozíciós idő hosszabb IR megvilágítás esetén; kevésbé világos kép;...
- Page 39 SIM Auto Match - Automatikus SIM-konfiguráció A kamera automatikusan beírja az MMS- és 3G-beállításokat a SIM-kártya behelyezésekor. Ha a “SIM Automatch nem sikerült, pls enter settings manually” megjelenik a képernyőn, ugorjon a “SIM Auto Match” menü “Manual” módjában, majd adja meg a kezelői beállításokat a “Manual Setup” menüben MMS Setup - MMS beállítása (Kérem, nyissa meg a kézi üzemmódot a "Kézi"...
- Page 40 SIM PIN Az alábbi leírás figyelmen kívül hagyható, ha a SIM-kártya már aktiválva van. (A “Pls beviteli PIN-kód” fázis nem jelenik meg a jel keresés után, ha a SIM-jét inicializálta és nincs aktív PIN-kódja.) 1) A kamera ellenőrzi, hogy a behelyezett SIM-kártya aktiválva van-e a “Teszt” üzemmódban lévő jelek keresése közben; 2) Ha a SIM-kártya nincs aktiválva és aktív PIN-kóddal rendelkezik, akkor a jelzés után megjelenik a “Pls input PIN-Code”...
-
Page 41: Műszaki Adatok
Nyelv English… Hónap: dátum: év; óra: perc: másodperc Date/Time Megjegyzés: Pls állítsa be a fényképezőgép dátumát / idejét annak biztosítására, hogy bizonyos Datum/Ora funkciók a várt módon működjenek. Stamp Kinyomtatja a programozott kamera azonosítót, hónapos fázist, hőmérsékletet, dátumot és időt a Pecset fényképen Alkaline/ NI-MH... - Page 42 Táplálás Elemek: 8 db AA / R6; Külső: 12V adapter Elemtípus Alkáli vagy Li-Ion vagy NiMH akkumulátorok Folytonos felvétel Igen Tápegység Elemek: 12V; DC tápegység: 12V Elemtípus 8AA R6 Külső DC Fogyasztás készenléti állapotban 0.173mA Készenléti idő 4~6 hónap (4×AA~8×AA) Teszt üzemmódban a kamera 60 másodpercre Automatikus kikapcsolás automatikusan kikapcsol, ha nem érintkezik...
- Page 43 A “maximális tartomány” a legjobb IR megvilágítást biztosítja. Mivel az IR intervallumértékek a maximális hatótávolság beállításon alapulnak; ezért kérjük, állítsa be az éjszakai üzemmódot a Max Range-ban, hogy jobb látómezővel távozzon; A kiváló minőségű 1.5V NiMH AA sokkal jobb IR-megvilágítás biztosított; Az alkali elemek nem képesek elegendő áramot biztosítani az éjszaka következetes megvilágítására;...
-
Page 44: Szybki Start
Zeskanuj poniśzy kod QR aby otworzyć aplikację Kontrolną kamery na Smartfonie Trail Camera (dostępny tylko dla modelu 3G) Android SZYBKI START Krok 1 Umocuj antenę Krok 2: Włóż baterie Otwórz tylną pokrywę kamery, lekko odchylając dwa zaciski, a następnie odkręć drzwiczki baterii u dołu. Naciśnij pokrywę “PUSH”... - Page 45 Krok 4: Uruchomienie kamery Przełącz 1. i 4. przycisk na “ON”, następnie naciśnij przycisk “OK”, ekran LED zostanie rozjaśniony. Sygnał wyszukiwania kamery automatycznie, który trwa około 30- 40 sekund, następnie pojawi się pasek sygnału wyświetlany w lewym górnym rogu ekranu LED. BARDZO WAŻNE UWAGI •...
- Page 46 MENU APARATU - USTAWIENIA DOMYŚLNE KAMERY W CZERWONEJ LIŚCIE...
- Page 47 PEŁNY WIDOK I OPIS KAMERY Obraz 1: Widok kamery z przodu 25 DIODY IR Kontrolka Czujnik światła (dzień noc) Obiektyw Czujnik PIR 31 DIODY IR Obraz 2: Widok kamery od dołu Wejście na baterie Naciśnij lekko aby otworzyć pokrywę DC in SD card slot Port USB TV out...
- Page 48 Karta SIM Obraz 3: Wnętrze, Lewy i Prawy boczny widok kamery (Złota dolna część) Slot Baterii KLAWISZE FUNKCYJNE I INNE SZCZEGÓŁY Przycisk uruchamiania Kamera/Wideo Klawisz Przycisk wyboru Przycisk GPRS Diod IR Przełącz w górę: ON – uruchomienie kamery,czerwona kontrolka zaświeci się...
-
Page 49: Główne Funkcje
GŁÓWNE FUNKCJE Oprócz wszystkich funkcji podobnych produktów na rynku, ten aparat cyfrowy został zaprojektowany w celu zapewnienia łatwego użytkowania produktu oraz dodatkowych funkcji, takich jak: obiektywy szerokokątne o kącie widzenia 100 stopni, 56 diod LED podczerwieni, czas otwarcia migawki tylko 0,4 s, zdjęcia seryjne z 1 zdjęciem / sekundę (do 5 kolejnych zdjęć), łatwe w użyciu menu itp. -
Page 50: Najważniejsze Funkcje
Pojemność karty 2 GB 4 GB 8 GB 16 GB 32 GB Rozdzielczość foto Photo (zdjęcia) 1631 3585 7492 15307 30936 8 MP 1041 2294 4798 9794 19795 12 MP 1613 3371 6887 13919 Video (godziny) 640x480 00:05:27 00:10:13 00:22:28 00:46:57 01:35:56 03:13:52... -
Page 51: Opcje Menu
LISTA OPERACJI PRZEGLĄDAJ ZAPISANE ZDJĘCIA / NAGRANIA W trybie testowym naciśnij przycisk “↑”, aby przejść do trybu zapisu zapisanego pliku; naciśnij przyciski “←” i “→”, aby wybrać, i “OK”, aby wyświetlić plik zdjęcia / wideo. Ponownie naciśnij “↑”, aby powrócić do poprzedniego menu. Naciśnij przycisk “M”, aby rozpocząć... - Page 52 Video On Video Size 1280*720, 640*480, 1920*1080, Wymiary wideo Video length 05~59 Sekundy Długość wideo • Ustawienia Programowalne opcje High, Middle, Low Większa wrażliwość na ruch to: wykrywanie ruchu małych obiektów; Sensitivity wykrywanie ruchu na większe odległości; Wrażliwość czujnika Lekki czujnik wykrywa różnicę między temperaturą ciała człowieka a temperaturą otoczenia; wolniejsze zwalnianie migawki;...
- Page 53 MMS Setup (Prosimy przejść do trybu ręcznego poniżej "Manual", jeżeli operator lokalny nie może automatycznie zostać przypisany do kamery przez automatyczną konfigurację). Skontaktuj się z operatorem URL / APN / IP / Port (nazwa użytkownika i hasło, jeśli to konieczne); i wprowadź...
- Page 54 Aparat sprawdzi, czy włożona karta SIM jest aktywowana podczas wyszukiwania sygnałów w trybie “Test”; Jeżeli karta SIM nie jest aktywna i ma aktywny kod PIN, po wyszukaniu sygnału na ekranie pojawi się komunikat “Pls input PIN-Code”; Następnie “SIM PIN” stanie się konfigurowalny na stronie “3G” menu; Wprowadź...
-
Page 55: Specyfikacja Techniczna
Month : date : year; hour : minute : second Date/Time Uwaga: Dostosuj datę / godzinę kamery, aby upewnić się, że niektóre funkcje działają zgodnie z Data / czas oczekiwaniami. Stamp Drukuje na zdjęciu zaprogramowany identyfikator kamery, fazę miesiąca, temperaturę, datę i godzinę Znaczek Alkaline/ NI-MH Battery Type... -
Page 56: Rozwiązywanie Problemów
Nagrywanie w pętli karmienie Baterie: 8 buc AA / R6; Zewnętrzny: adapter 12V Typ Baterii Baterie alkaliczne lub litowo-jonowe lub NiMH Nagrywanie w pętli Zasilacz Baterie: 12V; Zasilacz DC: 12V Typ Baterii 8AA R6 Zewnętrzny DC Zużycie w trybie gotowości 0.173mA Czas czuwania 4~6 miesięcy (4×AA~8×AA) - Page 57 Odległość oświetlenia IR nie spełnia oczekiwań Sprawdź i upewnij się, że baterie są w pełni naładowane lub wystarczające do pracy; “Maksymalny zasięg” zapewnia najlepsze oświetlenie podczerwienią. Ponieważ wartości interwału podczerwieni są oparte na ustawieniu maksymalnego zasięgu; więc dostosuj tryb nocny w Max Range, aby uzyskać lepszą odległość widzenia w nocy;...
-
Page 58: Avvio Rapido
Scansionare il codice QR sottostante per scaricare l’applicazione Trail Camera (disponibile solo per il modello 3G) Android AVVIO RAPIDO Passo 1: Fissare l’antenna Passo 2: inserire le batterie Aprire l*alloggiamento poteriore aprendo leggermente i due morsetti, poi svitate le viti dal lato inferiore. Premere sulla scritta “PUSH”... - Page 59 Passo 4: Avviare la camera Spostare i tasti 1 e 4 sulla posizione “ON”, poi premere il tasto “OK”. Lo schermo LED si accenderà. La camera cercherà segnale (l’operazione dura all’incirca 30-40 secondi). Successivamente nel angolo sinistro superiore dello schermo aparirà la barra del segnale. AVVERTENZE •...
- Page 60 IL MENU DELLA CAMERA - LE IMPOSTAZIONI PREDEFINITE SONO CONTRASSEGNATE IN ROSSO...
- Page 61 DESCRIZIONE DELLA FOTOCAMERA Figura 1: Vista frontale della fotocamera 24 led IR Indicatore luminoso Sensore luce (giorno/notte) Lente Sensore PIR 31 led IR Figura 2: Vista dal basso della fotocamera Scanalatura delle batterie Premere delicatamente per aprire questo scomparto DC in SD card slot Porta USB TV out...
- Page 62 Scheda SIM Figura 3: Vista dall’interno (la parte dorata in giù) Scomparto batterie FUNZIONI TASTE E ALTRI DETTAGLI Tasto di avvio Tasto Foto/Video Tasto selezione Tasto GPRS led IR 1) Spostare verso l’alto: ON - avvio della telecamera, la spia rossa si accende 5 volte prima di entrare in modalità...
-
Page 63: Funzioni Principali
FUNZIONI PRINCIPALI Oltre a tutte le funzionalità di prodotti simili sul mercato, questa fotocamera digitale è progettata per offrire un uso estremamente semplice del prodotto insieme a funzioni aggiuntive quali: obiettivi grandangolari a 100 gradi, 56 LED IR, tempo tempo di posa di soli 0,4 secondi, scatto continuo con 1 foto / secondo (fino a 5 scatti consecutivi), menu di facile utilizzo, ecc. -
Page 64: Connessione Usb
Capacità della scheda SD 2 GB 4 GB 8 GB 16 GB 32 GB Risoluzione fotografica Foto (immagini) 1631 3585 7492 15307 30936 8 MP 1041 2294 4798 9794 19795 12 MP 1613 3371 6887 13919 Video (ore) 640x480 00:05:27 00:10:13 00:22:28 00:46:57... - Page 65 ELENCO DELLE OPERAZIONI VISUALIZZARE FOTO / REGISTRAZIONI SALVATE In modalità test, premere il pulsante “↑” per accedere alla modalità di visualizzazione dei file salvati; premere i pulsanti “←” e “→” per selezionare, e “OK” per visualizzare il file foto / video. Premere di nuovo “↑”...
- Page 66 Min. blur: tempo di esposizione breve per ridurre la sfocatura del movimento, fornendo un’immagine più nitida. Questa opzione ha un’illuminazione IR a Night Mode distanza ridotta Modalità notturna Balanced: la combinazione perfetta tra le opzioni 1) e 3) Max. Range: tempo di esposizione più lungo per illuminazione IR più lunga; immagine meno chiara;...
- Page 67 • SIM Auto Match – Configurazione automatica SIM 1) La fotocamera entrerà automaticamente nelle impostazioni MMS e 3G quando è inserita la carta SIM; Se “SIM Automatch fallito, pls enter setups manualmente” appare sullo schermo, andare su “SIM Auto Match” in modalità “Manual”, e quindi inserire le impostazioni dell’operatore nel menu “Manual Setup”;...
- Page 68 Inserire il server IP FTP; Esempio: FTP Server IP: ftp://dianwan2008.gicp.net/ Enter: dianwan2008.gicp.net Inserire la porta del server FTP ; La porta più utilizzata sui server FTP è 21; Immettere la porta del server FTP di proprietà. Inserisci la password del tuo server FTP. Note: FTP carica solo foto sul tuo account FTP preimpostato;...
- Page 69 1) OFF; 2) ON; Scegliere l’opzione ON per inserire l’impostazione dell’ora in cui si desidera che la fotocamera invii il rapporto giornaliero NOTA: quando questa opzione è abilitata, la fotocamera non invierà più immagini tramite e-mail. L’unica posizione attiva rimanente è l’invio di questo rapporto. Cosa contiene nel rapporto giornaliero: Device IMEI Number, CSQ (Signal Strength/Nivel semnal): 0~31, Camera ID, Temperature, Date &...
-
Page 70: Specifiche Tecniche
SPECIFICHE TECNICHE Sensore di immagine 5 Mega Pixels Color CMOS Risoluzione 2560x1920 Modalità giorno / notte Gamma IR LED IR Top: 25 LED, Foot: 31LED Memoria Slot de card SD (max 32 GB) Tasti operativi Lente F=3.0; FOV=100°; Auto IR-Cut-Remove (di notte) Schermo LCD 2”... -
Page 71: Risoluzione Dei Problemi
Peso 404g IOS & Android RISOLUZIONE DEI PROBLEMI Le foto non catturano il soggetto / l’oggetto in questione 1. Controlla il parametro “Livello sensore” (sensibilità PIR). Per le condizioni ambientali, impostare il livello del sensore su “Alto” e per l’uso a bassa temperatura, impostare il sensore “Basso”. 2. -
Page 72: Allumer L'appareil Photo
Scannez les codes QR ci-dessous pour télécharger l’application smartphone pour le contrôle à distance de la caméra: Trail Camera (disponible uniquement pour le modèle 3G) Android ALLUMER L’APPAREIL PHOTO Étape 1: Fixer l’antenne Étape 2: Insérez les piles Ouvrez le couvercle derrière l’appareil photo en détachant les deux clips, puis desserrez les vis en bas. Appuyez sur le couvercle “PUSH”... - Page 73 Étape 4: démarrez la caméra Mettez les boutons 1 et 4 sur “ON”, puis appuyez sur le bouton “OK”; l’écran LED s’allume. L’appareil photo recherche automatiquement un signal (l’opération dure environ 30 à 40 secondes), après quoi vous verrez la barre de signal affichée dans le coin supérieur gauche de l’écran LED..
- Page 74 la caméra doit être retirée dans le champ ouvert où vous avez au moins 2 lignes de signal. Veuillez également vérifier attentivement les paramètres de l’appareil photo. MENU DE L’APPAREIL PHOTO - LES PARAMÈTRES PAR DÉFAUT SONT MARQUÉS EN ROUGE...
-
Page 75: Description De La Pièce
DESCRIPTION DE LA PIÈCE Figure 1: Vue de face de la caméra 24 led IR Indicateur lumineux Capteur de lumière (Jour / nuit) Lentille Capteur PIR 31 led IR Figure 2: Vue de dessous de la caméra Emplacement de la batterie Appuyez doucement pour ouvrir ce couvercle DC in SD card slot... - Page 76 Carte SIM Figure 3: Vue intérieure (le côté or vers le bas) Compartiment de la batterie FONCTIONS DES BOUTONS ET AUTRES DÉTAILS Bouton de Bouton photo / vidéo Bouton Sélectionner Bouton GPRS démarrage LED IR 1) Commutateur vers le haut: ON - démarrage de la caméra, le voyant rouge s’allume 5 fois avant d’entrer en mode de surveillance automatique à...
-
Page 77: Principales Fonctions
PRINCIPALES FONCTIONS En plus de toutes les caractéristiques de produits similaires sur le marché, cet appareil photo numérique est conçu pour fournir une utilisation très facile du produit avec des fonctionnalités supplémentaires telles que: lentilles grand angle de 100 degrés, 56 LED IR, temps vitesse d’obturation de seulement 0,4 secondes, prise de vue en continu avec 1 photo / seconde (jusqu’à... -
Page 78: Connexion Usb
Capacité de la carte SD 2 GB 4 GB 8 GB 16 GB 32 GB R é s o l u t i o n photo Foto (images) 1631 3585 7492 15307 30936 8 MP 1041 2294 4798 9794 19795 12 MP 1613 3371... -
Page 79: Supprimer Des Fichiers
LISTE DES OPÉRATIONS VOIR LES PHOTOS / ENREGISTREMENTS ENREGISTRÉS En mode test, appuyez sur le bouton “↑” pour entrer dans le mode d’affichage de fichier sauvegardé; appuyez sur les boutons “←” et “→” pour sélectionner, et “OK” pour afficher le fichier photo / vidéo. Appuyez à... - Page 80 Min. Blur: Temps d’exposition court pour diminuer le flou de mouvement et donner une image plus nette. Cette option a une illumination infrarouge à distance plus Night Mode courte Mode nuit Balanced: la combinaison parfaite entre les options 1) et 3) Max.
- Page 81 • SIM Auto Match – Configuration SIM automatique 1) L’appareil photo entrera automatiquement les paramètres MMS et 3G lorsque la carte SIM est insérée; Si “SIM Automatch a échoué, l’utilisateur entre manuellement dans les réglages” apparaît sur l’écran, allez dans “SIM Auto Match”...
- Page 82 Entrez le serveur IP FTP; Ex.: FTP Server IP: ftp://dianwan2008.gicp.net/ Enter: dianwan2008.gicp.net Entrez le port du serveur FTP; Le port le plus utilisé sur les serveurs FTP est 21; Entrez le port du serveur FTP propriétaire. Entrez l’accès au mot de passe du serveur FTP. Remarques: FTP télécharge uniquement les photos sur votre compte FTP prédéfini;...
-
Page 83: Spécifications Techniques
1) OFF; 2) ON; Choisissez l’option ON pour entrer le réglage de l’heure où vous voulez que la caméra vous envoie le rapport quotidien REMARQUE: Lorsque cette option est activée, l’appareil photo n’enverra plus d’images par e-mail. La seule position active restante est l’envoi de ce rapport. - Page 84 Mémoire Slot de card SD (max 32 GB) Clés de fonctionnement Lentilles F=3.0; FOV=100°; Auto IR-Cut-Remove (la nuit) Écran LCD 2” TFT, RGB, 262k Sensibilité du capteur de mouvement 3 niveaux Distance de détection de mouvement Angle de détection de mouvement 110°...
-
Page 85: Dépannage
DÉPANNAGE Les photos ne saisissent pas le sujet / objet concerné 1. Vérifier le paramètre « Capteur de niveau » (sensibilité PIR). Pour les conditions environnementales chaudes, réglez le niveau du capteur à « High » pour une utilisation à basse température, réglez le capteur sur « Low ». 2.
Need help?
Do you have a question about the Hunting 3C / 300C and is the answer not in the manual?
Questions and answers