Table of Contents
Advertisement
Advertisement
Table of Contents

Related Manuals for Innovo iE100A


Summary of Contents for Innovo iE100A
- Page 1 Digital Infrared Ear Thermometer User Manual Ver 1.1...
- Page 2 "AS IS" without warranties, guarantees or representations of any kind, either expressed or implied. The information in this document is subject to change without notice. Innovo Medical reserves the right of final interpretation of this document. Version 1.1 Issuing Date: April 2020...
- Page 3 Introduction Thank you for purchasing the Innovo iE100A Digital Infrared Ear Thermometer. The iE100A Ear Thermometer has passed numerous rigorous clinical tests and has proven to be safe, reliable and accurate when used in accordance with the operation manual. The iE100A Ear Thermometer has been specifically designed to measure body temperature from the ear.
-
Page 4: Table Of Contents
Contents Standard Packing List ......1 Features of the iE100A Ear Thermometer ........1 Important Warnings and Safety Precautions ........2 Note on Body Temperature ....4 Elements of the Thermometer ... 5 Battery Installation......6 Measuring Eardrum Temperature ..7 Measuring Object Surface Temperature ........ -
Page 5: Standard Packing List
1.Standard Packing List iE100A Ear Thermometer..……..1 PC Innovo Ear Probe Cover (box of 20)...1 PC Storage Case..…………………………1 PC 2 PCS AAA Batteries (pre-installed)………. User Manual……………………………1 PC 1 PC Quick Start Guide…………………..2.Features of the iE100A Ear Thermometer The iE100A Ear Thermometer measures body temperature from the ear canal. -
Page 6: Important Warnings And Safety Precautions
Intended use The iE100A Ear Thermometer is an infrared thermometer intended to measure body temperature via the eardrum. It may be used by medical professionals or by consumers in a home environment. - Page 7 immediately if you suspect that you or your child is not feeling well, has a fever, appears distressed or has a medical condition. Do not use the thermometer if any part, especially the sensor, shows any sign of damage. Please contact manufacturer if it is within the warranty period.
-
Page 8: Note On Body Temperature
Body temperature also varies by sites. Therefore, the iE100A Ear Thermometer should not be used to obtain body temperature from other parts of the body. Normal body temperature fluctuates throughout the day and is affected by external factors. -
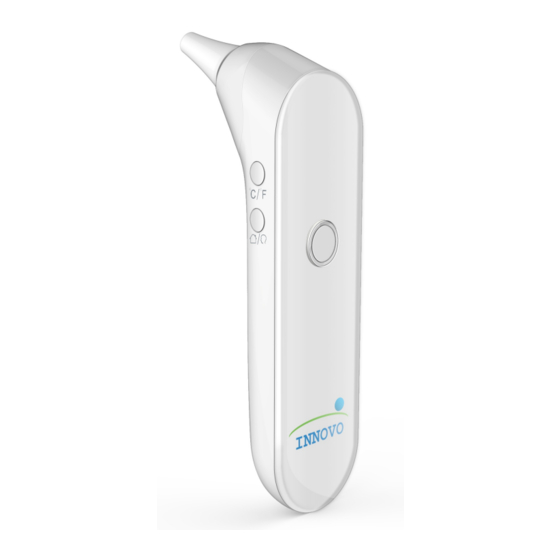
Page 9: Elements Of The Thermometer
5.Elements of the Thermometer Measuring unit (1) Unit button (Celsius/Fahrenheit) (2) Mode button (Ear/Object measurement mode) (3) LED display (4) Power/Measure button (with color coded ring) (5) Memory button (6) Sound button (On/Off) (7) Sensor lens (8) Ear probe (9) Battery cover Button and its function Button Function... -
Page 10: Battery Installation
Screen display and symbol designation 6.Battery Installation 1. Open the battery cover. 2. Install two AAA batteries into the battery compartment according to the stated polarities. 3. Close the battery cover until it snaps back in place. Note: • Prior to using the thermometer for the first time, pull the plastic tab, if any, off the battery compartment. -
Page 11: Measuring Eardrum Temperature
Warning Do not charge the included batteries because it may cause leakage, fire disaster or even explosion. Do not throw batteries into fire because it can cause an explosion. Dispose of batteries in accordance with local laws and regulations. 7.Measuring Eardrum Temperature Step 1: Power on Press the Power/Measure button to turn the thermometer on. - Page 12 The ear probe cover icon ( ) reminds user to load a new probe cover on the thermometer probe. Probe cover should be snapped on securely before measurement. Note: A new probe cover should be used for each measurement. Re-using probe cover or not using probe cover will affect the accuracy of measurement.
- Page 13 Step 3: Position Insert thermometer probe into the ear canal carefully. For accurate measurement, the probe should align with the eardrum. Note: For accurate measurement, perform an ear tug to straighten the ear canal. For children under 1 year old, gently pull the ear straight back.
- Page 14 Normal temperatures 89.6°F to 99.3°F / 32.0°C to 37.4°C Long beep Color coded ring glows blue for 3 seconds Fever may be present* 99.5°F to 109.4°F / 37.5°C to 43.0°C 10 short beeps Color coded ring glows red for 3 seconds Out of measurement range...
- Page 15 Step 5: Getting ready for next measurement Previous reading will continue to show on the screen. To enter “Ready to measure” mode, press the Power/Measure button once after color coded ring stops to glow blue or red (i.e. after 3 seconds from last reading). Screen will show “- - - -”...
-
Page 16: Measuring Object Surface Temperature
8.Measuring Object Surface Temperature Step 1: Power on Press the Power/Measure button to turn the thermometer on. Backlight comes on, color coded ring glows blue-to-red and the warm up sequence starts. Step 2: Ready to measure The Ear measurement mode ( ) is selected by default. - Page 17 Reading will be displayed in about 1 second. Note: Probe cover is not required for measuring object surface temperature. If one is still on, please remove before taking measurement. Note: You can press the Unit button ( to switch the result between Celsius and Fahrenheit.
- Page 18 ±2.0°F (±1.0°C) margin of error. Infrared radiation is affected by the material, surface color and texture of an object. Do not use the iE100A Ear Thermometer if the absolute surface temperature of an object is required. Step 4: Getting ready for next...
-
Page 19: Temperature Taking Tips For Accurate Measurement
If Power/Measure button is pressed while color coded ring still glows blue (i.e. within 3 seconds from last reading), the screen will show “hold” as the thermometer is not ready for measurement. Please wait until screen returns to show previous reading. Press the Power/Measure button again. -
Page 20: Memory Mode
temperatures will affect the reading. 4. Please use the thermometer indoor or in an environment where there is no strong air draft, such as from a fan, air conditioning or heater. 5. Keep ear canal clean and free from excess earwax build-up. - Page 21 Press the Memory button again. Screen shows “2”, then the next recorded reading. Repeat the steps above to access more recorded data. Note: You can enter Memory mode from “Ready to measure” mode by pressing the Memory button. A total of 30 readings can be recorded. ...
-
Page 22: Care And Cleaning
to confirm the deletion. “Clr” flashes three times and data is deleted. Screen shows “- - - -”. Note: To cancel data deletion after screen shows “Clr”, press the Power/Measure button once to return to Memory mode. After screen shows “Clr” and no button is pressed within 5 seconds, device will return to Memory mode. -
Page 23: Errors And Troubleshooting
readings. To clean the thermometer, wipe with a soft cloth slightly moistened with water or rubbing alcohol. Allow to air dry in a well ventilated area or gently wipe dry with a piece of tissue. Caution The thermometer sensor is extremely sensitive. - Page 24 Possible cause: Battery is completely exhausted. Solution: Replace the batteries. Refer to Section 6 on ‘Battery Dead battery Installation’. Low battery icon is displayed on screen for 10 seconds, then device powers automatically. Possible cause: Ambient temperature is too high (more than 104.0°F/ 40.0°C).
- Page 25 Color coded ring glows red for 3 seconds, then device powers off automatically in 10 seconds. Troubleshooting Problem Possible Solution Cause The battery Replace with is exhausted. new batteries of the same model or specifications. Polarities of Ensure that the batteries the batteries are reversed.
- Page 26 Attention: ● Electromagnetic interference: iE100A Ear Thermometer contains sensitive electronic components. You should not use the thermometer in an area with electromagnetic interference (e.g. near mobile phones or microwaves). ● Please dispose of the used thermometer and batteries in accordance with local regulation requirements.
-
Page 27: Technical Specifications
13.Technical Specifications Item Specification Product Innovo iE100A Digital Infrared name and Ear Thermometer model ASTM E1965; IEC 60601-1; Applicable IEC 60601-1-2 (EMC); regulations ISO80601-2-56; IEC and laws 60601-1-11 Temperature °F/°C, adjustable units Ear measurement mode: Measure- 89.6F-109.4F ment (32.0°C-43.0°C) temperature... - Page 28 When voltage is below 2.6V+0.1V/-0.05V, low battery icon ( ) flashes. Device will still work. Low battery When voltage is below indicator 2.5V+0.04V/-0.1V, low battery icon ( ) appears for 10 seconds, then device powers off automatically. Device will not work. Operating 2.6 ~ 3.3V voltage...
-
Page 29: Warranty And After-Sale Service
For inquiries, please email cs@innovogroups.com The device is covered by a one year warranty, effective from the date of purchase. Please go to www.innovo-medical.com and register your purchase. Batteries, packaging, and any damage caused by improper use are not covered under warranty. -
Page 30: Emc Information - Guidance And Manufacturer's Declaration
Symbol Description Warning device is not used correctly. Inaccurate reading or device damage may result if the Caution device is not used correctly. Protected against solid foreign objects of 12.5mm diameter and greater. Protected against IP22 vertically falling water drops when the device is tilted up to 15°. - Page 31 Guidance and manufacturer’s declaration – Electromagnetic emission The model iE100A is intended for use in the electromagnetic environment specified below. The customer or the user of the model iE100A should ensure that it is used in such an envi- ronment.
- Page 32 61000-3-3 Guidance and manufacturer’s declaration – Electromagnetic immunity The model iE100A is intended for use in the electromagnetic environment specified below. The customer or the user of the model iE100A should assure that it is used in such an envi- ronment.
- Page 33 70 % U main power (30 % power dip in supply occurs, ) for input lines current cycles of the <5 % U 61000-4- model (>95 % dip iE100A in U ) for drop off from normal level. It may be...
- Page 34 Guidance and manufacturer’s declaration – Electromagnetic immunity The model iE100A is intended for use in the electromagnetic environment specified below. The customer or the user of the model iE100A should ensure that it is used in such an envi- ronment.
- Page 35 Radia- used no ted RF 3 V/m closer to any part of the 61000- model iE100A, including ca- to 2.5 bles, than the recommen- separation distance calculated from the equation applicable to the frequency of the transmitter. Recommen- separation distance...
- Page 36 RF transmitters, an electromagnetic site survey should be considered. If the measured field strength in the location in which the model iE100A is used exceeds the applicable RF compliance level above, the model iE100A should be observed to verify normal opera- tion.
- Page 37 Recommended separation distances between portable and mobile RF communications equipment and the model iE100A The model iE100A is intended for use in an electromagnetic environment in which radiated RF disturbances are controlled. The customer or the user of the model iE100A can...
- Page 38 Manufactured for: Innovo Medical 10101 Stafford Centre Drive Ste B Stafford, TX 77477 Phone: +1-858-888-9781 cs@innovogroups.com www.innovo-medical.com...
Need help?
Do you have a question about the iE100A and is the answer not in the manual?
Questions and answers