Table of Contents
Advertisement
Quick Links
Advertisement
Table of Contents

Related Manuals for ACTi ENR-220P


Summary of Contents for ACTi ENR-220P
- Page 1 Quick Installation Guide ENR-220P 4-Channel 2-Bay Desktop Standalone NVR with 4-port PoE connectors ENR-221 9-Channel 2-Bay Desktop Standalone NVR ENR-221P 9-Channel 2-Bay Desktop Standalone NVR with 8-port PoE connectors ENR-222 16-Channel 2-Bay Desktop Standalone NVR...
-
Page 2: Before You Start
BEFORE YOU START Thank you for purchasing ACTi ENR Standalone Network Video Recorder. This guide contains all the information you need to quickly set up the device via local display interface. For detailed instructions on installation and operation, please search for the product manuals on http://www.acti.com/downloadcenter. -
Page 3: Front Panel
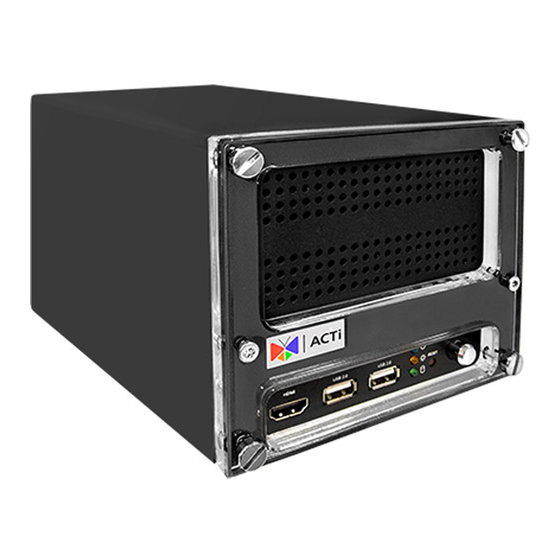
AT A GLANCE FRONT PANEL HDMI Output USB 2.0 Ports x 2 LED Indicators - Power LED (blue) - System LED (orange) - Hard Disk LED (green) Reset Button Power Button REAR PANEL ENR-221 & ENR-222 Power Connector USB 3.0 Port WAN Port LAN Port Digital Input / Output Audio Input / Output... - Page 4 AT A GLANCE REAR PANEL ENR-220P Digital Input / Output Audio Input / Output Power Connector USB 3.0 Port WAN Port LAN Port Power Over Ethernet (PoE) (PoE) x 4 ports AT A GLANCE REAR PANEL ENR-221P Digital Input / Output Audio Input / Output Power Connector USB 3.0 Port...
-
Page 5: Install Hard Disk Drive
INSTALL HARD DISK DRIVE Step 1 Remove the front panel screws, and then remove the back panel screws. Step 2 Slide the case backwards until it stops, and then lift it up to remove. Step 3 Insert Disk 2 in the lower bay, connect a SATA Power Cable and SATA Data Cable 2 to the hard disk. - Page 6 DHCP assigned WAN: (Optional) Connect to another network USB Devices Power Source via WAN for remote client connection. Default IP Address ENR-220P and ENR-221P 192.168.0.10 LAN : WAN: DHCP assigned (Optional) Connect to another network via WAN for remote client connection.
- Page 7 LOGIN 1. On the front panel, press the POWER BUTTON to turn on the ENR. 2. On the Login screen, using the on-screen keyboard, type the Account and Password. Account: admin Password: 123456 “123456” is the default password of the administrator’s user account. For security reasons, please remember to change it. Enter Numeric Keypad The User Interface...
-
Page 8: Format The Hdd
FORMAT THE HDD 1. Click the System Setup icon on the Live View screen. 2. Click the Storage > Management page. 3. Select the hard disk to format, then click Format. 4. Repeat the above steps to format the other disk, and then click OK. ADD DEVICES 1. - Page 9 Add Camera Manually If you are adding cameras located in another network, click Add Camera Manually. Fill in the IP address, HTTP Port, Account and Password. Then click Add. Or, use the RTSP page for RTP protocol. CHECK LIVE VIEW After adding the cameras, the models are listed on the left panel of the Live View screen.
-
Page 10: Manage Devices
MANAGE DEVICES Managing the devices can be done from the Live View screen. Right-click on the device model from the left panel, then click to: • Rename the device name on the list • Delete the device from the list • Setup the camera settings (see below) Camera Settings From the Camera Settings screen, click the corresponding page tab to configure... - Page 11 CHECK RECORDINGS On the Live View screen, click the Playback icon on the bottom right corner to enter the Playback screen. On the time bar, drag the current-time indicator to your desired position, and then click the Playback icon. Quick Installation Guide...
-
Page 12: System Setup
This product is under warranty Download the latest documentation, from the date of the original purchase which shall prevail over the printed version provided in the package, (“Warranty Period”). http://www.acti.com/ from downloadcenter. For more information, please visit our website http://www.acti.com/warranty...
Need help?
Do you have a question about the ENR-220P and is the answer not in the manual?
Questions and answers