ACTi ENR-110 User Manual
Enr-100 series
Hide thumbs
Also See for ENR-110:
- Quick installation manual (6 pages) ,
- Administrator's manual (139 pages) ,
- System administrator manual (148 pages)

Related Manuals for ACTi ENR-110


Summary of Contents for ACTi ENR-110
-
Page 1: User Manual
ENR-100 Series User Manual For V4.01.14 Firmware ENR-110 ENR-120 ENR-130 ENR-140 2014/08/18... -
Page 2: Legal Notice
Disclaimer The information contained in this document is intended for general information purposes. ACTi Corporation shall not be liable for errors contained herein or for incidental or consequential damages arising from the furnishing, performance, or use of this manual. -
Page 3: Regulatory Compliance Information
This product has been tested and found to comply with the limits for Class B Information Technology Equipment according to European Standard EN 55022 and EN 55024. In a domestic environment, this product may cause radio interference in which cause the user be require to take adequate measures. www.acti.com... -
Page 4: About This Manual
ENR surveillance system. The reader is expected to own not only the basic operation skills but permissions to access major functionalities defined by the System Administrator. You may also visit ACTi Download Center for updates and documents: http://www.acti.com/downloadcenter Technical Support If you have any questions during system installation, please feel free to contact our engineers via our Customer Help Desk platform http://www.acti.com/CHD. -
Page 5: Table Of Contents
4 Introduction Product Overview .................. 8 ENR Server / Client Architecture ............8 At A Glance ..................10 ENR-110 / ENR-120 / ENR-130 ..........10 ENR-140 ..................11 Power Button & Reset Button ............. 12 Turn On the Device ..............12 Turn Off the Device .............. - Page 6 Change UI language Remember Login Information Log Out ..................38 Monitoring ..................39 Live Screen Overview ..............39 Select a Customized Layout ............40 Watch a Specific Camera View ............ 40 Take a Snapshot ................41 Manual record ................41 www.acti.com...
- Page 7 Start / Stop a Tour ................ 46 Playback………………………………………………………………………..47 Playback Screen Overview ............47 Start Time Search ................ 48 Event Search ................49 Play the Video Footage ..............50 Add and Search Bookmarks ............51 Take a Snapshot ................51 Export Video ................52 www.acti.com...
-
Page 8: Introduction
Introduction Product Overview ACTi ENRSeries (hereafter referred to as ENR) is a compact and reliable multi-channel standalone NVR. It features a stable embedded Linux operating system and capabilities of supporting mega-pixel resolution H.264 streaming, an HDMI output for local display, PTZ control, scheduled / event-triggered / event speed-up recording, event management, synchronized playback, time / event-based playback search and video bookmarks. - Page 9 ENR-100 Series User’s Manual www.acti.com...
-
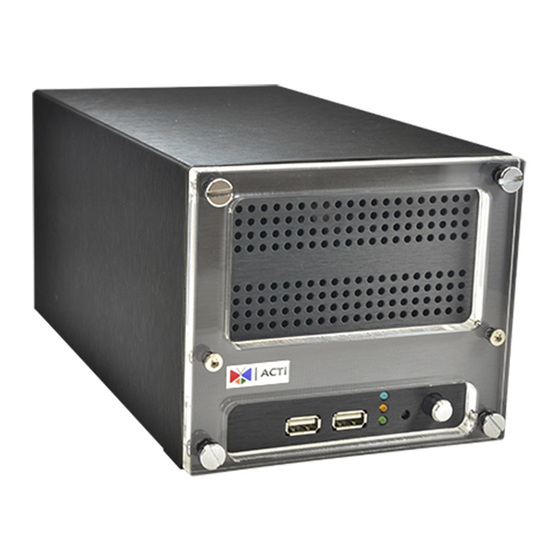
Page 10: At A Glance
ENR-100 Series User’s Manual At A Glance ENR-110 / ENR-120 / ENR-130 Front Panel Power Button USB 2.0 Ports LED Indicators Reset Button Rear Panel LAN 2 HDMI Output Power Connector www.acti.com... -
Page 11: Enr-140
ENR-100 Series User’s Manual ENR-140 Front Panel www.acti.com... -
Page 12: Power Button & Reset Button
Press down the Power Button and release, the Power LED will light up and turn solid blue. Turn Off the Device As this unit is powered on, the Power LED and System LED are both lit, and the Power Button is in pressed state. To turn ENR off, please do the following: www.acti.com... - Page 13 The local display screen will turn black, with an information dialogue box showing up. Please observe the System LED on the front panel, when its orange light is off, you may press the Power Button to completely shut down the unit. www.acti.com...
-
Page 14: Reset To Factory Default
The device power is on. Lights up for three The system resetting process is System Status seconds after Reset initializing. Orange Button is pressed Solid The system service is running. HDD LED Flashing Green The hard disk is in activity. www.acti.com... -
Page 15: Local Client Operation
Login window. Please contact your system administrator for account and password information. Log In On Login window, click into the Account and Password fields to enter your account information. Log Out On Live screen, click on the Logout button. www.acti.com... -
Page 16: System Overview
After logging in, you will enter Live screen. Live screen is the interface where you see the live streaming from your cameras and manipulate PTZ functions. Playback screen Where you can search the recordings, view the playback, put video bookmarks and export the video. www.acti.com... -
Page 17: Input Devices
The onscreen keyboards allow you to input characters without using a physical one. By clicking in a character field (e.g. Account or Server name) or number field (e.g. IP address or Port), the specific onscreen keyboard will be brought up. Standard Alphabet + Symbol Keyboard Number + Symbol Keyboard Symbol Keyboard www.acti.com... - Page 18 To disable the virtual keyboard if a physical one is already in use, on Live screen, click Setup System tab click “Keyboard”. Uncheck the box “Always shows software keyboard”. You may adjust other input devices’ settings by entering “Keyboard” or “Joystick”, and refer to System Administrator’s Manual for further details. www.acti.com...
-
Page 19: Monitoring
USB storage device, (2) LAN1 IP address, (3) LAN2 IP address,(4) Status Bar total free disk space, (5) your user account and (6) current system time. Opens Setup menu. Setup Menu Lists available layout selections and live view operation controls. Live Menu www.acti.com... -
Page 20: Display Your Desired Camera View
Enter Full Screen Mode You can hide the control panels by entering full-screen mode. On Live Menu, click this button to enter full-screen mode; on the bottom of full screen view, click “Exit Full Screen” return to normal display mode. www.acti.com... -
Page 21: Apply A Customized View Layout
Take a snapshot of this single channel ● Start manual recording of this single channel ● Enter Digital PTZ operation mode ( for all cameras, in 1x1 layout) ● Enter Optical PTZ operation mode ( for cameras with pan/tilt/zoom capabilities) ● www.acti.com... -
Page 22: Take A Snapshot
, click on it again to stop manual recording. Digital PTZ Operations Double-click on a channel to display it in 1x1 layout, and then click on it again to reveal Single Channel Menu. On Single Channel Menu, click to enable digital PTZ controls. www.acti.com... -
Page 23: Manipulate Ptz Devices On Ptz Panel
To take a snapshot of a layout containing all visible channels, select the desired layout and click on Live Menu. Manipulate PTZ Devices on PTZ Panel On Live screen, select a PTZ channel, the PTZ panel will become enabled. www.acti.com... - Page 24 Preset Points Operation mode, and click a red ID button. Start PTZ Preset Tour Click to enter Tour list. The ID of a saved tour will appear red. Click on it to start the tour, and click to stop. www.acti.com...
-
Page 25: Manipulate Ptz Devices With Mouse Controls
To execute optical Panning and Tilting, click anywhere on the live window to allow the camera to move in that direction. The farther you place the cursor from the center, the faster the Pan/Tilt movement. 2. To execute optical Zoom in or Zoom out, scroll the mouse. Pan/Tilt Zoom in Zoom out www.acti.com... -
Page 26: Layout Patrol
ENR-100 Series User’s Manual Layout Patrol By performing the Patrol function, all the four channels can be displayed by 1x1 layout in turns. www.acti.com... -
Page 27: Understand Channel Status
This will flash along with the channel outline border when the camera detects video motions on camera site. Recording Status This will appear when ENR is recording this channel by schedule, event or user’s manual control. Manual recording is proceeding Scheduled recording is proceeding www.acti.com... -
Page 28: Understand Event Notifications
On Live screen, the Event Panel displays the latest camera status alerts including digital input detection, motion detection, network loss, or network recovery. By clicking on the event notification card, you will be brought to the playback of this very event. www.acti.com... -
Page 29: Playback
Upon entering Playback screen, you will enter 16-channel synchronized playback. Display area Item Description Lists all channels Camera List Provides controls that help you search through the recorded Playback Control Panel footages easily. Lists available layout selections and playback related controls. Playback Menu www.acti.com... - Page 30 Channel 9 and Channel 13 to be played at the same time in a 2x2 layout. Drag these channels to the top. You can play certain channel in 1x1 layout by double-clicking this camera on Camera list. 1 5 9 13 To restore all the channels back to their original positions, click this button. www.acti.com...
-
Page 31: Start Time Search
2. On layout selection panel, select Start Time Search If you know the specific time of the event, you may start from choosing the precise, date and the hour. 1. Click on the current-time indicator above the time bar www.acti.com... - Page 32 The digital input device (e.g. PIR sensor) connected with the camera detected motion events during this period. ENR lost network connection with this camera during this period. Video encoder loses the signal from this camera Click “OK” to close the window. www.acti.com...
-
Page 33: Event Search
1. Click on the “Event Search” button on Playback Menu. 2. On Event Search window, define the Search Time, Duration, Cameras and Event Type then click “Search”. 3. After the search is completed, click “Cancel” to close this window. www.acti.com... -
Page 34: Play The Video Footage
List of events Play the Video Footage Use the buttons on Playback Control Panel to play your desired video footages. Bookmark the selected time Go to present time Reverse Play / Pause / Play Timeline scale Switch Play Speed Switch www.acti.com... -
Page 35: Add And Search Bookmarks
The bookmarks will be shown on the left, click any bookmark to go to the saved time position. To delete a bookmark, simply right-click on it to being up the confirmation window, click “OK” to delete the selected bookmark. www.acti.com... -
Page 36: Take A Snapshot
2. Select the Export Duration and Export Type, and click “Start”. The exported video will be saved onto the USB mass storage. Please make sure the USB mass storage has already been connected to ENR device and the available storage space is enough. www.acti.com... -
Page 37: Remote Client Operation
Type in the IP address and port number directly into Internet Explorer. Sample IP will look like this: http://220.228.146.21:1000 or domain name http://enr.acti.com. If the port number is 80, you do not need to append it when typing the address. http://ip address:port number Log In www.acti.com... -
Page 38: Enter Account & Password
To have the server remember your Account, Password and language setting for future, check “Remember me”. Auto-login By enabling Auto-login function, you can enter ENR Live screen directly without inputting user account and password next time. Log Out On Live screen, click “Application” “Logout”. www.acti.com... -
Page 39: Monitoring
Points and Tour controls. This panel is only enabled when a PTZ device channel is selected on live view display area. Live Screen Lists available layout selections and live view operation controls. Menu Click the tabs to enter other screens: Playback and Setup Screen Switch www.acti.com... -
Page 40: Select A Customized Layout
You can switch you current view to another pre-set custom layout by clicking on the layout name. Watch a Specific Camera View To watch a certain camera view which is not in your current layout, double-click on it on Camera list, the new channel will be added to your current layout. www.acti.com... -
Page 41: Take A Snapshot
To record the live stream of a channel, right-click on it and then select “Manual Record”. As the manual recording proceeds, a hand icon will appear right on this channel on Camera list. To stop recording, right-click on the channel and select “Manual Record” again. www.acti.com... -
Page 42: Trigger Digital Output
If a camera is connected with an audio-out device( e.g. a speaker), you can make use of the audio-in device ( e.g. a microphone) to send the audio signal to the camera side. To do this, right-click on the channel and select ”Audio Out”. www.acti.com... -
Page 43: Digital Ptz Navigation
Picture in Picture view. Draw Zoom area Picture-in-Picture area Cancel Zoom area If this camera has optical PTZ feature, you will have to right-click on the channel and select “Digital PTZ” to start digital PTZ navigation. www.acti.com... -
Page 44: Optical Ptz Navigation
Pan/Tilt Zoom in Zoom out - Use onscreen controls to operate PTZ movements: Open the PTZ panel on the left, and click on the controls the functions of which are explained below: www.acti.com... -
Page 45: Go To A Preset Point
If the system administrator has previously defined certain PTZ preset points, you can directly click on a preset button to have the camera find the corresponding view. The executable preset point buttons appear as buttons 1 and 2 below www.acti.com... -
Page 46: Start / Stop A Tour
If the system administrator has previously defined certain PTZ tour, you can directly click on a preset tour button to have the camera execute the tour. To stop the tour, click on the “Pause” button. The executable preset tour buttons appears as buttons 1 below www.acti.com... -
Page 47: Playback
Upon entering Playback screen, you will enter 16-channel synchronized playback Display area Item Description Lists all channels Camera List Provides controls that help you search through the recorded Playback Control Panel footages easily. Lists available layout selections and playback related controls. Playback Menu www.acti.com... -
Page 48: Start Time Search
1. Click on the current-time indicator above the time bar. 2. Specify the date on the calendar, and click “OK”. 3. To search for footage of a specific event, click on the event filter to highlight those special events in different colors. www.acti.com... -
Page 49: Event Search
If you want to filter the recording by Event Type, you may perform an event search to locate the desired video footage. 1. Scroll the time bare to your desired position. 2. Click on the “Search” button on Playback Menu. www.acti.com... -
Page 50: Play The Video Footage
4. The search result will be display on the Search Result panel. Click on an event to jump to the time spot. Play the Video Footage Use the buttons on Playback Control Panel to play your desired video footages. Reverse Play / Pause / Play Click to change play speed www.acti.com... -
Page 51: Add And Search Bookmarks
You can take a snapshot of the currently-displayed image of a channel and save it as a JPG file on your computer. On Playback Menu, click . Select the camera channel, input the overlay text (optional), select the destination folder to save the file and click “Save This” to export this image. www.acti.com... -
Page 52: Export Video
2. Drag the time bar to the end point of the footage, right-click on the time bar and select “Mark Export End” 3. Click on the Playback Menu. 4. On Export window, select the channels, file format and the destination folder, and then click “Export”. www.acti.com...
Need help?
Do you have a question about the ENR-110 and is the answer not in the manual?
Questions and answers