Advertisement
Quick Links
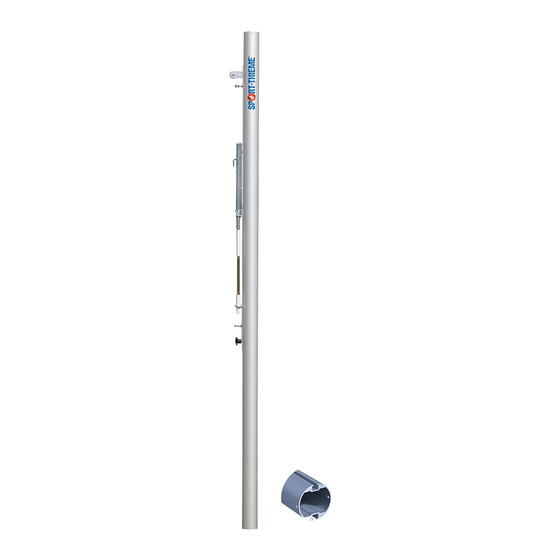
Montageanleitung
Volleyball-Pfosten
Bestell-Nr. 1178047, 1178050, 1377008,
13770110
Hinweise zum Einbetonieren der
Bodenhülsen:
1. Bodenhülsen gem. Zeichnung einbauen.
Wir empfehlen, daß diese negativ mit 1°
Neigung nach außen gesetzt werden.
2. Verwenden Sie beim Einbetonieren der
Bodenhülse keine Schnellabbinde- oder
Frostschutzmittel, da diese Zusätze zu
Beschädigungen der Bodenhülsen führen
können.
3. Wenn die Anlage bei Spielfeldern mit
Kunststoffbelägen eingesetzt wird, müssen
die Bodenhülsen entsprechend gekürzt
werden, oder aber spezielle Bodenhülsen für
Kunststoffbeläge eingesetzt werden.
Montage der Schiene für Pfosten mit
Spannvorrichtung:
1. Rollenhalter (U-Profil) mit Inbusschrauben
M 6x16 und Fächerscheiben in die beiden
oberen Gewindelöcher montieren.
2. Rolle mit Linsenkopfschraube M 6x25 und
Flachmutter M 6 in Rollenhalter einsetzen.
Instruction for Assembly
Volleyball-Uprights
Catalogue no. 1178047, 1178050, 1377008,
13770110
Indications to concrete ground sockets:
1. Mount ground sockets according to the
drawing. We recommend to place them
negative-going by about 1° declination to
the outside.
2. Do not apply an acceleration mixture or
antifreeze as these adhesives may cause
damages to the sockets.
3. The ground sockets have to be shortened
correspondingly if the unit is used on plastic
grounds or if special ground sockets for plastic
grounds are used.
Assembly of the rail for uprights with
tensioning device:
1. Mount roller holding device (U-profile) with
hexagon socket screws M 6x16 and fanshaped
disks into the upper thread holes.
2. Fit roller into roller holding device with oval
head screw M 6x25 and flat nut M 6.
3. Screw handwheel into lower thread hole.
Instructions d'Assemblage
Poteaux de Volleyball
Référence 1178047, 1178050, 1377008,
13770110
Renseignements pour bétonner des manchons:
1. Monter les manchons selon l'esquisse. Nous
recommandons de les fixer négativement à
l'extérieur avec une inclinaison de 1 dégrée.
2. N'employer pas d`accélérateur de prise ou
de solution antiréfrigérante parce que ces
adjuvants peuvent endommager les manchons.
3. Les manchons sont à raccourcir conformément
si l`équipement est appliqué sur des terrains
plastiques ou si des manchons spéciaux pour
des terrains plastiques sont utilisés.
Montage du rail pour les poteaux avec
dispositif de tension:
1. Monter le dispositif de retenue à rouleaux
(profilé en U) avec des boulons à six pans
creux M 6x16 et des rondelles coniques à
eventail dans les deux trous taraudés.
2. Mettre le rouleau dans le dispositif de retenue
avec vis à tête bombée M 6x25 et écrou
plat M 6.
1
Advertisement

Related Manuals for Sport-thieme 1178047


Summary of Contents for Sport-thieme 1178047
- Page 1 Montageanleitung Instruction for Assembly Instructions d’Assemblage Volleyball-Pfosten Volleyball-Uprights Poteaux de Volleyball Bestell-Nr. 1178047, 1178050, 1377008, Catalogue no. 1178047, 1178050, 1377008, Référence 1178047, 1178050, 1377008, 13770110 13770110 13770110 Hinweise zum Einbetonieren der Indications to concrete ground sockets: Renseignements pour bétonner des manchons: Bodenhülsen:...
- Page 2 4. Screw nuts M 8 on closed threaded ring eyes 3. Visser la roue à main dans le trou taraudé 3. In das untere Gewindeloch Handrad ein- M 8x25. Screw one in boring below roller inférieur. drehen. holding device, one above handwheel and fix with nuts.
- Page 3 Enfoncer les capuchons en haut et en bas et les Tensioning of the net: ouvrir en forant par les percages des poteaux Bei runden Pfosten ∅ 83 mm: Use the flexible crank mounted at the tensioning avec un percoir de 1,5 mm et les fixer avec des Pfostenverschlußkappen oben und unten in die device to tension the net.
- Page 4 que l’écrou pour la corde du filet roule Wartungshinweise: Warning: parfaitement sur le pivot. Faire attention qu’il y Bitte unbedingt beachten, daß alle Schraub- Before use check if all connections are fixed a toujours assez de graisse sur le pivot. verbindungen von Zeit zu Zeit überprüft und and reinspect it from time to time.
-
Page 8: Mounting Instructions
Einbauhinweise für Beachvolleyball – Bodenhülsen Art. 1178050, 1377011 zum Aufdübeln Art. 1178047, 1377008 zum Einbetonieren ___________________________________________________________________ Mounting Instructions for Beach Volleyball Ground Sockets Art.no. 1178050, 1377011 for plugging Art.no. 1178047, 1377008 for concretion _____________________________________________ Instructions pour le montage des manchons pour les poteaux de Beach Volleyball Réf. - Page 9 1. Bodenhülsen „zum Aufdübeln“ entsprechend der Spielfeldgrösse auf Betonfundament auf- dübeln. Hierbei beachten, dass die Bodenhülsen mit 1° negativ Neigung gefertigt wurden. Auf der Bodenplatte der Bodenhülse ist „Ziffer 1“ einge- prägt. Diese muß beim Aufdübeln nach innen Richtung Netz zeigen. Gesamtlänge: 360mm Einstecktiefe: 350mm 2.
Need help?
Do you have a question about the 1178047 and is the answer not in the manual?
Questions and answers