Table of Contents
Advertisement
Quick Links
Advertisement
Table of Contents

Related Manuals for VIRTUFIT Etappe I


Summary of Contents for VIRTUFIT Etappe I
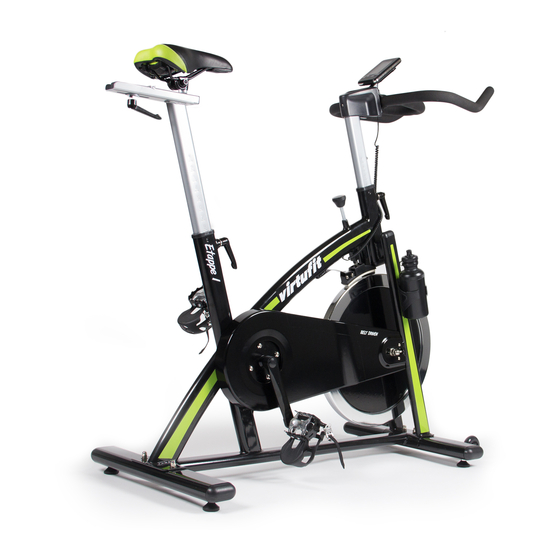
- Page 1 Etappe 1 Spinbike User manual Gebruikershandleiding Virtufit Etappe 1...
- Page 2 ASSEMBLY INSTRUCTIONS 9 - 10 ADJUSTING THE BIKE ADJUSTING THE BIKE 11 -12 MAINTENANCE MAINTENANCE 13 - 15 CONTROL PANEL CONTROL PANEL EXPLODED DRAWING EXPLODED DRAWING 17 - 18 PARTS LIST PARTS LIST TRAINING INSTRUCTIONS TRAINING INSTRUCTIONS VirtuFit Etappe 1 Spinbike...
-
Page 3: Safety Instructions
0.5 metres of free space all around it. – Before using the device, check that the nuts and bolts are securely tightened. – The safety of the device can only be maintained if it is regularly examined for damage and/or wear and tear. VirtuFit Etappe 1 Spinbike... - Page 4 – Maintenance assembly and repair work not carried out by an official dealer. – In the event of improper use, neglect and / or poor maintenance. – Failure to maintain the device in accordance with the manufacturer’s instructions (see the enclosed manual). VirtuFit Etappe 1 Spinbike...
- Page 5 Attach the Rear Stabilizer (4) to the Main Frame (16) using two sets of Ø8 Flat Washers (5), M8 Domed Nut (6) and M8*52 Carriage bolt (3). • Then fix the bottle holder (9) to the main frame with 2 PCS screw3 (43), put the Bottle (32) to the bottle holder (9) VirtuFit Etappe 1 Spinbike...
- Page 6 Insert the vertical Seat Post (10) into the main frame (16) and line up the holes. • Secure the saddle in position with the Adjustment Knob (7). The correct height for the seat can be adjusted after the bike is fully assembled. VirtuFit Etappe 1 Spinbike...
- Page 7 (22) with bolt (81) and connect plug (A1 & A2). De pedalen (pt.1 L gemarkeerd met "L" Rechts. Sluit ze aa crank. De rechter rechterzijde van het zitten. Merk rechterpedaal moet met de klok mee en VirtuFit Etappe 1 Spinbike...
- Page 8 When you start to notice that the block is getting dry, put a little silicone oil on the block again. Make sure that the block does not get dry. VirtuFit Etappe 1 Spinbike...
-
Page 9: Adjusting The Bike
(Pt.18) me and then the secondary knob. (pt.19) en M LET OP: STEVIG VA Schuif de Computer H stekker (A1 FIG.3 FIG.4: De peda gemarkee Rechts. S crank. D rechterzij VirtuFit Etappe 1 Spinbike zitten. -
Page 10: Emergency Brake
Emergency Brake function in any situation indrukken. you would need it in, firmly press down on the Emergency Brake & Brake Control Knob (52). NOTE: To use the emergency brake function you must press the button (52). Press firmly. VirtuFit Etappe 1 Spinbike... -
Page 11: Daily Maintenance
SEMI-ANNUAL MAINTENANCE • Inspect all bolts and nuts in connection with moving parts of the device, tighten as required. • Check the mobility of moving parts and components of the use equipment, silicone spray if necessary. VirtuFit Etappe 1 Spinbike... -
Page 12: Changing The Batteries
2. Use a 3V CR2032 battery as power supply. 3. Remove the screws from the battery holder. 4. Remove the battery protective cap. 5. Insert the battery in the indicated location. 6. Replace the battery protective cover and screw it back on. VirtuFit Etappe 1 Spinbike... -
Page 13: Control Panel
• Press and hold the button for 2 seconds to clear all settings. To set the values of TIME, DISTANCE, DISTANCE, CALORIES and PULSE, you can hold down the button to quickly increase the values (this is not possible during training). VirtuFit Etappe 1 Spinbike... - Page 14 Shows the user’s heart rate. You can set a target heart rate. When your heart rate PULSE reaches the target heart rate, the computer will indicate this with a “Bi” alarm sound. VirtuFit Etappe 1 Spinbike...
- Page 15 4. U kunt ook de “MODE” knop gebruiken om één waarde te selecteren en weer te geven. Alle andere des verdwijnen dan, behalve RPM en SPEED. Deze blijven zichtbaar, en wisselen van display venster. waardes verdwijnen dan, behalve RPM en SPEED. Deze blijven zichtbaar, en wisselen van display ven VirtuFit Etappe 1 Spinbike...
-
Page 16: Exploded Drawing
EXPLODED DRAWING TEKENING & ONDERDELEN LIJST VirtuFit Etappe 1 Spinbike... -
Page 17: Parts List
Computer holder Bushing Computer Spring 1 End kap (3) Bolt Locking knob Wheel Flat washer φ32*φ8.2*2 Nut M8 End kap (1) Fixing nut M12*1.25 Fixing nut 1 Fixing tube Crank end cap Bearing End kap (4) Flywheel VirtuFit Etappe 1 Spinbike... - Page 18 Flywheel cover Flat washer 35*20*2.0 Fixing nut Spring 2 Short fixing tube Flat washer 27*M20*1 Domed nut Spring cover Spring 3 Plastic frame Little plastic Woolly block Bolt 1 Spring brake Lock nut Spring washer Bolt 2 VirtuFit Etappe 1 Spinbike...
-
Page 19: Training Instructions
The purpose of cooling down is to return the body to its normal or near normal, resting state at the end of each exercise session. A proper cool-down slowly lowers your heart rate and allows blood to return to the heart. VirtuFit Etappe 1 Spinbike... - Page 20 For questions or missing parts please contact your dealer.
Need help?
Do you have a question about the Etappe I and is the answer not in the manual?
Questions and answers