
Related Manuals for Hoover Expert


Summary of Contents for Hoover Expert
- Page 1 Advanced Intelligence Robotic Vacuum Cleaner expert 3D Object Detector Technology Cliff/Stair Avoidance Sensor Anti-Bacterial UV Cleaning Light and HEPA Filtration...
-
Page 3: Specifications
9240 Expert Congratulations on the purchase of your new HOOVER vacuum cleaner. There are many useful features built into your extractor and we recommend that you carefully read this instruction manual so that you may take best advantage of them. -
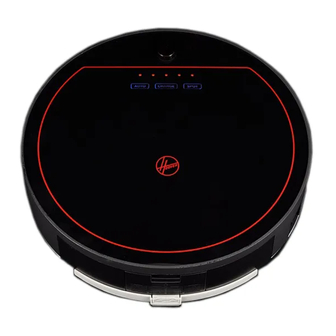
Page 4: Robot Vacuum
Robot Vacuum: Top cover AUTO/automatic cleaning Decorative lights CHARGE/charge SPOT/spot cleaning Signal transmitter Decorative lights Auto-charging electrodes Wall detection sensors Anti-bacterial Floor brush UV light Left wheel Dust container Ground detection sensors Main cleaning brush Battery cover Power switch Front wheel Side brush Battery charger socket... -
Page 5: Before You Begin
Before you Begin This cleaner must be operated in accordance with these instructions and used only for domestic household cleaning to remove DRY dirt and dust from household carpet and flooring. This cleaner is not fit to be used as an industrial cleaner hence will void the manufacturer’s warranty if used inappropriately. Please read these instructions thoroughly This will ensure you obtain full benefit from your new cleaner. -
Page 6: Safety Precautions And Warnings
Safety Precautions & Warnings WARNING: Electricity can be extremely dangerous. This appliance is powered by rechargeable Ni-MH batteries and is provided with a charging base plate. Please ensure the voltage marked on the mains power adaptor is suitable for connection to standard mains power outlet voltage. - Page 7 Safety Precautions & Warnings No one else can disassemble, maintain or transform Don’t use other chargers only the one supplied with the product except the maintenance technicians the unit or it may cause product damage, electric designated by our company, or it may cause fire, shock or fire due to high voltage.
- Page 8 Assembly WARNING! The cleaner should be switched off and disconnected from the mains power supply before assembling. Note: Remove the protective film from the top cover. Battery Replacement & Instalment Release the battery cover screw with a screwdriver, by turning in an anti-clockwise direction.
-
Page 9: Before Use
Preparation Battery Replacement and Instalment – Virtual Wall Open the cover. Place the batteries, 2 x AAA DC 1.5V battery (not included) with correct polarity (+/-). Remove the battery if the Virtual Wall is not in use for extended periods. Battery Replacement and Instalment –... -
Page 10: Function Information On Panel
Preparation (continued) To obtain a better cleaning result, it is suggested remove any chairs from the area to be cleaned. Make sure there is no step more than 20mm in the area to be cleaned, the cleaner may not be able to go across or may get stuck. - Page 11 SPOT: • Press the “SPOT” button, the cleaner will work in the spot cleaning mode; it will work around 1-2 minutes within 1 square metre. Note: The cleaner won’t go back to the charging station while the battery is not low. •...
-
Page 12: Automatic Charging
Preparation (continued) Charging Method of Main Body (Continued) Press the “CHARGE” button on the remote controller or the machine panel and the cleaner will search for the charging base plate to charge in a valid scope. When the machine is searching for the charging base plate, press the “CHARGE”... -
Page 13: Remote Controller
Instructions for Use Remote Controller Control Panel of Remote Controller Weekdays Emission signal Current time Pre-set to select all or turn Pre-set time off charging indicators Pre-set cleaning Charge Setting of current time TIMER Speed Automatic cleaning Power button Con firm Spot cleaning Direction buttons... - Page 14 Instructions for Use (continued) Functions Introduction of Remote Controller SPEED selection • Press “SPEED” button on the Remote controller, you can choose fast or slow running speed. fast speed slow speed TIMER (Current TIMER Setting) • Press “TIMER” button first and then press “ ” “ ” buttons, you can see a shining spot on the screen of the Remote controller switching among hour, minute &...
-
Page 15: Virtual Wall
FULL GO FUNCTION Press the “SET” button, the screen shows a shinning spot, then press the “UV” button, you can see “ ” displaying with the first F flashing, press again the “SET” to stop flashing which indicates FULL GO function is activated, so the machine can automatically clean when has been fully charged. - Page 16 Preparation (continued) Virtual Wall (Continued) Charging Base Plate Code check button LED Indicator (backside) Infrared signal transmitting window Charging electrode DC socket...
- Page 17 Automatic Charging Position the charging base plate on a hard, level surface against a wall. No obstacle or hollow areas 3m away from the charging base plate in the front and 1m on the right and left. The Robot cannot search the charging base plate for charging if the infrared signal transmitting window of the charging base plate is covered.
-
Page 18: Troubleshooting
Troubleshooting Assembly & Disassembly of Dust Box IMPORTANT! Always ensure the cliff sensor, wall sensor and the bumper are kept clean and free of dust using the microfibre cloth provided. Switch off the cleaner. Hold the machine bottom with your hand, press the button on the dust box. -
Page 19: Filter Replacement & Cleaning
Filter Replacement & Cleaning Press the two side clips over the dust box to open the fencing plate, If the rubber part which attached the fencing plate was worn out, you need to take out it for replacement. take out Press the button on the dust box, the fan assembly will automatically pop up. - Page 20 Troubleshooting (continued) Filter Replacement & Cleaning (Continued) Reinstall the filter in the original position. Rubber cleaning head Tip: The rubber cleaning head sometimes might be dropped off when you clean the dustbin, please follow the below instruction to reinstall it. Assembly &...
-
Page 21: Assembly & Disassembly Of Side Brush
Assembly & Disassembly of Side Brush Release the screw in the main shaft of the side brush before you change a new one. Press the side brush against the main shaft and then fasten the screw. Cleaning of Main Brush and Floor Brush Clear the hair or big dust particles on two ends of the brushes regularly to improve the cleaning performance. -
Page 22: Failure Information
Problems and Solutions If you come across a problem, please use the checklist of troubleshooting tips before ringing Hoover Customer Care. Problem... - Page 23 Problem Solutions The cleaner goes across the 1. Check the virtual wall is turned on. virtual wall. 2. Check the correct battery is used and fitted to the virtual wall properly. Ensure the power of the virtual wall is enough. 3.
-
Page 24: Conditions Of Warranty
Robotic Vacuum Cleaner Conditions of Warranty Your Hoover cleaner, in the case of domestic use, has a one year parts The decision to repair or replace the cleaner is at the sole discretion of and labour warranty against product defects and failures when the Hoover Floorcare.
Need help?
Do you have a question about the Expert and is the answer not in the manual?
Questions and answers