Table of Contents
Advertisement
Quick Links
Advertisement
Table of Contents

Subscribe to Our Youtube Channel
Related Manuals for NI cRIO-FRC II


Summary of Contents for NI cRIO-FRC II
- Page 1 Artisan Technology Group is your source for quality new and certified-used/pre-owned equipment SERVICE CENTER REPAIRS WE BUY USED EQUIPMENT • FAST SHIPPING AND DELIVERY Experienced engineers and technicians on staff Sell your excess, underutilized, and idle used equipment at our full-service, in-house repair center We also offer credit for buy-backs and trade-ins •...
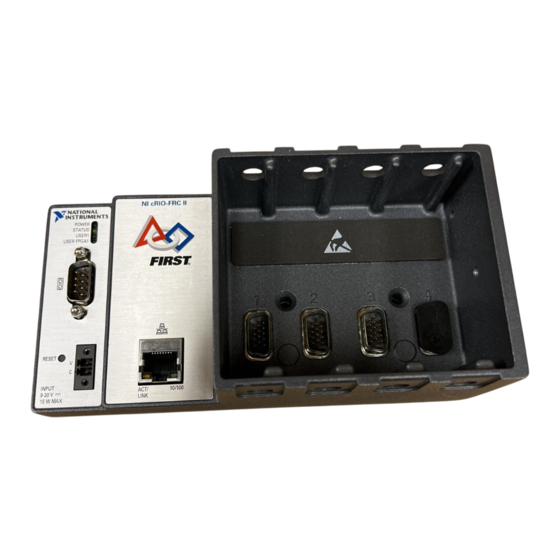
- Page 2 5. RS-232 Serial Port 3. Power Connector This document describes how to connect the cRIO-FRC II to a network and how to use the features of the cRIO-FRC II. This document also contains specifications for the cRIO-FRC II. Artisan Technology Group - Quality Instrumentation ... Guaranteed | (888) 88-SOURCE | www.artisantg.com...
-
Page 3: Safety Guidelines For Hazardous Locations
Safety Guidelines for Hazardous Locations The cRIO-FRC II is suitable for use in Class I, Division 2, Groups A, B, C, D, T4 hazardous locations; Class I, Zone 2, AEx nA IIC T4 and Ex nA IIC T4 hazardous locations; and nonhazardous locations only. -
Page 4: Electromagnetic Compatibility Guidelines
• A number 2 Phillips screwdriver • Power supply • Ethernet cable NI cRIO-FRC II User Manual and Specifications | © National Instruments | 3 Artisan Technology Group - Quality Instrumentation ... Guaranteed | (888) 88-SOURCE | www.artisantg.com... -
Page 5: Related Documentation
You can mount the chassis horizontally on a flat, vertical surface. The following figure shows the chassis mounted horizontally. Figure 2. cRIO-FRC II Mounted Horizontally 4 | ni.com | NI cRIO-FRC II User Manual and Specifications Artisan Technology Group - Quality Instrumentation ... Guaranteed | (888) 88-SOURCE | www.artisantg.com... - Page 6 4.0 mm 4.0 mm Cooling Outline (0.16 in.) (0.16 in.) 25.4 mm (1 in.) NI cRIO-FRC II User Manual and Specifications | © National Instruments | 5 Artisan Technology Group - Quality Instrumentation ... Guaranteed | (888) 88-SOURCE | www.artisantg.com...
- Page 7 Panel or wall mounting is the best method for applications that are subject to high shock and vibration. You can use the NI 9904 panel mount kit to mount the cRIO-FRC II on a flat surface. Complete the following steps.
- Page 8 Panel or wall mounting is the best method for applications that are subject to high shock and vibration. If you do not have the NI 9904 panel mount kit and do not require the portability that the NI 9904 affords, you can mount the chassis directly on a flat surface using the mounting holes.
-
Page 9: Mounting The Chassis On A Din Rail
Mounting the Chassis on a DIN Rail You can order the NI 9912 DIN rail mount kit if you want to mount the chassis on a DIN rail. You need one clip for mounting the chassis on a standard 35 mm DIN rail. Complete the following steps to mount the chassis on a DIN rail. - Page 10 Mounting the Chassis on a Desktop Using the NI 9901 Desktop Mounting Kit You can use the NI 9901 desktop mounting kit to mount the chassis on a desktop. You must install the adapter bracket using two M3 × 20 screws. The adapter bracket and the screws are included in the kit.
- Page 11 Align the I/O module with an I/O module slot in the chassis. The module slots are labeled 1 to 4, left to right. 10 | ni.com | NI cRIO-FRC II User Manual and Specifications Artisan Technology Group - Quality Instrumentation ... Guaranteed | (888) 88-SOURCE | www.artisantg.com...
- Page 12 Use a standard Category 5 (CAT-5) or better shielded, twisted-pair Ethernet cable NI cRIO-FRC II User Manual and Specifications | © National Instruments | 11 Artisan Technology Group - Quality Instrumentation ... Guaranteed | (888) 88-SOURCE | www.artisantg.com...
-
Page 13: Wiring Power To The Chassis
The cRIO-FRC II filters and regulates the supplied power and provides power for all of the I/O modules. The cRIO-FRC II has one layer of reverse-voltage protection. Complete the following steps to connect a power supply to the chassis. - Page 14 Autoload VI on device reboot chassis reset option. To restart the cRIO-FRC II in safe mode, press and hold the Reset button for 5 s, then release it. The Status LED lights solid yellow, indicating that the cRIO-FRC II is in safe mode. Refer to the MAX help for information about safe mode.
- Page 15 Connecting Serial Devices to the cRIO-FRC II The cRIO-FRC II has an RS-232 serial port to which you can connect devices such as displays or input devices. Use the Serial VIs to read from and write to the serial port from a LabVIEW RT application.
-
Page 16: Understanding Led Indications
USER1 USER FPGA1 POWER LED The POWER LED is lit while the cRIO-FRC II is powered on. This LED indicates that the power supply connected to the chassis is adequate. STATUS LED The STATUS LED is off during normal operation. The cRIO-FRC II indicates specific error... - Page 17 If you want the controller to attempt a new DHCP connection, proceed to step 2. Press and hold the Reset button for 5 s, then release it. The cRIO-FRC II attempts to establish a new DHCP connection. If it fails, it assigns itself a link-local IP address. If the DHCP connection is successful and appropriate for your application, skip to step 4.
-
Page 18: Rs-232 Serial Port
Power consumption 15 W maximum Power supply input range 9 V to 30 V NI cRIO-FRC II User Manual and Specifications | © National Instruments | 17 Artisan Technology Group - Quality Instrumentation ... Guaranteed | (888) 88-SOURCE | www.artisantg.com... -
Page 19: Physical Characteristics
Do not connect the cRIO-FRCII to signals or use for measurements within Measurement Categories II, III, or IV. 18 | ni.com | NI cRIO-FRC II User Manual and Specifications Artisan Technology Group - Quality Instrumentation ... Guaranteed | (888) 88-SOURCE | www.artisantg.com... -
Page 20: Safety And Hazardous Locations Standards
Online Product Certification section. Note For EMC compliance, operate this product according to the documentation. NI cRIO-FRC II User Manual and Specifications | © National Instruments | 19 Artisan Technology Group - Quality Instrumentation ... Guaranteed | (888) 88-SOURCE | www.artisantg.com... -
Page 21: Online Product Certification
Storage humidity (IEC 60068-2-78) 5% RH to 95% RH, noncondensing Pollution Degree Maximum altitude 2,000 m Indoor use only. 20 | ni.com | NI cRIO-FRC II User Manual and Specifications Artisan Technology Group - Quality Instrumentation ... Guaranteed | (888) 88-SOURCE | www.artisantg.com... -
Page 22: Worldwide Support And Services
For additional environmental information, refer to the Minimize Our Environmental Impact web page at ni.com/environment. This page contains the environmental regulations and directives with which NI complies, as well as other environmental information not included in this document. Waste Electrical and Electronic Equipment (WEEE) - Page 23 . You can find information about end-user license agreements (EULAs) ni.com/patents and third-party legal notices in the readme file for your NI product. Refer to the Export Compliance Information at ni.com/ for the NI global trade compliance policy and how to obtain relevant HTS codes, ECCNs, and other legal/export-compliance import/export data.
- Page 24 Artisan Technology Group is your source for quality new and certified-used/pre-owned equipment SERVICE CENTER REPAIRS WE BUY USED EQUIPMENT • FAST SHIPPING AND DELIVERY Experienced engineers and technicians on staff Sell your excess, underutilized, and idle used equipment at our full-service, in-house repair center We also offer credit for buy-backs and trade-ins •...
Need help?
Do you have a question about the cRIO-FRC II and is the answer not in the manual?
Questions and answers