
Subscribe to Our Youtube Channel
Related Manuals for Naya AFDI-PT420


Summary of Contents for Naya AFDI-PT420
- Page 1 Wireless Full Duplex Intercom System Belt-pack AFDI-PT420 User’s Manual Please read the manual carefully before operation...
-
Page 2: Chapter 1 Function Display
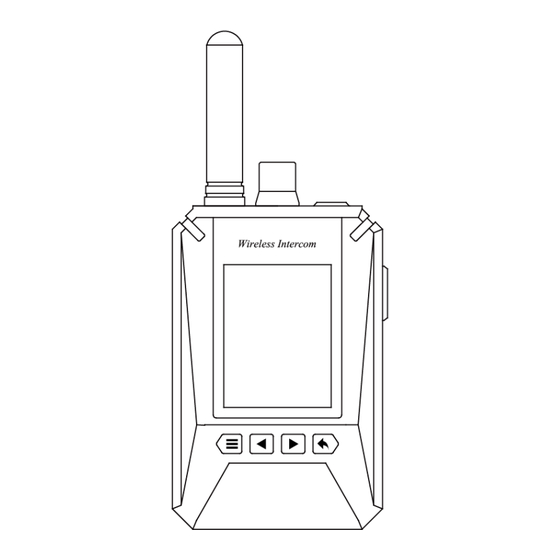
Chapter 1 Function Display Switch / Volume Screw the switch clockwise to turn on the device and enlarge the volume, Antenna Receive and transfer signal.。 Headphone Headphone Interface Chapter 2 Description Indicator Red light flicker indicates transfer signal and green light flicker indicates receive signal. If the tally function is enabled by tally setting, the indicator will display tally signal in priority, namely continuously red(PGM) or green(PVW). -
Page 3: Chapter 3 Installation
Charging Indicator Red light indicates charging, green light indicates fully charged. Type-C Charging Interface. 1/4 Screw Hole Fix the device to tripod. Chapter 3 Installation Step 1 Hold the antenna and screw clockwise to tighten. Step 2 Put the headphone connector into the interface. Step 3 Screw the volume key clockwise to turn on the device and enlarge the volume. -
Page 4: Chapter 4 Display Screen
Chapter 4 Display Screen Channel Display the present channel, the range is 25 - 110. Battery Level Display the battery level. The icon will be empty when the level is too low. Now the belt-pack is unable to talk. Please charge soon. Belt-pack ID Display the belt-pack ID, the range is 1-99. -
Page 5: Chapter 5 Settings
Chapter 5 Settings Press the button, the screen will prompt “Press Return Key into menu”. Then press the button to enter the menu. Select the following 11 mode settings by pressing buttons. Includes Channel Setting, Background Sound Level, Voice Control Setting, Headset Type Setting, Noise Suppression Level, TALLY Setting, MIC Return, ID Setting, Group Setting, Language Setting, Preload configuration. - Page 6 Voice Control Setting Enter the menu and choose “Voice Control Setting”. Then press “Confirm” button to enter the setting. Choose suitable mode by pressing “Left” and “Right” button. There are 2 modes, namely VOX Mode and PTT Mode. Select the suitable level according to the situation. Press “Exit” button to return to the previous menu after setting.
- Page 7 Headset Type Enter the menu and choose “Headset Type”. Then press “Confirm” button to enter the setting. Choose suitable headset type by pressing “Left” and “Right” button. There are 2 headset types, namely headphone and earphone. Choose the suitable headset type as required. Press “Exit” button to return to the previous menu after setting.
- Page 8 Tally Setting Enter the menu and choose “Tally Setting”. Then press “Confirm” button to enter the setting. Choose to turn on or turn off the function by pressing “Left” and “Right” button. Press “Exit” button to return to the previous menu after setting. Turn on the Tally function, the 2 indicators at the top of the belt-pack display red or green colors continuously according to the switcher signal.
- Page 9 Belt-pack ID Setting Enter the menu and choose “Belt-pack ID Setting”. Then press “Confirm” button to enter the setting. Set different belt-pack ID for each belt-pack by pressing “Left” and “Right” button. There are 99 ID from 1 to 99. Press “Exit” button to return to the previous menu after setting. Group ID Setting Enter the menu and choose “Group ID Setting”.
- Page 10 Quick Setting Enter the menu and choose “Quick Setting”. Then press “Confirm” button to enter the setting. Change the setting by pressing “Left” and “Right” button. Press “Exit” button to return to the previous menu after setting. Keep current Settings: Keep all the current setting data. Restore Factory Settings: Restore all factory data.
-
Page 11: Chapter 6 Communication Description
Chapter 6 Communication Description Chapter 7 Warning Please don’t use the device in the following situation as the signal may influence electronic or medical equipment. ·Hospital, nearby cardiac pacemaker and other medical equipment. ·Gas station and other combustible and explosive area. ·Airplane. -
Page 12: Chapter 8 Maintenance And Cleaning
Chapter 8 Maintenance and Cleaning Please read the following contents carefully for smoothly operation, long service life, better daily maintenance and cleaning. Maintenance Do not use hard material to puncture or scrape device. Do not put device in hard corrosive environment that may damage circuits. Do not break the antenna. -
Page 13: Chapter 9 Quality Commitment And Maintenance Terms
Chapter 9 Quality Commitment and Maintenance Terms Warranty services for material and manufacturing process defect under normal operation since purchase date. Warranty Scope and Duration 12 months for the base station and belt-packs 6 months for headphones Warranty Claim You should provide product warranty card or valid purchase invoice to apply repair. The product mark should be kept clean and intact during the warranty period. - Page 14 WeChat Subscription Number Shanghai NAYA Intelligence Technology Co. Ltd. http://www.nayatec.com...
Need help?
Do you have a question about the AFDI-PT420 and is the answer not in the manual?
Questions and answers