
Related Manuals for Pyle PL1SN104


Summary of Contents for Pyle PL1SN104
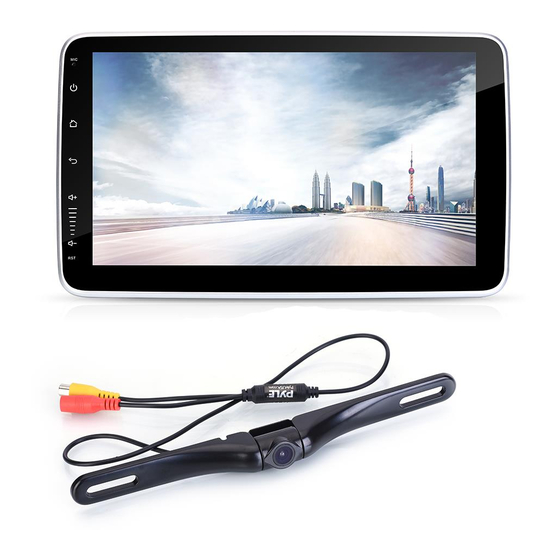
- Page 1 User’s Manual PL1SN104 Adjustable Viewing Angle (Maximum Angle 360°) 10.1'' Touch Screen TFT/LCD Monitor Single Din MP5 Player With Swivel Screen, Phone Link, With Backup Camera...
-
Page 2: Table Of Contents
Precautions Wiring Diagram General Operation AM/FM Tuner Operation Multimedia player Music playing interface Viedo or Picture playing interface AUX in/ Rearview Camera Wireless BT Streaming AutoLink Software (Phone Link) Setting Menu Troubleshooting Systematic Parameter Disassembly Steps of Display Rear View Backup Camera Installation www.PyleUSA.com... -
Page 3: Precautions
Precautions 1. When the interior of the car is extremely cold and the unit is used soon after switching on the heater, moisture may form on the disc or the optical parts of the player and proper playback may not be possible. If moisture forms on the disc, wipe it off with a soft cloth. If moisture forms on the optical parts of the player, do not use the player for about one hour. -
Page 4: Wiring Diagram
Wiring-Back Panel: www.PyleUSA.com... - Page 5 Wiring-Color Wiring: www.PyleUSA.com...
-
Page 6: General Operation
General Operation: Profile of main interface 7. Steering Wheel Control Setting 1.Time Setting 8. EQ 2. Radio 9. Wallpaper 3. Bluetooth 10. AUX 4. USB 11. AutoLink 5. SD Card 12. Settings 6. Navigation (optional) Note: If there is no any device connection, icons for USB, SD will be showed no device. Click is invalid in this case. -
Page 7: Am/Fm Tuner Operation
Car logo • Preset car logo to match your car brand Steering wheel control • Set the function button on you steering wheel via the system learning setting AUX Input • Connect an optional audio video source to the Aux input AM/FM Tuner Operation Radio interface RDS turn on function Touch Radio icon in main interface to switch to radio mode. -
Page 8: Music Playing Interface
1. Click the icon to enter the playlist Select Previous Program / Title / Song Play / Pause Select Next Program / Title / Song Volume Title Menu Selection Video or Picture playing interface Note: Sliding the controlling bar in the bottom to show the next page. AUX in (Auxiliary device input) Click in from the main interface SRC key in remote control to switch to... -
Page 9: Wireless Bt Streaming
Wireless BT Streaming Dialing Call records Phone BT Phone Phone book Bluetooth music Phone Book BT Music Setup Settings Wireless BT Music The phone must support A2DP agreement. Press BT Music icon in the main interface. Under the connected mode, click play keys in Wireless BT interface to play different music formats restored in the phone. -
Page 10: Autolink Software(Phone Link)
AutoLink Software(Phone Link) AutoLink connects your device to your Android mobile phone and iPhone through the standard USB port and transfer the picture and sound from the phone to the device. You can control the phone through the device's screen , such as receiving calls, dialing calls, listening to music, watching movies or photos. - Page 11 AutoLink AutoLink www.PyleUSA.com...
-
Page 12: Setting Menu
Setting System Disc Setting Setting Time& Date Vsurround Setting Setting Frames Adjust Panel Setting Setting Ledcolor Version Setting Setting www.PyleUSA.com... -
Page 13: Troubleshooting
Wheel Set Setting Connect the steering wheel control cable, and click the corresponding key to activate the function. After entering into the steering wheel control interface, then keep pressing the steering wheel “VOL+” button in your car, at the same time click “... - Page 14 Turnover screen Turnover screen does not open Auto Open of turnover screen setting Auto Open»ON automatically. is OFF. No image Connection of brake wire is not correct; Connect brake wire with cathode of Not brake state power supply correctly; Keep brake state after car is placed safe.
-
Page 15: Systematic Parameter
Systematic Parameter Specifications FM Radio • Working voltage: Direct current 12V • Frequency modulation: • Working voltage range: 10.8V-16V 87.5 MHz ~108.0MHz (Europe) • Maximum working electronic current: 10A • Flexibility (-30dB):10dBu • Installation angle: less than 30 degree tilted the front side and backside SNR (-50dB):15dBu •... -
Page 16: Disassembly Steps Of Display
Disassembly Steps of Display 1. Pull the two clips(A&B) on the 2. Remove the display. back of the display to both sides. 3. Press the clips toward the center 4. Disassembly completed. and unplug the cable. www.PyleUSA.com... -
Page 17: Rear View Backup Camera Installation
Rear View Backup Camera Installation Please read all of the installation instructions carefully before installing the product. Improper installation will void manufacturer’s warranty. The installation instructions do not apply to all types of vehicles, and are written as guidelines to assist in installing the system. Please consult an experienced technician if you are not comfortable installing the product. - Page 18 System Installation and Wiring Note: Camera System installation on diesel vehicles may require a slightly different wiring install. Caution: Connecting to other types of electrical systems will cause damage to your vehicle. Please contact the manufacturer if you are unaware of the system type in your vehicle. Refer to the model's power requirements prior to connection and installation.
- Page 19 Angle Adjustable Camera Lens • Located on the camera housing are 2 screws which lock the camera lens angle in position. • The screws may be loosened to allow camera lens angle adjustment • Loosen the screws, adjust the camera lens into the desired angle. then tighten the screws securely. •...
Need help?
Do you have a question about the PL1SN104 and is the answer not in the manual?
Questions and answers