
Related Manuals for SOMNOmedics SOMNO HD Eco


Summary of Contents for SOMNOmedics SOMNO HD Eco
- Page 1 Manual SOMNO HD Eco SOMNOmedics GmbH – Am Sonnenstuhl 63 – D-97236 Randersacker Tel. (+49) 931 / 35 90 94-0 – Fax (+49) 931 / 35 90 94-49 E-Mail info@somnomedics.de – Internet www.somnomedics.eu...
- Page 2 SOMNOmedics GmbH – Am Sonnenstuhl 63 – D-97236 Randersacker Tel.: (+49) 931 / 35 90 94 - 0 – Fax: (+49) 931 / 35 90 94 - 49 E-Mail: info@somnomedics.de - Internet: www.somnomedics.eu Rev. 1 28.10.2019 SOMNO HD eco is a trade mark of the SOMNOmedics company.
-
Page 3: Table Of Contents
Inhalt Getting started – Quick Guide ..................5 Introduction ........................7 Intended use ......................7 Patients ........................7 Essential performance features of the device ............7 Safety instructions....................8 System components & accessories ............... 10 Labels/Symbols ..................... 11 Preparing the patient: applying main device, sensors and electrodes ......12 Connecting the sensor plug to the main device ............ - Page 4 4.7.3 Firmware Update .................... 29 Troubleshooting ......................29 Cleaning and maintenance ................... 31 Cleaning and disinfection ..................31 Maintenance interval ....................33 Usage and maintenance of the rechargeable battery ..........33 Technical Data ......................34 Service .......................... 41 Interference ......................41 Product life cycle ....................
-
Page 5: Getting Started - Quick Guide
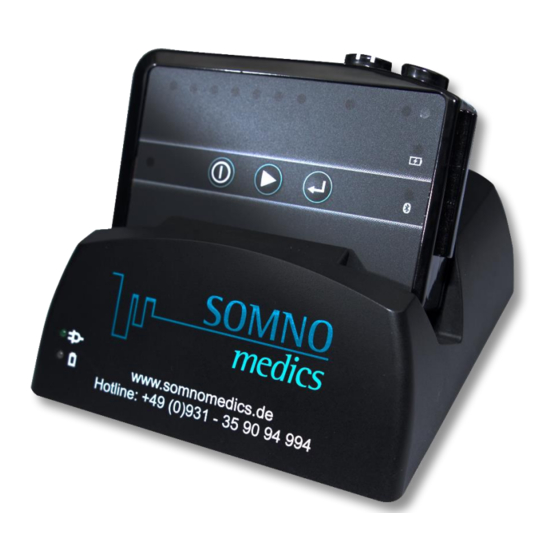
Getting started – Quick Guide Control and display elements of the main device Control elements which are active and selectable are backlit. Power button: with this button the device can be turned on and off. The button is illuminated continuously red if the device is on. The button is flashing red if the device is recording and green if in wait mode. -
Page 7: Introduction
Introduction Thank you for purchasing the SOMNO HD eco from SOMNOmedics. Please read the following instruction manual carefully before installing and using the device. We gratefully accept any feedback and helpful suggestions to improve our product or instruction manual. Please find the safety instructions and important information in the chapter “Safety instructions”, as well as in the individual chapters where they are labelled as follows:... -
Page 8: Safety Instructions
Damaged parts should not be used and must be repaired or replaced by trained experts or by persons authorized by SOMNOmedics. Warning: Avoid using the device in close proximity to other equipment or in stacked combination with other equipment. - Page 9 Cellular Phones, Microwave Ovens, etc. within a distance of 30 cm (in accordance with IEC 60601-1-2) to SOMNO HD™. If a battery change is required, only batteries specified by SOMNOmedics may be used. SOMNOmedics cannot guarantee error-free operation if different batteries are used.
-
Page 10: System Components & Accessories
Hamburg organises safe disposal. When recharging a partly-charged Li-Ion battery, this counts as one whole recharging cycle and shortens the durability of the battery. Always recharge the battery with the SOMNOmedics docking station NGA102 as the battery can otherwise be damaged. SOMNO HD eco should only ever be used with sensors and electrodes specified and approved for usage with this device by SOMNOmedics. -
Page 11: Labels/Symbols
Nasal cannula RIP effort belt abdomen RIP effort belt thorax --- Check the current price list for all available options --- Cable length Item Article number Cable length USB cable for docking NGA102 180cm station (1-port) USB cable for docking NGA103 180cm station (3-port) -
Page 12: Preparing The Patient: Applying Main Device, Sensors And Electrodes
The power supply is intended for indoor use only. 3 Preparing patient: applying main device, sensors electrodes Note: The main device should be placed on top of light clothes (nightshirt, pyjamas) and should not be in direct contact with the skin. Note: If applying the main device and the sensor in a different way then shown... -
Page 13: Connecting The Sensor Plug To The Main Device
Main device and sensors on the patient’s body Connecting the sensor plug to the main device Please insert the sensor plugs into the main device as shown in the following image: Inserting a sensor plug into the main device The device automatically recognises the connected sensors. The Luer-lock plug of the nasal cannula is screwed directly into the sensor port: Connecting the luer-lock plug to the main device Insert the headbox plug into the designated port and position. -
Page 14: Sensors For Polysomnography
Connecting the headbox plug to the main device Insert the SpO2 plug into the bottom as shown in the image. Connecting the SpO2 plug to the main device Note: In order to prevent damage of the sensor, patient should take off SpO2 sensor while washing hands or splashing water. -
Page 15: Nasal Cannula
Connecting the effort belt to the main device using the thin end Wrap the belt around the patient. Insert the wider side of the effort belt to the right side following the guiding rail. Connecting the effort belt with the main device using the wider end Thread the belt into the sensor. -
Page 16: Spo2 Sensor
Note: Nasal cannulas are single-use items. Adjust fixing sleeve in order to secure the sensor’s position. Attaching the nasal cannula 3.2.3 SpO2 sensor The finger sensor should be attached to the most suitable finger. The upper side of the sensor is marked by the embossing of a finger as shown in the following image. -
Page 17: Mikrophone
Attaching the PLM electrodes to the legs Note: Do not use dried-out adhesive snap electrodes. Only use electrodes provided by SOMNOmedics to ensure the best signal quality. Note: When using the leg EMG sensors, always use a ground lead electrode to ensure optimal signal quality. -
Page 18: Flow Sensor (Thermistor)
3.2.6 Flow sensor (Thermistor) The thermistor measures the air flow via temperature changes and can be worn like a nasal cannula. See the following image to fit the sensor to the patient’s face. Make sure that both upper sensor elements (highlighted red in the following image) are located directly below the nostrils and that the lower element is located directly in front of the mouth. -
Page 19: Eeg/ Eog
EEG/ EOG Previous to the application clean all skin areas with Nuprep abrasive gel. Connect the EEG electrodes in accordance to the labelling and colour-coding to the headbox. Make sure you are using the same type of electrodes for all derivations (e.g. only Ag/AgCl or only gold cup). -
Page 20: Application For 32-Channel Headbox According To 10-20 System
3.3.2 Application for 32-channel headbox according to 10-20 System Electrode positions (10-20) Use the cable link between the reference electrode and the second free EMG port for application of EMG electrodes according to AASM rules Cable link CPAP sensor and CPAP device The PAP device is connected via the dual pressure sensor. -
Page 21: Operating The Main Device
Connecting the pressure sensor to the mask via an oxygen adaptor 4 Operating the main device Control Elements Control and display elements of the main device Control elements which are active and selectable are backlit. -
Page 22: Switch-On /-Off Of The Device
Power button: with this button the device can be turned on and off. The button is illuminated continuously red if the device is on. The button is flashing red if the device is recording and green if in wait mode. Button for starting a recording. -
Page 23: Patient Markers/Event Markers
During the start-up process of the device the LEDs of the sensor ports are used to indicate the battery capacity. Each LED is reflecting a capacity of 14 %. Green means charged, red empty. The device in the following figure has four green and three red LEDs. So the battery capacity is four times 14 %. -
Page 24: Initialisation Via Domino Software
4.2.1 Initialisation via DOMINO Software If initialising a recording with the DOMINO software you can enter the patient’s name, ID and further information such as date of birth, height and weight. This data is saved together with the measurement. The device can be programmed for manual or automatic start or for an online recording. 4.2.1.1 Pre-programmed automatic start For initialisation of the device please place the device in the docking station. - Page 25 After successful initialization the status is displayed (patient data, start, montage). You can change the initialization by clicking “change”. The initialization dialogue will re-open. After initialisation the device enters wait mode automatically. The power button is flashing green. All sensor ports expecting a sensor are indicated with a red LED. The LED is red until the expected sensor is connected.
-
Page 26: Direct Initialisation Of The Device
4.2.2 Direct initialisation of the device As an alternative to the above, you can start a measurement directly on the device. When Bluetooth is active, the data can be displayed in an online recording or with the SOMNOmedics app on a tablet. -
Page 27: Functionality Of The Leds/Buttons During The Recording
Please keep in mind that for direct start of the device the last montage is still remembered by the device. The device is expecting the sensors of the last montage and the recording is running with the previous sampling rates and duration. Due to intelligent connect you can add whatever sensor you need for the recording and the sensor will be recognised and added. -
Page 28: Impedance Check And Biocalibration
If you have purchased the blood pressure option there is an entry in the device specific information menu called “Blood pressure activated”. If you want to purchase the blood pressure option later please contact the SOMNOmedics service hotline. Required signals for the blood pressure calibration are ECG and plethysmogram from the SpO2 finger sensor. -
Page 29: Data Transfer Via Docking Station
4.7.1 Data transfer via docking station When the main device is plugged into the docking station and a measurement is on the device, the virtual docking station displays the following: Virtual docking station, main device is connected, measurement ready for transfer Click “Transfer”... - Page 30 If the configuration file on your memory card is faulty five short beep sounds will inform you. The device is shut down afterwards. The similar five beep sounds will sound if the configuration file is broken. Is a faulty or not programmed sensor connected to the device the corresponding LED at the port is flashing red until the sensor is removed again.
-
Page 31: Cleaning And Maintenance
Wipe the case of the main device with a lint-free, soft cloth slightly moistened with a mild detergent. We recommend Terralin Liquid for cleaning. Note: This SOMNOmedics device complies with protection class IP 22 regarding ingression of humidity and water. Cleaning should be performed with a lint-free and damp cloth. - Page 32 Item Disinfectant Concentration Duration Frequency Other (Trade name) Headbox Wipe disinfection: After use Remove adhesive residues e. g. if necessary. Follow manufacturer’s instructions! Terralin Liquid Ready to use 5 min Mikrozid AF cloths Ready to use 5 min Thermistor Wipe disinfection: After use Remove adhesive residues e.
-
Page 33: Maintenance Interval
Note: disinfection solutions must be prepared with cold water. Maintenance interval After 3 years of use, send the main device to SOMNOmedics for validation and inspection. The inspection includes an examination for damage, a function test and a firmware update. -
Page 34: Technical Data
Technical Data Component Sensor Resolution Measurement range Frequency range Accuracy Measurements and weight 0.07 – 15 Hz Thermistor 16 Bit 115 x 78 x 25 mm 190 g incl. battery 0.5 – 10 Hz Activity external 16 Bit ± 1 g ±... - Page 35 Storage medium Industrial Grade µSD card, 1 GB in standard version Temperature range in use 0 – 50 °C, Storage: -20 – 70 °C Only use memory cards authorised by SOMNOmedics While in use: 10 – 90 %, non-condensing Humidity When stored/transported: 10 –...
- Page 36 Article Skin contact (if yes, see Overview Product Name Picture Mechanical specifications number Biocompatibility) NGA101 Adapter for LoFlo Capnograph, Digital Optocoupler Dimensions: 60mm x 92mm x 26mm Weight: 90g; Cable length: 200cm Dimensions: 93mm x 59mm x 26mm; Weight: NGA104 4-channel analogue optocoupler 94g, Cable length: 200cm Inductive effort belt for SOMNO HD...
- Page 37 Article Skin contact (if yes, see Overview Product Name Picture Mechanical specifications number Biocompatibility) Dimensions: 59mm x 39mm x 10mm (each); Weight: 61g; Material: medical grade silicone; NGS052 MUX RIP Sensor for pediatric applications Cable length: 120cm; Cable length between sensor parts: 20cm Dimensions: 53mm x 23mm x 12mm ;...
- Page 38 Article Skin contact (if yes, see Overview Product Name Picture Mechanical specifications number Biocompatibility) Dimensions: Ø 32mm x 10mm; Weight: 42g; Material: medical grade silicone; Cable length: Combined EEG- and EOG Sensor including light NGS110 140cm; Red connector cable: 11,5cm; Blue sensor connector cable: 26,5cm;...
- Page 39 Article Skin contact (if yes, see Overview Product Name Picture Mechanical specifications number Biocompatibility) Dimensions: 25mm x 30mm x 15mm NGS270 Weight: 21g; Material: medical grade silicone; Cable length: 20cm Differential pressure sensor for Pneumotachograph Dimensions: 51mm x 29mm x 15mm NGS272 Dual pressure sensor for Pneumotachograph Weight: 29,9g;...
- Page 40 Article Skin contact (if yes, see Overview Product Name Picture Mechanical specifications number Biocompatibility) Dimensions: finger diameter 7.5 to 12.5 mm; SEWP151 Weight: 48g; Material: soft wrap; Cable length: Fingerclip Soft Wrap Tape 150cm Dimensions: 68mm x 66mm x 16mm Weight: 82g;...
-
Page 41: Service
SOMNOmedics if: add-ons, modifications and repairs are carried out exclusively by persons authorised by SOMNOmedics or made by SOMNOmedics personnel. the device is only handled by instructed persons and skilled workers. transportation of the device is only carried out with original packing. -
Page 42: Accessories And Replacement Parts
Note: If you use accessories which are not authorised by SOMNOmedics and it comes to service provision, this will be invoiced. Note: It is not permitted to open the device. Repairs, opening the device and modifications are carried out exclusively in the factory. All kind of repair and warranty procedures must to be performed by SOMNOmedics. - Page 43 The use of accessories, sensors, and cables other than those provided by SOMNOmedics GmbH and specified in chapter 2.5 may result in increased emission and/or decrease immunity of this device.
- Page 44 8 kV contact Electrostatic discharge Floors should be wood, concrete or ceramic tile. (ESD), IEC61000-4-2 If floors are covered with synthetic material, the 2 kV, ± 4 kV, ± 8 kV, ± 15 relative humidity should be at least 30 %. kV air 2 kV for power supply lines Electrical fast...
- Page 45 Where P is the maximum output power rating of the transmitter in watts according to the transmitter manufacturer and d is the recommended separation distance in meters (m). Interference may occur in the vicinity of equipment marked with the following symbol:...
-
Page 46: Service Hotline And Contact
Send us a message by fax at any time. +49 (0) 9 31 / 35 90 94 49 Send us your query by email any time. service@somnomedics.de Get free access to current software updates via service login on our website www.somnomedics.eu * Saturday and Sunday from 07:00 a.
Need help?
Do you have a question about the SOMNO HD Eco and is the answer not in the manual?
Questions and answers