Table of Contents
Advertisement
Quick Links
I
nstruction Manual
USA
SOMNOscreen™ plus
Caution: Federal law restricts this device to sale by or on the order of a physician.
SOMNOmedics America Inc. – 815 Ponce de Leon Blvd., Suite
P-209 – Coral Gables, FL 33134
Toll free: 866 361 9937
info@somnomedics-diagnostics.com
www.somnomedics-diagnostics.com
Advertisement
Table of Contents

Related Manuals for SOMNOmedics SOMNOscreen plus


Summary of Contents for SOMNOmedics SOMNOscreen plus
- Page 1 Manual SOMNOscreen™ plus Caution: Federal law restricts this device to sale by or on the order of a physician. SOMNOmedics America Inc. – 815 Ponce de Leon Blvd., Suite P-209 – Coral Gables, FL 33134 Toll free: 866 361 9937 info@somnomedics-diagnostics.com...
- Page 2 Rev. 6 30.10.2019 SOMNOscreen™ is a registered trademark of the SOMNOmedics Company. - 2 -...
-
Page 3: Table Of Contents
Table of contents Introduction ............................ 5 About this instruction manual ....................6 Explanation of Symbols used in this Manual ................6 SOMNOscreen™ plus Menu Structure ..................7 About the SOMNOscreen™ plus ....................8 Indication for Use ........................8 Intended Use ..........................8 Device Description ........................ - Page 4 Troubleshooting ........................- 40 - Overview ..........................- 40 - Description of Errors in the Logbook .................. - 45 - - 45 - Maintenance ..........................- 46 - Maintenance rate ....................... - 46 - Cleaning and disinfection ....................- 46 - Use and Maintenance of the Rechargeable Battery ............
-
Page 5: Introduction
1 Introduction SOMNOmedics thanks you for purchasing this product. Please read the following instruction manual carefully before you turn on the device. We are thankful for any feedback and helpful suggestions you can make, in order to improve our product or our instruction manual. -
Page 6: About This Instruction Manual
About this instruction manual It is essential that you read each paragraph carefully when you see this icon on the left of that paragraph. This icon indicates potential danger to Patients, Property, Data Loss or in connection with external devices. This icon also appears on the label on the bottom of the SOMNOscreen™... -
Page 7: Somnoscreen™ Plus Menu Structure
1.3 SOMNOscreen™ plus Menu Structure Main Menue Structure Record Check Signals System Exit Device ID Battery Capacity Selected Montage Device ID Start Recording Time / Date System Check: weiß Check Battery And Software-Update Storage Capacity weiß Capacity Low: Capacity Empty: weiß... -
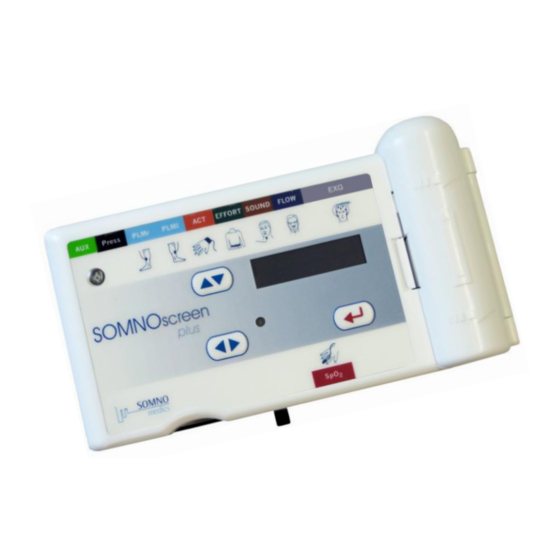
Page 8: About The Somnoscreen™ Plus
2 About the SOMNOscreen™ plus Display Status LED Li ION Battery Control Keys and Marker EXG 1-24 Light Sensor External Sensors Body Position Internal Effort Flashcard Pulse Oximeter Eject Mechanism Fig. 2-1: SOMNOscreen™ plus SOMNOscreen™ plus has not been designed for outdoor use. It is very important to protect the SOMNOscreen™... -
Page 9: Model And Device Number
2.4 Model and Device Number When unpacking the SOMNOscreen™ plus, check to make sure that all items are in good condition and that all accessories correspond to the delivery note. Also compare the Model on the delivery note with the label on the bottom of the SOMNOscreen™ plus. Additional in devices with integrated... -
Page 10: Interactive Display And Keyboard
2.5 Interactive display and keyboard The Display is divided into 2 lines of 16 characters per line and 2 columns giving 4 fields. The blinking cursor indicates the active field. The display shows the complete Menu, Selected Signals and Current Status including warning notes, error codes and hints. -
Page 11: Configurations
2.6 Configurations The SOMNOscreen™ plus is available in 4 different configurations. All configurations include a Compact Flash Card, Compact Flash Card Reader (USB or adapter for PCMCIA-slot), 2 x Li ION Batteries (2550mAh) with 1 x Battery Charger, a Carry Bag for housing the SOMNOscreen™ plus and Sensors, Instruction Manuals and the DOMINO software for Initialisation, Data Transfer and Analysis. -
Page 12: Safety Instructions
This device complies with IP protection class “20”. This means that this device is NOT waterproof. If liquids do enter the system, DO NOT switch it on. Please send the device to SOMNOmedics Customer Services immediately. Do not use an autoclave for cleaning the SOMNOscreen™ plus or any of its accessories, cables and sensors. - Page 13 Damaging the Guarantee Seal “Warranty void, if seal is broken” will immediately void the guarantee of this SOMNOmedics product. Use only Compact Flash Cards, which are supplied by SOMNOmedics. The use of any other Compact Flash Card could cause data to be corrupted. SOMNOmedics cannot guarantee error free operation where incorrect Compact Flash Cards are used.
-
Page 14: Operating Instructions
SOMNOmedics only guarantees for the safety, reliability and function of the instrument if ▪ Installation, extension, modifications and repairs are exclusively carried out by personnel authorized for these tasks by SOMNOmedics. ▪ The room in which the equipment is operated complies with the instruction ▪... -
Page 15: Initializing The Compact Flash Card
4.2.2 Initializing the Compact Flash Card Fig. 4-1: DOMINO Panel Patient Data Input: After having formatted the Card, enter the data into the corresponding fields (see Fig. 4-2). Type carefully as this information will be saved for later use. It is important to enter a Patient ID number. - Page 16 Now, click on the Next button or on the tab sheet Date. Select one of the following start options. These options can be set either on the Date or Montage tab sheet. Below you will find a description of all start options. The different start options are: Manual start without timer: (1) Measurement is started manually.
- Page 17 Press on Next, and choose a montage. Select predefined Montage require. Please ensure that the displayed Hardware ID is identical to that on the SOMNOscreen™ plus label. Selecting the Online Mode (4) activates data transfer via telemetry or cable. Lastly, click on the button Initialize Flash Card.
-
Page 18: Manual Start
4.2.3 Manual Start Connect the sensors to the patient and switch on the SOMNOscreen™ plus. Please Note: The SOMNOscreen™ plus should only be turned on after the patient has been fully set up. The on button is found on the second “O” of the word SOMNOscreen™ plus. Press the red arrow 4 times in order to manually start the recording. -
Page 19: Auto Start With Prior Signal Check
4.2.5 Auto Start with Prior Signal Check Connect the sensors to the patient and switch on the SOMNOscreen™ plus. Please Note: The SOMNOscreen™ plus should only be turned on after the patient has been fully set up. The on button is found on the second “O” of the word SOMNOscreen™ plus. The ID (last name of patient) will be shown on the display. -
Page 20: Manual Cancellation Of Recording
4.2.6 Manual cancellation of recording You can abort the recording process at any time. The following instructions explain how to cancel a recording while the system is still running: Display Function Simultaneously press S1 , S2 and S3 for at least 1 second. Select CANCEL with S2 and confirm with S3 Now select SURE with S2... -
Page 21: Relevant Information For Performing Measurements
Battery Charger. Insert a fully charged battery into the device and start the recording again. Please note: When replacing the battery, only use batteries supplied by SOMNOmedics! If alternative batteries are used, SOMNOmedics cannot guarantee error free operation. - 21 -... - Page 22 4.2.9.2 Flash Card Missing Display Function Please insert an initialized Compact Flash Card into the SOMNOscreen™ plus. Important: The Compact Flash Card must include the file config.dat. This file is created automatically during the Initialisation process. 4.2.9.3 Wrong Montage Chosen Display What to do? The card was initialized with a montage which does not belong to that...
-
Page 23: Menu System (Battery Check/ Time Set / Firmware Update / Reading Error Log)
Pressing S3 once more will be save the date and time. Firmware update: Firmware updates are carried out at the company SOMNOmedics! Error Logbook: The logbook provides information about errors that may occur in the SOMNOscreen™ plus. The information provided includes the Error Code, Date and Time. -
Page 24: Attach The Sensors To The Patient
5 Attach the Sensors to the Patient Do not attach SOMNOscreen™ plus directly on the patient’s skin. It is preferable to attach the SOMNOscreen™ plus over a pyjama or t-shirt. Take the figures below to attach the SOMNOscreen™ plus and the sensors to the patient. If you attach the SOMNOscreen™ plus or the sensors in another way to the patient, invalid data may be recorded. -
Page 25: Somnoscreen™ Plus And Shoulder Belt
SOMNOscreen™ plus and Shoulder Belt SOMNOscreen™ plus is mainly held in place by the strap shown in Fig. 5-2. In order for it not to move during respiration, a shoulder belt is added. Place the strap on the shoulder. Then secure it at the back as shown in Fig. -
Page 26: Effort Sensor
5.2 Effort Sensor Fig. 5-4: Threading of the straps The inductive Effort Belts should be placed above and below the SOMNOscreen™ plus. Fig. 5-5: Attaching the inductive belts Fig. 5-6: Connecting the plug to the socket Fig. 5-6 shows how to connect the green coloured plug to the SOMNOscreen™ plus. - 26 -... - Page 27 Optional: The expansion of the Thorax or Abdomen during breathing can be measured via the internal effort belt and an external effort belt. SOMNOscreen™ Alternatively, plus can be placed on the abdomen. The external effort belt is then placed on the Thorax. Fig.
-
Page 28: Plm Sensors
Additionally it is necessary to fix the cable with an extra tape to avoid interferences during the measurements. Note: Do not use dried up electrodes. Use only the electrodes obtained from SOMNOmedics to ensure high quality measurement. B) Acceleration Sensors Fig. -
Page 29: Activity Sensor (Wrist)
Attach the acceleration sensors on the feet like shown in Fig. 5-10 and secure the sensors with tape. Additionally it is necessary to fix the cable of the sensor with extra tape to avoid interferences during the recording. Fig. 5-11: Connecting the plug to the socket Fig. -
Page 30: Spo2 Sensor
Fig. 5-13:Connecting the plug to the socket Fig. 5-13 shows how to connect the orange coloured plug to the SOMNOscreen™ plus. SPO2 Sensor The finger clip sensor includes the feature for oxygen saturation, pulse and plethysmography. Attach the finger clip to the most suitable finger of the patient. The embossed symbol of a finger has to point up as shown in Fig. -
Page 31: Microphone
5.6 Microphone Centre the microphone between the larynx and the carotid artery. To avoid tensions to the skin it is recommend that the patient looks straight forward when fitting the microphone. Avoid strangulations to the patient’s neck caused by the cable. The plain site of the sensor has to be fitted on the patient’s skin. -
Page 32: Flow Sensor (Thermistor)
5.7 Flow Sensor (Thermistor) The flow sensor measures the nasal oral flow of the patient. Look at Fig. 5-49 to fit the sensor on the patients face. Notice that the two red coloured elements of the sensor have to be fitted directly below the nostrils. -
Page 33: Cpap Sensor With Nasal Cannula
5.8 CPAP Sensor with Nasal Cannula Connect the nasal cannula via Luer lock to the pressure interface of the CPAP sensor. Afterwards connect the black coloured plug to the correlating socket of the SOMNOscreen™ plus (Fig. 5-22). Lastly you can fit the nasal cannula sensor to the patient’s face. Notice that the red coloured tubes have to be placed in the nostrils of the patient (look at Fig. -
Page 34: Cpap Pressure Sensor With Cpap Device
5.9 CPAP Pressure Sensor with CPAP Device There are two possibilities to connect the pressure sensor to the CPAP device: Possibility A: Follow the steps below, if the CPAP mask contains an interface for a pressure tube (outside-Ø: 5 mm, inside-Ø: 2 mm): Connect the supplied tube (Length: 20 cm, outside-Ø: 5 mm, inside-Ø: 2 mm) via the Luer Lock connector to the pressure interface of the CPAP sensor. - Page 35 Possibility B: If the CPAP mask does not contain an interface for the supplied tube, follow the next steps below: Connect the supplied tube (outside-Ø: 5 mm, inside-Ø: 2 mm) via Luer Lock to the pressure interface of the CPAP sensor. Connect the other end of this tube with the T-adaptor (also supplied). The air supplying tube has to be fitted on the free end of the T-adaptor.
-
Page 36: Ecg
5.10 a) SOMNOscreen™ plus PSG+ Connect the two ECG cables to the plugs labelled ECG on the headbox. Attach the yellow coloured electrode to a disposable electrode and secure it to ICR 4 (Fig. 5-26). The green coloured electrode has to be fitted to ICR 2 parasternal left with a disposable electrode too. Fig. - Page 37 b) SOMNOscreen™ plus EEG 32 Connect the two ECG cables to the plugs labelled ECG on the Digital Headbox. Attach the yellow coloured electrode to a disposable electrode and secure it to ICR 4 (see Fig. 5-8). The green coloured electrode should to be fitted to ICR 2 parasternal left with a disposable electrode. Fig.
-
Page 38: Eeg- / Eog Electrodes
5.11 EEG- / EOG electrodes It is required to clean the skin where the electrodes (gold or snap electrodes) are to be fitted. Use an abrasive paste (suitable for bio-electrical measurements) to prepare the patients skin. You have to fill the gold electrodes with EEG gel, before placing them on the patient’s skin. - Page 39 b) Attaching the electrodes, EEG 32*: Fig. 5-31: Attaching the electrodes (10-20) * For EEG 32 recordings the electrodes are placed according to the 10% distance (10-10 system). - 39 -...
-
Page 40: Troubleshooting
Error codes on the SOMNOscreen™ plus display Please contact SOMNOscreen™ plus Support. ERROR 01 The internal lithium Contact SERVICE battery of the clock Send in the device to SOMNOmedics for changing the is discharged. The battery. device was stored without a battery. Service required. - Page 41 Problem Possible Reason What to do? Flash Card Flash Card Transfer The Compact Flash In both cases, please contact the SOMNOmedics does not work (but Card was removed hotline. data.dat file is during a recording. available). Reset during recording (Sensors were inserted after Program Start).
- Page 42 Problem Possible Reason What to do? Measurement does not start Pre-programmed Date or Time of Check Date and Time on the PC. Insert the Compact SOMNOscreen™ measurement does not Flash Card (pre-programmed with a Manual Start) and check the Date and Time on the SOMNOscreen™ start.
- Page 43 Problem Possible Reason What to do? Online Mode SOMNOscreen™ Make sure that the SOMNOscreen™ plus is turned on Online mode does not start, no signals on the plus has not been and that the pre-programmed recording has already screen. turned on and is not started.
- Page 44 Problem Possible Reason What to do? Online Mode Insufficient distance The distance between the Video and Data Receivers between Video and must be at least 1.5 m apart. If possible, place them at Data Receiver. different heights. If necessary, use a longer RS232 cable to obtain more distance.
-
Page 45: Description Of Errors In The Logbook
Problem with Hard Windows start files could be damaged. Please inform missing after a start or Disc Drive. your system administrator or SOMNOmedics. restart. Floppy disk inserted Remove the Floppy Disk from the Disk Drive and try in Floppy Disk Drive. -
Page 46: Maintenance
7 Maintenance 7.1 Maintenance rate Return the SOMNOscreen™ plus to SOMNOmedics for inspection after 3 years of usage. The inspection includes the replacement of the internal battery, calibration of all the recording channels and visual inspection for any external damage. - Page 47 Disinfection of sensors, electrodes, elastic belts: Article Disinfectant Concentration Duration Intervals Other (trade mark) SOMNOscreen™ Wipe After use DO NOT use a wet or plus device disinfection: fluffy cloth. For example: Ensure that no Terralin Liquid Ready to use 5min liquids enter the device during Mikrozid AF...
- Page 48 Article Disinfectant Concentration Duration Intervals Other (trade mark) PLM (Active Wipe After use Remove adhesives if Electrode) disinfection: necessary. Follow For example: manufacturer's Terralin Liquid Ready to use 5min instructions! Mikrozid AF Ready to use 5 min Cloth Activity Sensor Wipe After use Remove adhesives if...
- Page 49 Article Disinfectant Concentration Duration Intervals Other (trade mark) Gold Plated Wipe After use Remove adhesives if Electrodes disinfection: necessary. For example: Then remove all Terralin Liquid Ready to use 5min residues of EEG paste under running Mikrozid AF Ready to use 5 min warm water from the Cloth...
-
Page 50: Use And Maintenance Of The Rechargeable Battery
Use and Maintenance of the Rechargeable Battery SOMNOmedics recommends the use of rechargeable batteries in the SOMNOscreen™ plus. We supply two Lithium-Ion (Li ION) rechargeable batteries with each system. The battery supplied offers a long life (approximately 500 charges), is not susceptible to memory effects and is ecologically friendly. -
Page 51: Service
8 Service 8.1 Biological Calibration and Measuring the Electrode Impedance It is possible to draw conclusions from skin contact of single EXG electrodes when using the integrated SOMNOscreen™ plus display. The following list forms the basis for the biological calibration for the different channels: EOG channels Viewed on the Display: Eyes Open (look straight ahead) Eyes Closed (look left and right) -
Page 52: Technical Specification
Technical Specification Component Channels Resolution Measurement range Frequency range Accuracy Dimensions and Weight SOMNOscreen™ plus 0,2 – 70Hz 140 x 80 x 36 mm EXG1 16 Bit ±80mV ±5% 0,2 – 70Hz 260 g (incl. battery) EXG2 16 Bit ±80mV ±5% 0,2 –... - Page 53 -Module Resolution 8 Bit Oxygen saturation 70 to 99 % Pulse rate 18 to 300 beats per minute Wavelength red: 660 nanometer infrared: 910 nanometer 70 – 100% ± 2 for adults using the finger clip sensor SpO2 70 – 95% ± 3 for neonates using the child or neonates sensors (±...
- Page 54 Data processing 16 Bit ADC - Active Filtering Different Sampling Rates Adjustable (4/s to 512/s); optional: up to 4096/s Continuous Data Acquisition Power supply Diameter: 20,3 mm length: 70,4 mm Nominal voltage: 3,6V Maximal voltage: 4,2 V Nominal capacity: 2550 mAh Maximal charge current: 0,9 A Integrated protection circuit with overload protection at 4,35 V Deep discharge protection at 2,4V...
-
Page 55: Malfunctions
The device does is not work correctly (poor measurements) Components are loose or fit poorly Connectors are damaged (crushed or cut cables) Please contact your local distributor for a fast response or contact SOMNOmedics for a fast and efficient response. Please see chapter 8.7. 8.4 Warranty SOMNOmedics will only guarantee the Safety, Reliability and Operation of the SOMNOscreen™... -
Page 56: Contact
You can send us important information by fax to: 931-451-3757 We also provide service and support via e-mail on: service@somnomedics.de Our homepage: www.somnomedics-diagnostics.com If due to some possible technical difficulties our staff cannot answer, you will be redirected to our mail box. -
Page 57: Notes
9 Notes - 57 -...
Need help?
Do you have a question about the SOMNOscreen plus and is the answer not in the manual?
Questions and answers