Table of Contents
Advertisement
Quick Links
Advertisement
Table of Contents

Related Manuals for SPX Waukesha Cherry-Burrell W Series


Summary of Contents for SPX Waukesha Cherry-Burrell W Series
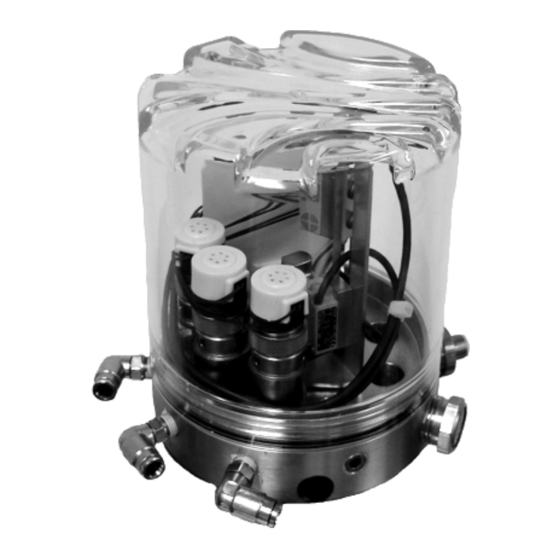
- Page 2 W-Series, 2-Piece Control Top and Switch-Only Options Read and understand this manual prior to installing, operating or servicing this equipment.
- Page 3 E-mail: wcb@spx.com Web site: www.spxpe.com Information contained in this manual is subject to change Copyright © 2008 SPX All Rights Reserved. without notice and does not represent a commitment on the part of Waukesha Cherry-Burrell. No part of this manual...
-
Page 4: Table Of Contents
Waukesha Cherry-Burrell Table of Contents Waukesha Cherry-Burrell Warranty ..........4 Shipping Damage or Loss ................4 Warranty Claim .....................4 Safety .....................5 Care of Stainless Steel ................6 Stainless Steel Corrosion ................6 Elastomer Seal Replacement Following Passivation ........6 Care of Acrylic Control Top Covers .............6 Introduction ..................7 General Information ..................7 Models and Specifications ................7... -
Page 5: Waukesha Cherry-Burrell Warranty
Warranty Waukesha Cherry-Burrell Waukesha Cherry-Burrell Warranty Seller warrants its products to be free from defect in materials and workmanship for a period of one (1) year from the date of shipment. This warranty shall not apply to products which require repair or replacement due to normal wear and tear or to products which are subjected to accident, misuse or improper maintenance. -
Page 6: Safety
Waukesha Cherry-Burrell Safety Safety READ AND UNDERSTAND THIS MANUAL PRIOR TO INSTALLING, OPERATING OR SERVICING THIS EQUIPMENT Waukesha Cherry-Burrell recommends users of our equipment and designs follow the latest Industrial Safety Standards. At a minimum, these should include the industrial safety requirements established by: Occupational Safety and Health Administration (OSHA), Title 29 of the CFR Section 1910.212- General Requirements for all Machines National Fire Protection Association, ANSI/NFPA 79... -
Page 7: Care Of Stainless Steel
Care of Stainless Steel Waukesha Cherry-Burrell Care of Stainless Steel Stainless Steel Corrosion Corrosion resistance is greatest when a layer of oxide film is formed on the surface of stainless steel. If film is disturbed or destroyed, stainless steel becomes much less resistant to corrosion and may rust, pit or crack. Corrosion pitting, rusting and stress cracks may occur due to chemical attack. -
Page 8: Introduction
Waukesha Cherry-Burrell Introduction Introduction For valve information, please refer to the specific publication assigned to the type of valve you have. For additional product information, please see our web site at http://www.spxprocessequipment.com/sites/wcb/literature.asp. General Information Information in this manual should be read by all personnel involved in installation, setup, operation and maintenance of W-Series control tops and switch-only options. -
Page 9: Installation And Operation
Waukesha Cherry-Burrell Installation and Operation Installation and Operation Routing for Compressed Air, Vent and Wiring VA100-633 VA100-634 Figure 2: Base Underside View Figure 3: Base Top View A. V-Groove Plenum with C. Setscrew F. Inside Diameter I. Underside air supply channels D. -
Page 10: Solenoids Operation
Waukesha Cherry-Burrell Installation and Operation Solenoids Operation Barrel-Type Solenoid Solenoid Operation • 24VDC (5-25VDC) typically used on all valves Solenoids direct compressed air through the ports in the base of the control top to drive the motion of the valve. For •... - Page 11 Waukesha Cherry-Burrell Installation and Operation Figure 7: Control Top Bottom View, Ports 5,6,8 Figure 9: Top View, (1) Solenoid Figure 8: Top View, No Solenoids Figure 10: Top View, (2) Solenoids Figure 11: Top View, (3) Solenoids NOTE: Arrangements are the same for proximity and micro switch configurations. Page 10 95-03083 April 2008...
-
Page 12: Wiring And Pin Instructions: Set & Forget Switch
Waukesha Cherry-Burrell Installation and Operation Wiring and Pin Instructions: Set & Forget Switch PAGE, FIGURE CONNECTION VOLTAGE Page 11, Fig. 12 Strain Relief Page 12, Fig. 13 6 Pin Eurofast Page 12, Fig. 14 8 Pin Eurofast Page 13, Fig. 15 10 Pin Eurofast Page 13, Fig. - Page 13 Waukesha Cherry-Burrell Installation and Operation Pin Connector wires Sensor wires this this side of Terminal Block side of Terminal Block Pin Connector Side 6 Pin Connector Sensor Side P/N 113601 Ground Wire Pole #1 ID on this side Pink Ground (not shown for clarity) Brown Brown (Sensor) Gray...
- Page 14 Waukesha Cherry-Burrell Installation and Operation Sensor and Solenoid wires Pin Connector Wires this this side of Terminal Block side of Terminal Block 10 Pin Connector P/N 121760 Pin Connector Side Pole # 1 ID Sensor Side on this side Ground Wire Solenoid 1 Vent Plug Green...
- Page 15 Waukesha Cherry-Burrell Installation and Operation 4 Pin Connector Cut back and tape White (Pin 2) and Black (Pin 4) wires Ref. P/N 113600 Black (Sensor) Brown (Sensor) Solenoid 2 Solenoid 1 Brown (PMO Yoke Prox) Solenoid 3 Vent Plug Solenoid 2 Solenoid 1 Blue (PMO Yoke Prox) Brown...
- Page 16 Waukesha Cherry-Burrell Installation and Operation 5 PIN CONNECTOR REF. P/N 115761 V + ; BROWN (SENSOR), BROWN (PMO YOKE PROX) VENT PLUG 1X ADDRESS TO BE: 3 I3; BLACK (PMO SWITCH) SOLENOID I2; BLACK (SENSOR) LOCATION 1 10X ADDRESS TO BE: 6 I1;...
-
Page 17: Wiring And Pin Instructions: Proximity And Micro Switches
Waukesha Cherry-Burrell Installation and Operation Wiring and Pin Instructions: Proximity and Micro Switches NUMBER PAGE, SPECIFICATION 3 WIRE YOKE FIGURE TYPE CONNECTOR PROXIMITY SOLENOIDS SWITCH Page 17, Fig. 20 Strain Relief Micro Switch 17-88 Strain Relief Proximity Page 17, Fig. 21 17-88 Switch Page 18, Fig. - Page 18 Waukesha Cherry-Burrell Installation and Operation Figure 20: Strain Relief Micro Switch Figure 21: Strain Relief Proximity Switch April 2008 95-03083 Page 17...
- Page 19 Waukesha Cherry-Burrell Installation and Operation Figure 22: 4-Pin Eurofast Figure 23: 4-Pin Eurofast with AS-I Card Page 18 95-03083 April 2008...
- Page 20 Waukesha Cherry-Burrell Installation and Operation Figure 24: 5-Pin Eurofast 5 PIN CONNECTOR P/N 115761 UPPER SWITCH (NORMALLY OPEN) V + ; BROWN (LOWER PROX SWITCH), BROWN (UPPER PROX SWITCH), SOLENOID BROWN (PMO YOKE PROX) LOCATION 1 1X ADDRESS TO BE: 3 I3;...
- Page 21 Waukesha Cherry-Burrell Installation and Operation 5 PIN CONNECTOR P/N 115761 UPPER SWITCH (NORMALLY OPEN) V + ; BROWN (LOWER PROX SWITCH), SOLENOID BROWN (UPPER PROX SWITCH), LOCATION 1 BROWN (PMO YOKE PROX) 1X ADDRESS TO BE: 3 LOWER SWITCH I3; BLACK (PMO PROX SWITCH) (NORMALLY CLOSED) 10X ADDRESS TO BE: 6 I2;...
- Page 22 Waukesha Cherry-Burrell Installation and Operation Figure 28: 8-Pin Eurofast Figure 29: 8-Pin Eurofast with 3-Wire Proximity April 2008 95-03083 Page 21...
- Page 23 Waukesha Cherry-Burrell Installation and Operation Figure 30: 10-Pin Eurofast Figure 31: 10-Pin Eurofast Page 22 95-03083 April 2008...
- Page 24 Waukesha Cherry-Burrell Installation and Operation Figure 32: 12-Pin Eurofast Figure 33: 5-Pin Minifast April 2008 95-03083 Page 23...
- Page 25 Waukesha Cherry-Burrell Installation and Operation Figure 34: 6-Pin Minifast Figure 35: 7-Pin Minifast Page 24 95-03083 April 2008...
- Page 26 Waukesha Cherry-Burrell Installation and Operation Figure 36: 8-Pin Minifast Figure 37: 9-Pin Minifast April 2008 95-03083 Page 25...
- Page 27 Waukesha Cherry-Burrell Installation and Operation Figure 38: 10-Pin Minifast Figure 39: 10-Pin Minifast Page 26 95-03083 April 2008...
-
Page 28: Maintenance
Waukesha Cherry-Burrell Maintenance Maintenance Important Safety Tips. Maintain an adequate stock of replacement parts. Set up specific inspection and servicing schedules to maintain efficiency and avoid unexpected shutdowns. DANGER: Do not put a hand into the yoke or body of a pneumatically actuated valve. Inspect the switch settings and operation on a regular basis. -
Page 29: Disassembly
Maintenance Waukesha Cherry-Burrell Disassembly Connect the wiring. Remove the valve from service. WARNING: Only authorized electricians Shut off the delivery of air. should terminate electrical wires. Disconnect the electrical supply and lock out all To install solenoids, first check that the o-ring at the power solenoid base is in place. - Page 30 Waukesha Cherry-Burrell Maintenance Description of Switch Function Electrical connection • The sensor measures the upper edge of the valve spin- The unit must be connected by a qualified electrician. dle. Observe all national and international regulations for the installation of electrical equipment. Disconnect power •...
- Page 31 Maintenance Waukesha Cherry-Burrell Operation The sensor is operated via the push buttons Pos. and A. Open Teach. To do so, press the buttons with a blunt object. See B. Seat C. Close Figure 47. D. Pos. CAUTION: Sharp objects may damage the E.
- Page 32 Waukesha Cherry-Burrell Maintenance Programming Guide: Single Seat Valves W60/W80/W90 Run Mode Display: After power up, the sensor goes automatically into run mode. NOTE: A green blinking LED means that the sensor was A. Close Position powered up without a target present. Power down and (RED LED) power up with the target present.
- Page 33 Maintenance Waukesha Cherry-Burrell Programming Guide: Double Seat Valves W70 and W60 3-Position Actuator Run Mode Display: After power up, the sensor goes automatically into run mode. NOTE: A green blinking LED means that the sensor was powered up without a target present. Power down and A.
- Page 34 Waukesha Cherry-Burrell Maintenance Set-up/Operation After mounting, wiring and adjustment, check whether the unit operates correctly. If possible, put the valve into all available positions and check if the unit switches correctly and if the operations are correctly indicated by the LED’s. Indication by LED for the different operating modes The sensor has 3 operating modes which the sensor automatically generates depending on the programming: •...
-
Page 35: Micro Switch
Maintenance Waukesha Cherry-Burrell Error Messages Error Description Measure Flashes at 8 Hz directly after leaving the programming mode Error message can be during = adjustment error! acknowledged by pressing the close adjustment Taught position values are not within the detection range or position button positions are not permissible or plausible Flashes at 8Hz = spindle head is at the edge or outside the... - Page 36 Waukesha Cherry-Burrell Maintenance Figure 53: Valve Open Adjustment Figure 54: Valve Closed Adjustment NOTE: In this manual, “stem-raised” is understood to be when the valve stem is fully retracted into the actuator. “Stem-lowered” is understood to be when the valve stem is fully extended out from the actuator.
-
Page 37: Set & Forget Control Top
Parts Lists Waukesha Cherry-Burrell Set & Forget Control Top 33,11 23, 24 19, 20 VA100-577 Page 36 95-03083 April 2008... - Page 38 Waukesha Cherry-Burrell Parts Lists Set & Forget Control Top Item # Part Description Part No. Base - w/ effector Clipp. Solenoid Control Module 119579 Mounting Cup - Control Module 119557 O-ring N70134 O-ring N70157 SCHS - 1/4-28 x .50", 18-8 SS 119625 Set Screw - 1/4-20 x .75", 18-8 SS, Cone Point 119624...
-
Page 39: W-Series 2-Piece Control Module With Proximity Or Micro Switches
Parts Lists Waukesha Cherry-Burrell W-Series 2-Piece Control Module with Proximity or Micro Switches 32, 28 26 20, 21 33, 9 16, 17 VA100-611 Page 38 95-03083 April 2008... - Page 40 Waukesha Cherry-Burrell Parts Lists W-Series 2 Piece Control Module with Proximity or Micro Switches Item # Part Description Part No. Base - w/ effector Clipp. Solenoid Control Module 119579 Mounting Cup - Control Module 119557 O-ring N70134 O-ring N70157 SCHS - 1/4-28 x .50", 18-8 SS 119625 Set Screw - 1/4-20 x .75", 18-8 SS, Cone Point 119624...
-
Page 41: Set & Forget, Switch-Only
Parts Lists Waukesha Cherry-Burrell Set & Forget, Switch-Only VA100-694 Item # Description Part No. Set & Forget Switch-Only (PNP) 126078 Adapter Mount 125463 O-Ring see note 1 Screws 121658 Cap Screws 119625 Stem for 126155 kit 119677 for 126156 kit 119681 for 126157 kit 119679... -
Page 42: Exterior Mount Proximity Switch
Waukesha Cherry-Burrell Parts Lists Exterior Mount Proximity Switch VA100-578 Item # Description Part No. Bracket-Prox switch 116295 116294 Long Stroke 116293 Extra Long Stroke 120319 Switch Block 116297 Switch Plate 116296 Washer Plain #8 18/8 Narrow 43-26 Proximity switch 24VDC / 110VAC (NC) 17-79 Proximity switch 24VDC / 110VAC (NO) 17-72... -
Page 43: Valve Mount Proximity Switch
Parts Lists Waukesha Cherry-Burrell Valve Mount Proximity Switch VA100-580 Item # Description Part No. Modified Yoke 4AR and 4AL 110132 5AR and 5AL 112795 6AR and 6AL 114430 Mount Bracket 112794 Switch *, Proximity 24VDC / 110AC 17-73 Screws 30-575 Washer, 4"... -
Page 44: Troubleshooting
Waukesha Cherry-Burrell Troubleshooting Troubleshooting PROBLEM POSSIBLE CAUSE SUGGESTED ACTION Leaking Air Air leaking from between Missing or damaged O-rings Disassemble and remove Control Top, actuator and Control Module inspect air vent plug O-ring and mounting cup O-rings, replace if required. Wrong porting arrangement Check porting and revise as required. - Page 45 Troubleshooting Waukesha Cherry-Burrell PROBLEM POSSIBLE CAUSE SUGGESTED ACTION Electrical Set & Forget, continued No Valve “Open” signal Upper switch not adjusted properly Adjust switch. Erratic switch alarms Control failure Check control wiring and power source. Loose hardware Check Set & Forget Sensor mounting and proper assembly of indicator stem and target.
- Page 47 For more information about our worldwide locations, approvals, certifications, and local representatives, please visit www.spxpe.com. SPX reserves the right to incorporate our latest design and material changes without notice or obligation. Design features, materials of construction and dimensional data, as described in this bulletin, are provided for your information only and should not be relied upon unless confirmed in writing.
Need help?
Do you have a question about the Waukesha Cherry-Burrell W Series and is the answer not in the manual?
Questions and answers