Table of Contents
Advertisement
Quick Links
Maintenance Manual
TM
VectorStar
ME7838 Series
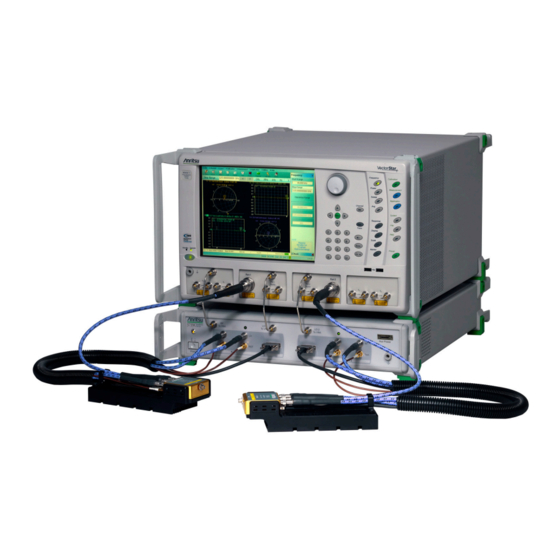
2-Port Broadband/Banded
Millimeter-Wave VNA System
High Performance Modular Broadband/Banded Millimeter-Wave
Vector Network Analyzer (VNA) Measurement System
ME7838A Millimeter-Wave VNA System, 70 kHz to 125 GHz
ME7838D Millimeter-Wave VNA System, 70 kHz to 145 GHz
ME7838E Millimeter-Wave VNA System, 70 kHz to 110 GHz
ME7838G Millimeter-Wave VNA System, 70 kHz to 220 GHz
B
Anritsu Company
P/N: 10410-00306
490 Jarvis Drive
Revision F
Morgan Hill, CA 95037-2809
Published: January 2020
USA
Copyright 2020 Anritsu Company
http://www.anritsu.com
Advertisement
Table of Contents
Troubleshooting

Subscribe to Our Youtube Channel
Related Manuals for Anritsu VectorStar ME7838 Series


Summary of Contents for Anritsu VectorStar ME7838 Series
- Page 1 ME7838D Millimeter-Wave VNA System, 70 kHz to 145 GHz ME7838E Millimeter-Wave VNA System, 70 kHz to 110 GHz ME7838G Millimeter-Wave VNA System, 70 kHz to 220 GHz Anritsu Company P/N: 10410-00306 490 Jarvis Drive Revision F Morgan Hill, CA 95037-2809 Published: January 2020 Copyright 2020 Anritsu Company http://www.anritsu.com...
-
Page 3: Table Of Contents
VectorStar MS464xB Series Vector Network Analyzers ......1-2 VectorStar ME7838 Series 2-Port BB/mmW VNA Measurement System....1-2 VectorStar ME7838A4 Multiport BB/mm-Wave VNA Measurement System . - Page 4 System Components............4-1 Contents-2 PN: 10410-00306 Rev. F VectorStar ME7838 Series MM...
- Page 5 General Safety Warnings ........... . . 6-1 Contents-3 PN: 10410-00306 Rev. F VectorStar ME7838 Series MM...
- Page 6 Replacement Procedure ........... 7-9 Contents-4 PN: 10410-00306 Rev. F VectorStar ME7838 Series MM...
- Page 7 A104 Assembly Detail ........... . 8-19 Contents-5 PN: 10410-00306 Rev. F VectorStar ME7838 Series MM...
- Page 8 S-Parameter Measurements ..........A-3 Contents-6 PN: 10410-00306 Rev. F VectorStar ME7838 Series MM...
-
Page 9: Chapter 1 - General Information
From here, you can select the latest sales, service and support contact information in your country or region, provide online feedback, complete a “Talk to Anritsu” form to get your questions answered, or obtain other services offered by Anritsu. -
Page 10: Related Documentation
1-4 Related Documentation General Information Related Documentation VectorStar™ Series VNA documentation is available on Anritsu’s Web site at: http://www.anritsu.com/en-us/products-solutions/products/ms4640b-series.aspx Product Information, Compliance, and Safety • VectorStar Product Information, Compliance, and Safety (PICS) – 10100-00063 VectorStar MS464xB Series Vector Network Analyzers •... -
Page 11: Vectorstar Mn469Xc Series Multiport Vna Measurement System
• 3659 Cal-Verif- Kit-UG and System Performance Verification Software for BB-mmW ME7838D with 0.8 mm Connectors – 10410-00327 Updates to Manuals For updates to any of the VectorStar Series VNA documentation, visit Anritsu’s Web site at: http://www.anritsu.com/en-us/products-solutions/products/ms4640b-series.aspx Electrostatic Discharge (ESD) Prevention All electronic devices, components, and instruments can be damaged by electrostatic discharge. -
Page 12: Me7838 Series Vna System Overview
Table 1-6, “ME7838E Waveguide Band Configuration System Components • Table 1-7, “ME7838D Standard Broadband VNA System Components • Table 1-8, “ME7838G Standard Broadband VNA System Components Additional configuration information is available in the relevant system technical data sheet. PN: 10410-00306 Rev. F VectorStar ME7838 Series MM... - Page 13 4 Attenuators • Includes front panel loops above with four (4) attenuators, bias tees in test set, gain compression, and efficiency measurement software. • If Option 062 is selected, use Option MS4647A-081 above. VectorStar ME7838 Series MM PN: 10410-00306 Rev. F...
- Page 14 1-6 ME7838 Series VNA System Overview General Information PN: 10410-00306 Rev. F VectorStar ME7838 Series MM...
-
Page 15: Me7838A Waveguide Band Configuration System Components - Ms4640A Based
Includes front panel loops above with four (4) attenuators, bias tees in test set, gain compression, and efficiency measurement software. • If Option 062 is selected, use Option MS4647A-081 or MS464xA-083 above. VectorStar ME7838 Series MM PN: 10410-00306 Rev. F... -
Page 16: Me7838A Standard Broadband Vna System Components - Ms4647B Based
4 Attenuators • Includes front panel loops above with four (4) attenuators, bias tees in test set, gain compression, and efficiency measurement software. • If Option 062 is selected, use Option MS4647B-081 above. PN: 10410-00306 Rev. F VectorStar ME7838 Series MM... -
Page 17: Me7838A Waveguide Band Configuration System Components - Ms4640B Based
Includes front panel loops above with four (4) attenuators, bias tees in test set, gain compression, and efficiency measurement software. • If Option 062 is selected, use Option MS4647B-081 or MS464xB-083 above. VectorStar ME7838 Series MM PN: 10410-00306 Rev. F... -
Page 18: Me7838E Standard Broadband Vna System Components
• Includes front panel loops above with four (4) attenuators, bias tees in test set, gain compression, and efficiency measurement software. • If Option 062 is selected, use Option MS4647B-087 above. 1-10 PN: 10410-00306 Rev. F VectorStar ME7838 Series MM... -
Page 19: Me7838E Waveguide Band Configuration System Components
4 Attenuators • Includes front panel loops above with four (4) attenuators, bias tees in test set, gain compression, and efficiency measurement software. • If Option 062 is selected, use Option MS464xB-087. VectorStar ME7838 Series MM PN: 10410-00306 Rev. F 1-11... -
Page 20: Me7838D Standard Broadband Vna System Components
• Includes front panel loops above with four (4) attenuators, bias tees in test set, gain compression, and efficiency measurement software. • If Option 062 is selected, use Option MS4647B-081 above. 1-12 PN: 10410-00306 Rev. F VectorStar ME7838 Series MM... -
Page 21: Me7838G Standard Broadband Vna System Components
• Includes front panel loops above with four (4) attenuators, bias tees in test set, gain compression, and efficiency measurement software. • If Option 062 is selected, use Option MS4647B-081 above. VectorStar ME7838 Series MM PN: 10410-00306 Rev. F 1-13... -
Page 22: Recommended Test Equipment
USB 2.0 Type A Port • National Instruments GPIB Controller and Driver Power Range: 30 to 20 dBm Power Meter Anritsu ML2437A or ML2438A A, T Other: GPIB Controllable Power Range: 30 to 20 dBm Keysight 437, E4418B, or Power Meter Other: GPIB Controllable... - Page 23 Digital Multimeter DC Voltage: ± 20 V Frequency Range: DC to 40 GHz Attenuator Anritsu 41KC-20 Attenuation: 20 dB a.Use Codes: P = Performance Verification; A = Adjustment; T = Troubleshooting VectorStar ME7838 Series MM PN: 10410-00306 Rev. F 1-15...
-
Page 24: Test Equipment - Me7838A/E - Waveguide Band Configuration
Verification Standard Precision Waveguide Section Flann 26443-4123 (WR-10) Power Range: 30 to 20 dBm Power Meter Anritsu ML2437A or ML2438A A, T Other: GPIB Controllable Power Range: 30 to 20 dBm Keysight 437, E4418B, or Power Meter Other: GPIB Controllable... -
Page 25: Test Equipment - Me7838D
• National Instruments GPIB Controller and Driver Power Range: 30 to 20 dBm Power Meter Anritsu ML2437A or ML2438A A, T Other: GPIB Controllable Freq. Range: 70 kHz to 70 GHz Power Sensor Anritsu SC7770 Power Range:30 to 20 dBm... -
Page 26: Test Equipment - Me7838G
P, T Waveguide: WR05 Verification Device MI-WAVE 690G-2.0/387 P, T Straight Section Length: 2 inches Adapter 0.8 mm male to MA25400A Interface Anritsu 33.8G50 (Qty. 2) P, T WR5 Waveguide to MA25400A Adapter Anritsu 35WR5G (Qty. 2) P, T Interface... - Page 27 Digital Multimeter DC Voltage: ± 20 V Frequency Range: DC to 40 GHz Attenuator Anritsu 41KC-20 Attenuation: 20 dB a.Use Codes: P = Performance Verification; A = Adjustment; T = Troubleshooting VectorStar ME7838 Series MM PN: 10410-00306 Rev. F 1-19...
- Page 28 1-7 Recommended Test Equipment General Information 1-20 PN: 10410-00306 Rev. F VectorStar ME7838 Series MM...
-
Page 29: Chapter 2 - Replaceable Parts
This chapter does not include the replaceable parts information for the MS4640A and MS4640B Vector Network Analyzer. For their replaceable parts information, refer to the VectorStar MS4640A Note Series VNA Maintenance Manual – 10410-00268 and VectorStar MS4640B Series VNA Maintenance Manual – 10410-00320. VectorStar ME7838 Series MM PN: 10410-00306 Rev. F... -
Page 30: Me7838 Series System Replaceable Parts
Table 2-1. There are no serviceable components or subassemblies inside the 3743A/E, 3744A/E, MA25300A, SM6499 or SM6527 Millimeter-Wave modules. The modules must be returned to Anritsu Company for repair. Note Instruments shipped to European Union countries after 22nd July, 2017 are compliant with the requirements in the RoHS Directive, officially known as Directive 2011/65/EU. - Page 31 806-223 and 806-224 described above. Millimeter-Wave Module Interface Cable Set for 3739B and 3739C 3-ND75338 • Includes test port/test set to module cables 3-ND75298, 3-ND75299, 3-806-226, 3-806-254 and 3-806-256 described above; RoHS Compliant VectorStar ME7838 Series MM PN: 10410-00306 Rev. F...
-
Page 32: 3739A Test Set Replaceable Subassemblies And Parts
K female to K female Panel Adapter K232B • Five (5) per system, 1 per replacement kit V female to V female Panel Adapter V232 • two (2) per system, 1 per replacement kit PN: 10410-00306 Rev. F VectorStar ME7838 Series MM... -
Page 33: 3739B Test Set Replaceable Subassemblies And Parts
K female to K female Panel Adapter K232B • Five (5) per system, 1 per replacement kit V female to V female Panel Adapter V232 • two (2) per system, 1 per replacement kit VectorStar ME7838 Series MM PN: 10410-00306 Rev. F... -
Page 34: 3739C Test Set Replaceable Subassemblies And Parts
SPDT Switch Control PCB Assembly – 64951-3 ND70926<R> • Does not include M-M ribbon cable for connection to A1 PCB Connector P5 • Mounts on top of A104 SPDT Switch – 70242 (above) PN: 10410-00306 Rev. F VectorStar ME7838 Series MM... - Page 35 K female to K female Panel Adapter; RoHS Compliant K232B • Five (5) per system, 1 per replacement kit V female to V female Panel Adapter; RoHS Compliant V232 • Two (2) per system, 1 per replacement kit VectorStar ME7838 Series MM PN: 10410-00306 Rev. F...
-
Page 36: 3743A/E And 3744A/E Millimeter-Wave Module Replaceable Parts
Knurled M3 Screw for mounting Millimeter-Wave Modules in brackets; RoHS Compliant 3-83968 • 8 per system, 4 per module, 1 per replacement kit Heatsink; RoHS Compliant 3-ND84646 • Two (2) per system, 1 per replacement kit PN: 10410-00306 Rev. F VectorStar ME7838 Series MM... -
Page 37: Chapter 3 - Performance Verification
• Environmental Conditions • Temperature • 23 °C ± 3 °C, with < 1 °C variation from calibration temperature • Relative Humidity • 20-50% recommended • Error Correction: • Perform 12-term calibration VectorStar ME7838 Series MM PN: 10410-00306 Rev. F... -
Page 38: Me7838A/E System Verification-Broadband System Configuration
The use of non-Anritsu calibration / verification kit is not supported. Performance Verification Software Overview The Anritsu W1 Connector Broadband VNA System Performance Verification Software is provided on a USB memory device packaged with the Anritsu 3656B Calibration / Verification Kit. -
Page 39: Me7838A/E System Verification Procedure-Broadband System Configuration
5. Install the W1 male to female adapter from the 3656B Calibration / Verification Kit on the Port 2 3743A/E Millimeter-Wave Module. 6. Run the Anritsu W1 Connector Broadband VNA System Performance Verification Software on the PC. 7. Follow the directions displayed on the computer to perform calibration. - Page 40 Due to different calibration methods are required to cover the 110 GHz range (SOLT for low band and SSST for high band), the verification is done in two steps Low band and High band with the Note break point set to 65 GHz. PN: 10410-00306 Rev. F VectorStar ME7838 Series MM...
-
Page 41: Me7838A/E System Verification-Waveguide Millimeter-Wave System Configuration
The performance of ME7838A/E Waveguide Millimeter-Wave system configuration is verified by looking at the calibrated system residual performance at the waveguide interfaces. Equipment Required • Anritsu 3655 Series Waveguide Calibration Kit • Extended E Band (WR-12): 3655E-1 • Extended W Band (WR-10): 3655W-1 •... - Page 42 (terminations, sliding loads and one-piece offset shorts) prior to starting a calibration. The assumption here is that device mating will utilize all four screws from the calibration device side. PN: 10410-00306 Rev. F VectorStar ME7838 Series MM...
-
Page 43: Procedure
17. Click Back on the lower section of the right side menu to return to previous menu. 18. Select Calibrate | Manual Cal | 1-Port Cal | Modify Cal Setup | Line Type | Waveguide 19. Select Cal Method | Offset Short (SSLT) 20. Select Edit Cal Params VectorStar ME7838 Series MM PN: 10410-00306 Rev. F... - Page 44 34. Remove the load from Port 1. 35. Select Sliding Load. 36. Set the vernier knob of the sliding load to 0 and install the sliding load to Port 1. 37. Select Position 1 to measure. PN: 10410-00306 Rev. F VectorStar ME7838 Series MM...
- Page 45 68. Select Position 4 to measure. 69. Adjust the vernier knob counter-clockwise to a new position. 70. Select Position 5 to measure. 71. Adjust the vernier knob counter-clockwise to a new position. VectorStar ME7838 Series MM PN: 10410-00306 Rev. F...
- Page 46 (or the adjacent troughs if the ripple has the greatest positive peak) in the frequency band of interest as shown in Figure 3-2, “Markers Positioning for Directivity Verification”. Figure 3-2. Markers Positioning for Directivity Verification 3-10 PN: 10410-00306 Rev. F VectorStar ME7838 Series MM...
- Page 47 • Setting fractional amount of Smoothing (e.g. 2.5%) will help find a good setting. • Turn off Smoothing after the measurement is done. 92. Select Marker. VectorStar ME7838 Series MM PN: 10410-00306 Rev. F 3-11...
- Page 48 98. Find the corresponding “X dB Below Reference” value, the “Ref X” value and the “Ref X” value of the “REF ± X Pk to Pk Ripple dB” value on the RF measurement chart. 3-12 PN: 10410-00306 Rev. F VectorStar ME7838 Series MM...
- Page 49 107. Remove the flush short from the Flann precision waveguide section. 108. Repeat Step 79 to Step 88. 109. Record the calculated Directivity value into Port 2 Measured column of Table A-1 on page A-2. VectorStar ME7838 Series MM PN: 10410-00306 Rev. F 3-13...
- Page 50 0.0016 0.0138 -0.0138 0.0275 1.0028 0.0014 0.0123 -0.0123 0.0245 Phasor Interaction 1.0025 0.0013 0.0109 -0.0109 0.0219 1.0022 0.0011 0.0097 -0.0098 0.0195 1.0020 0.0010 0.0087 -0.0087 0.0174 Figure 3-4. RF Measurement Chart 3-14 PN: 10410-00306 Rev. F VectorStar ME7838 Series MM...
-
Page 51: Me7838D System Verification
Note vendor of the wafer probe equipment if such support is desired. The procedures are automated by using the Anritsu 0.8 mm Connector Broadband VNA System Performance Verification Software in conjunction with the Anritsu 3659 Calibration / Verification Kit. Note The use of non-Anritsu calibration / verification kit is not supported. -
Page 52: Me7838D System Verification Procedure
5. Install the 0.8 mm male to female adapter from the 3659 Calibration / Verification Kit on the Port 2 MA25300A Millimeter-Wave Module. 6. Run the Anritsu 0.8 mm Connector ME7838D/G VNA System Performance Verification Software on the 7. Follow the directions displayed on the computer to perform calibration. - Page 53 Since different calibration methods are required to cover the 145 GHz range (SOLT for low band and SSST for high band), the verification is done in two steps Low band and High band with the break Note point set to 80 GHz. VectorStar ME7838 Series MM PN: 10410-00306 Rev. F 3-17...
-
Page 54: Me7838G System Verification
70 kHz to 145 GHz by analyzing the measurement of artifacts that are traceable to International System of Units (SI) via national metrology institutes. The procedures are automated by using the Anritsu 0.8 mm Connector Broadband VNA System Performance Verification Software in conjunction with the Anritsu 3659 Calibration / Verification Kit. -
Page 55: Me7838G Wr05 Waveguide System Verification
This procedure is used to verify the measurement capability of the VNA, calibration kit, and any required adapters as a system from 140 GHz to 220 GHz by analyzing the S-parameter measurements of a specified waveguide device. VectorStar ME7838 Series MM PN: 10410-00306 Rev. F 3-19... -
Page 56: 3-10 Me7838G 0.8 Mm Coaxial System Verification Procedure
6. Install the 0.8 mm male to female adapter from the 3659 Calibration / Verification Kit on the Port 2 MA25400A Millimeter-Wave Module. 7. Run the Anritsu 0.8 mm Connector ME7838D/G VNA System Performance Verification Software on the 8. Follow the directions displayed on the computer to perform calibration. - Page 57 Since different calibration methods are required to cover the 145 GHz range (SOLT for low band and Note SSST for high band), the verification is done in two steps — Low band and High band with the breakpoint set to 80 GHz. VectorStar ME7838 Series MM PN: 10410-00306 Rev. F 3-21...
-
Page 58: Me7838G Wr05 Waveguide System Verification Procedure
The WR05 waveguide system verification procedure is described below. Equipment Required • OML V05CAL WR05 Waveguide Calibration Kit • Anritsu 35WR5G WR05 to MA25400A Adapters (Qty 2) • MI-WAVE 690G-2.0/387 2 inch WR05 Waveguide Straight Section Procedure 1. Dismount both MA25400A modules from the probe station, if required. -
Page 59: Waveguide Device S-Parameters Measurements
28. Select Tr2 | Display | Trace Format | Log Mag 29. Select Tr3 | Display | Trace Format | Log Mag 30. Select Tr4 | Display | Trace Format | Log Mag VectorStar ME7838 Series MM PN: 10410-00306 Rev. F 3-23... - Page 60 33. Verify that S11 and S22 are better than -10 dB and verify that S21 and S12 are better than -2 dB. 34. Record the measured values to Table A-3, “S-Parameter Measurements Results” on page A-3. 3-24 PN: 10410-00306 Rev. F VectorStar ME7838 Series MM...
-
Page 61: Chapter 4 - Theory Of Operation
Figure 4-1 on page 4-2 shows the ME7838 Series VNA Broadband system configuration and illustrates the interconnections among the VNA, Test Set, and Millimeter-Wave Modules. VectorStar ME7838 Series MM PN: 10410-00306 Rev. F... - Page 62 Test Set Test IF Test IF Ref IF Ref IF Power & Control Power & Control TEST TEST Millimeter-Wave Millimeter-Wave Module Module (Port 1) (Port 2) Figure 4-1. ME7838 Series VNA System Interconnections PN: 10410-00306 Rev. F VectorStar ME7838 Series MM...
-
Page 63: Functional Description Of System Components
DSP Module RF Source Module 5 - 20 GHz Switched Doubler Doubler Module Module Switched Quadrupler LO Module Module Transfer Switch Front Panel RF Out Figure 4-2. MS4647A/B Option 080/081 Block Diagram VectorStar ME7838 Series MM PN: 10410-00306 Rev. F... - Page 64 • 3 dBm from 8 to 10 GHz • 0 dBm from 10 to 20 GHz • +3 dBm from 20 to 27 GHz • +2 dBm from 27 to 40 GHz PN: 10410-00306 Rev. F VectorStar ME7838 Series MM...
-
Page 65: 3739A Broadband Test Set
The Port 1 and Port 2 LO Out ports have a typical power output at 5 to 10 GHz of +6 dBm. The Port 1 and Port 2 RF Out ports have minimum power output at 26 to 40 GHz of +10 dBm. VectorStar ME7838 Series MM PN: 10410-00306 Rev. F... -
Page 66: 3739B Broadband Test Set
Both Port 1 and Port 2 LO Out ports have typical power output at 5 to 10 GHz of +6 dBm in Modular/BB mode (used when Anritsu 3743/3744 series or MA25300A series modules are installed) and at 8 to 22 GHz of +17 dBm in mmW mode (used when OML/VDI Millimeter-Wave modules are installed). -
Page 67: 3739C Broadband Test Set
Both Port 1 and Port 2 LO Out ports have minimum power output at 5 to 10 GHz of +6 dBm in Modular/BB mode (used when Anritsu 3743/3744 Series or MA25300A modules are installed) and at 8 to 22 GHz of +17 dBm in mmW mode (used when OML/VDI Millimeter-Wave modules are installed). -
Page 68: 3743E Millimeter-Wave Module
• Generating 65 to 110 GHz stimulus signals for operation • Generating LO Level Detector outputs • Generating Source Level Detector outputs • Converting 65 to 110 GHz test signals to IF for operation PN: 10410-00306 Rev. F VectorStar ME7838 Series MM... -
Page 69: 3744E-Ew Millimeter-Wave Module
• Generating stimulus signals for operation 54 GHz and above • Generating LO Level Detector outputs • Generating Source Level Detector outputs • Converting test signals to IF for operation above 30 GHz VectorStar ME7838 Series MM PN: 10410-00306 Rev. F... -
Page 70: Me7838A System Operation-Broadband Configuration
Both the Reference and Test IF signals are then fed to the 3739A, 3739B or 3739C Test Set. The IF signals pass through the 3739A or 3739B Test Set and are fed to the IF Inputs of the MS4647A or MS4647B VNA for further signal processing. 4-10 PN: 10410-00306 Rev. F VectorStar ME7838 Series MM... -
Page 71: Me7838A System Operation-Waveguide Band Configuration
Both the Reference and Test IF signals are then fed to the 3739A, 3739B or 3739C Test Set. The IF signals pass through the 3739A, 3739B or 3739C Test Set and are fed to the IF Inputs of the MS464xA or MS464xB VNA for further signal processing. VectorStar ME7838 Series MM PN: 10410-00306 Rev. F 4-11... -
Page 72: Me7838E System Operation-Broadband Configuration
Both the Reference and Test IF signals are then fed to the 3739B or 3739C Test Set. The IF signals pass through the 3739B or 3739C Test Set and are fed to the IF Inputs of the MS4647B VNA for further signal processing. 4-12 PN: 10410-00306 Rev. F VectorStar ME7838 Series MM... -
Page 73: Me7838E System Operation-Waveguide Band Configuration
Both the Reference and Test IF signals are then fed to the 3739B or 3739C Test Set. The IF signals pass through the 3739B or 3739C Test Set and are fed to the IF Inputs of the MS464xB VNA for further signal processing. VectorStar ME7838 Series MM PN: 10410-00306 Rev. F 4-13... -
Page 74: Me7838D System Operation
Both the Reference and Test IF signals are then fed to the 3739C Test Set. The IF signals pass through the 3739C Test Set and are fed to the IF Inputs of the MS4647B VNA for further signal processing. 4-14 PN: 10410-00306 Rev. F VectorStar ME7838 Series MM... -
Page 75: 4-10 Me7838G System Operation
Both the Reference and Test IF signals are then fed to the 3739C Test Set. The IF signals pass through the 3739C Test Set and are fed to the IF Inputs of the MS4647B VNA for further signal processing. VectorStar ME7838 Series MM PN: 10410-00306 Rev. F... - Page 76 4-10 ME7838G System Operation Theory Of Operation 4-16 PN: 10410-00306 Rev. F VectorStar ME7838 Series MM...
-
Page 77: Chapter 5 - Adjustment
• Krytar 102040013K Directional Coupler Procedure 1. Ensure that all system components have been assembled per VectorStar ME7838 Series VNA System Installation Guide – 10410-00293. 2. Install a GPIB interface cable between the power meter GPIB port and the Dedicated GPIB port of the MS464xx VNA. - Page 78 Ref IF Ref IF Power & Control Power & Control K(m) to K(m) Adapter Module Module (Port 2) (Port 1) Pwr/Ctrl Pwr/Ctrl TEST TEST Figure 5-1. LO Level Cal Setup (Broadband Configuration shown) PN: 10410-00306 Rev. F VectorStar ME7838 Series MM...
- Page 79 Figure 5-2. DIAGNOSTICS ACCESS Dialog Box 13. Enter the password CajaNueva in the Password field and click OK. 14. The Diagnostics Menu appears as shown in Figure 5-3. Figure 5-3. DIAGNOSTICS Menu VectorStar ME7838 Series MM PN: 10410-00306 Rev. F...
- Page 80 15. Select Hardware Cal to access the Hardware Cal Menu as shown in Figure 5-4. Figure 5-4. HARDWARE CAL Menu 16. Select Src LO Level Cal and the LO Level Cal Menu appears as shown in Figure 5-5. Figure 5-5. LO LEVEL CAL Menu PN: 10410-00306 Rev. F VectorStar ME7838 Series MM...
- Page 81 19. After the calibration is complete, remove the Power Sensor and Directional Coupler from the Port 1 LO connector of the 3739A, 3739B or 3739C Test Set and re-connect the LO cable. VectorStar ME7838 Series MM PN: 10410-00306 Rev. F...
-
Page 82: Alc Level Calibration
• Anritsu SC7770 Power Sensor • Anritsu 33WFVF50 W1 female to V female Adapter • Anritsu 33W.8F50 W1 male to 0.8 mm female Adapter (Included with 3659 Calibration Kit) • Keysight 437B, E4418B, or N1913A with Option 200 Power Meter •... -
Page 83: Setup Procedure
Step 4. Install a GPIB interface cable between the Anritsu ML243XA power meter GPIB port and the Dedicated GPIB port of the MS464xx VNA. 5. Install a GPIB interface cable between the GPIB port of the Keysight 437B, E4418B, or N1913A power meter and the Dedicated GPIB port of the MS464xx VNA. - Page 84 14. Turn on power meters, if not done previously, and allow them to warm up at least 30 minutes. 15. Connect the Anritsu SC7770 power sensor to the Calibrator port of the ML243XA power meter and calibrate the power sensor.
- Page 85 Figure 5-7. Figure 5-7. DIAGNOSTICS ACCESS Dialog Box 21. Select Hardware Cal to access the Hardware Cal menu as shown in Figure 5-8. Figure 5-8. HARDWARE CAL Menu VectorStar ME7838 Series MM PN: 10410-00306 Rev. F...
- Page 86 5-3 ALC Level Calibration Adjustment 22. Select ALC Cal; the ALC Level Cal menu appears as shown in Figure 5-9. Figure 5-9. ALC LEVEL CAL Menu 5-10 PN: 10410-00306 Rev. F VectorStar ME7838 Series MM...
-
Page 87: Alc Calibration Procedure-Broadband Configuration
3. Confirm that Freq Range displays Bnd1:54G-70GHz. If not, select Freq Range and select Band 1. 4. Connect the Anritsu SC7770 power sensor to the Test Port of the Millimeter-Wave Module at Port 1. 5. Select Port 1 ALC Cal. - Page 88 33W.8F50 Adapter from the Keysight W8486A power sensor and install the adapter to the Anritsu SC7770 power sensor. 36. Install the Anritsu SC7770 power sensor to the Test Port of the Millimeter-Wave Module at Port 1. 5-12 PN: 10410-00306 Rev. F...
- Page 89 5-3 ALC Level Calibration 37. Change the Freq Range to Bnd1:54G-70GHz. 38. Select Port 2 ALC Cal. 39. Click the Start Cal button to start the calibration. 40. The ALC Calibration is now complete. VectorStar ME7838 Series MM PN: 10410-00306 Rev. F 5-13...
-
Page 90: Alc Calibration Procedure-Banded Millimeter-Wave Configuration
Figure 5-11 on page 5-15 will appear. 2. Connect the Anritsu SC7770 power sensor to the Test Port of the Millimeter-Wave Module at Port 1. 3. Ensure that Freq Range displays Bnd1:54G-70GHz. If not, select Freq Range and select Band 1. - Page 91 Adjustment 5-3 ALC Level Calibration Figure 5-11. ALC [3739-IF] Menu VectorStar ME7838 Series MM PN: 10410-00306 Rev. F 5-15...
- Page 92 Figure 5-12. ALC [3739-RF] Menu Port 2 RF Leveling Calibration 21. Connect the Anritsu SC7770 power sensor to the W1 Test Port of the Millimeter-Wave Module at Port 2. 22. Select Port 2 ALC Cal. 23. Click the Start Cal button to start the calibration.
- Page 93 Module at Port 2. 33. Change the Freq Range to Bnd1:54G-70GHz. 34. Connect the Anritsu SC7770 power sensor to the Test Port of the Millimeter-Wave Module at Port 2. 35. Select Port 2 ALC Cal. 36. Click the Start Cal button to start the calibration.
- Page 94 5-3 ALC Level Calibration Adjustment 5-18 PN: 10410-00306 Rev. F VectorStar ME7838 Series MM...
-
Page 95: Chapter 6 - Troubleshooting
Always observe the static-sensitive component handling precautions. To provide protection for the rear panel connectors, when the top cover is removed, the rear feet Caution should be reattached onto the chassis after removing the top cover. VectorStar ME7838 Series MM PN: 10410-00306 Rev. F... -
Page 96: Troubleshooting Strategy
• Ensure that no setup and installation errors exist (e.g. cabling error and cable connection). Refer to the VectorStar ME7838 Series VNA System Installation Guide part number 10410-00293. • Isolate the fault to a system components (e.g. VNA, Test Set, or Millimeter-Wave Module) using a process of elimination. - Page 97 3739A Test Set. d. Refer to “General Troubleshooting of the 3739B/C Test Set” on page 6-13 for procedures to further isolate if the fault is in the 3739B/C Test Set. VectorStar ME7838 Series MM PN: 10410-00306 Rev. F...
-
Page 98: Troubleshooting Test - Vna Source And Lo Power Level Check
The VNA Source and LO Power Level Check verifies that sufficient levels of source power and LO power are supplied to the 3739A, 3739B or 3739C Test Set. This test assumes that the ME7838A system is assembled per the VectorStar ME7838 Series Note 2-Port Broadband/Banded Millimeter-Wave VNA System Installation Guide –... - Page 99 17. Vary the CW Frequency and monitor the output with the Spectrum Analyzer to see if the power level is > 3.2 dBm 18. If the output is unexpectedly low, the fault lies in the MS464xx VNA. VectorStar ME7838 Series MM PN: 10410-00306 Rev. F...
-
Page 100: Troubleshooting Test - Non-Ratio Power Level Check
The Non-Ratio Power Level Check is very useful to isolate which of the four VNA receiver channels is faulty. Equipment Required • Anritsu 3656B Calibration / Verification Kit (For ME7838A and ME7838E) • Anritsu 3659 Calibration / Verification Kit (For ME7838D) •... -
Page 101: General Troubleshooting Of The 3739A Test Set
6-11. If RF port and LO port power levels are at the expected level, then the fault most likely lies in the Note Millimeter-Wave Module that is connected to the respective port. VectorStar ME7838 Series MM PN: 10410-00306 Rev. F... -
Page 102: Troubleshooting Test - 3739A Power Supply Dc Check
Table 6-2. Power Supply Expected DC Voltages Test Point Common Expected Voltage 5 V 12 V 12 V 12 V 5. If any of the voltages is not present, replace the power supply. PN: 10410-00306 Rev. F VectorStar ME7838 Series MM... - Page 103 6-8 Troubleshooting Test – 3739A Power Supply DC Check Voltage Test Points – E17, E18, E19, and E20; Common Test Point – TP1 Figure 6-1. Locations of Power Supply Voltage Test Points on 3739A A1 Board VectorStar ME7838 Series MM PN: 10410-00306 Rev. F...
-
Page 104: Troubleshooting Test - 3739A A1 Bias Control Pcb Dc Bias Check
0.05 V 11 V 11 V SPDT Bias 5 V 5 V 12 V Fan Bias 6. If any of the voltage is not present, replace the A1 Bias Control PCB Assembly. 6-10 PN: 10410-00306 Rev. F VectorStar ME7838 Series MM... -
Page 105: 6-10 Troubleshooting - 3739A Test Set Port Power Level Check
The Test Set Port Power Level Check verifies that sufficient levels of RF power and LO power are supplied to the Millimeter-Wave Modules. Equipment Required • Anritsu ML2437A or ML2438A Power Meter • Anritsu MA2474D Power Sensor • Anritsu MS2718B Spectrum Analyzer •... - Page 106 Check if the Port 2 LO Amplifier output level is low. g. If the level is <9 dBm, then replace the Port 2 LO Amplifier. h. If the level is >9 dBm, then replace the Port 2 LO Modulator. 6-12 PN: 10410-00306 Rev. F VectorStar ME7838 Series MM...
-
Page 107: General Troubleshooting Of The 3739B/C Test Set
If RF port and LO port power levels are at their expected level, then the fault most likely lies in the Note Millimeter-Wave Module that is connected to the respective port. VectorStar ME7838 Series MM PN: 10410-00306 Rev. F 6-13... -
Page 108: 6-12 Troubleshooting Test - 3739B/C Power Supply Dc Check
Power Supply Expected DC Voltages Test Point Common Expected Voltage 5 V 12 V 12 V 12 V 6. If any of the voltages is not present, replace the power supply. 6-14 PN: 10410-00306 Rev. F VectorStar ME7838 Series MM... - Page 109 6-12 Troubleshooting Test – 3739B/C Power Supply DC Check Voltage Test Points – E17, E18, E19, and E20; Common Test Point – TP1 Figure 6-2. Locations of Power Supply Voltage Test Points on 3739B A1 Board VectorStar ME7838 Series MM PN: 10410-00306 Rev. F 6-15...
- Page 110 6-12 Troubleshooting Test – 3739B/C Power Supply DC Check Troubleshooting Voltage Test Points – E17, E18, E19, and E20; Common Test Point – TP1 Figure 6-3. Locations of Power Supply Voltage Test Points on 3739C A1 Board 6-16 PN: 10410-00306 Rev. F VectorStar ME7838 Series MM...
-
Page 111: 6-13 Troubleshooting Test - 3739B/C A1 Bias Control Pcb Dc Bias Check
8 V 6 V P15 & P16 Doubler Module 5 V 5 V 5 V 7. If any of the voltage is not present, replace the A1 Bias Control PCB Assembly. VectorStar ME7838 Series MM PN: 10410-00306 Rev. F 6-17... -
Page 112: 6-14 Troubleshooting - 3739B/C Test Set Port Power Level Check
Millimeter-Wave Modules. Equipment Required • Anritsu ML2437A or ML2438A Power Meter • Anritsu MA2474D Power Sensor • Anritsu MS2720T with Opt 732 Spectrum Analyzer • Anritsu 34NKF50 Adapter • Anritsu 15KK50-1.0A RF Cable • Anritsu 41KC-20 20 dB Fixed Attenuator Procedure 1. - Page 113 21. Vary the CW Frequency and monitor the output with the Spectrum Analyzer to see if the power level is ~ 9 dBm. 22. If the output is unexpectedly low, replace the Port 2 LO Doubler Module. VectorStar ME7838 Series MM PN: 10410-00306 Rev. F 6-19...
- Page 114 6-14 Troubleshooting – 3739B/C Test Set Port Power Level Check Troubleshooting 6-20 PN: 10410-00306 Rev. F VectorStar ME7838 Series MM...
-
Page 115: Chapter 7 - Removal And Replacement Procedures For 3739A
VNA. There is a risk of back injury if this instrument is moved by one person. Make sure that any equipment carts can safely carry the instrument weight. 10. Set the VNA aside in a secure, clean, and anti-static environment. VectorStar ME7838 Series MM PN: 10410-00306 Rev. F... - Page 116 To provide protection for the rear panel connectors, when the top cover is removed, the rear feet Caution should be reattached onto the chassis after removing the top cover. 13. Reattach the rear feet to the chassis. PN: 10410-00306 Rev. F VectorStar ME7838 Series MM...
- Page 117 5 – Front Right Side Handle, Feet, and Hardware 11 – Top Cover – Lift from rear 6 – Front Left Side Handle, Feet, and Hardware Figure 7-2. 3739A Test Set – Initial Disassembly and Removing Top Cover VectorStar ME7838 Series MM PN: 10410-00306 Rev. F...
-
Page 118: Reassembly Procedure - Power, Disconnect, And Covers
15. Connect the Port 1 to Module Port 1 Cable Assembly to the Test Set. Note that each cable is clearly labeled: a. Port 1 Test. Tighten and torque as above. b. Port 1 Ref. Tighten and torque as above. c. Port 1 RF. Tighten and torque as above. PN: 10410-00306 Rev. F VectorStar ME7838 Series MM... - Page 119 Port 2 Module Connections 27. Following the same sequence as the sub-section above, connect the cables to the Port 2 Module. a. SRC b. RF c. LO d. REF e. TEST f. Power/Signal VectorStar ME7838 Series MM PN: 10410-00306 Rev. F...
- Page 120 Front Panel orange Standby LED is illuminated. b. On the VNA Front Panel, press the Standby/Operate key for at least one second. The green Operate LED illuminates. The splash screen appears, and the instrument starts. PN: 10410-00306 Rev. F VectorStar ME7838 Series MM...
-
Page 121: Replaceable Part Chassis Locations
Right A103 A107 A102 A101 A100 A106 A104 A105 Port 1 Front Port 2 Front Panel Figure 7-3. 3739A Test Set – Chassis Top Side – Major Component Locations (1 of 2) VectorStar ME7838 Series MM PN: 10410-00306 Rev. F... - Page 122 18 – A105 LO Amplifier Module, 0.01 GHz to 20 GHz, Port 2 – ND73160 – 3-1070-13 – With soldered-on cable harness. Figure 7-3. 3739A Test Set – Chassis Top Side – Major Component Locations (2 of 2) PN: 10410-00306 Rev. F VectorStar ME7838 Series MM...
-
Page 123: Replacement Parts
3. On the front of the power supply, disconnect the Power Supply Cable Harness – ND73168 – 71918 from the power supply. On the power supply, when the power supply is viewed from the front of the chassis, the connectors are: VectorStar ME7838 Series MM PN: 10410-00306 Rev. F... - Page 124 • The other end of the harness should be connected to the A1 PCB connector P4. Common Reassembly Procedures 10. If no other interior replacement procedures are required, follow the common reassembly procedures described above in “Reassembly Procedure – Power, Disconnect, and Covers” on page 7-4. 7-10 PN: 10410-00306 Rev. F VectorStar ME7838 Series MM...
-
Page 125: A1 Bias Control Pcb Assembly - Nd73163
The A1 Bias Control PCB is located near the rear center of the chassis as shown in Figure 7-3 on page 7-7 above. The A1 PCB Connector and Test Point locations are shown in below. VectorStar ME7838 Series MM PN: 10410-00306 Rev. F 7-11... - Page 126 7-6 A1 Bias Control PCB Assembly – ND73163<R> Removal and Replacement Procedures For 3739A Figure 7-5. A1 Bias Control PCB Assembly – ND73163 – 3-72143-3 (1 of 2) 7-12 PN: 10410-00306 Rev. F VectorStar ME7838 Series MM...
-
Page 127: Replacement Procedure
9. Loosely insert the ten pan head screws and make sure the PCB is correctly positioned, and then tighten the screws. 10. Reconnect the cable harnesses to the A1 PCB as listed in Table 7-1 on page 7-14. VectorStar ME7838 Series MM PN: 10410-00306 Rev. F 7-13... - Page 128 To Power Supply Load Resistors Common Reassembly Procedures 11. If no other interior replacement procedures are required, follow the common reassembly procedures described above in “Reassembly Procedure – Power, Disconnect, and Covers” on page 7-4. 7-14 PN: 10410-00306 Rev. F VectorStar ME7838 Series MM...
-
Page 129: Module Replacement Basics
7. If a semi rigid coaxial cable was undone to access the module, reconnect it by aligning carefully, threading, and then torque as described above. 8. Repeat the general steps above until the module group is complete. VectorStar ME7838 Series MM PN: 10410-00306 Rev. F 7-15... -
Page 130: A100 - Nd73159
2 – A105 LO Amplifier Module – ND73160 – 3-1070-13 mounting, 4 each. with 3-71916-2 soldered-on cable harness – Connects to Port 2. Figure 7-6. A100 and A105 Modules – Bracket Mounting Detail 7-16 PN: 10410-00306 Rev. F VectorStar ME7838 Series MM...And A105 - Nd73160 Lo Amplifier Modules And Bracket Assembly -
Page 131: A101 - Nd73161
2 – A101 Cable Harness – Connects to A1 PCB 4 – A106 Cable Harness – Connects to A1 PCB Connector P10. Connector P11. Figure 7-7. A101 and A106 Modulator Modules VectorStar ME7838 Series MM PN: 10410-00306 Rev. F 7-17...And A106 - Nd73162 Modulator And Bracket Assembly -
Page 132: A102 And A107 Isolator Modules - 3-1000-58 And Bracket Assembly
2 – A107 Isolator Module, Port 2, 5 GHz to 10 GHz – bracket. 3-1000-58 5 – Bracket-to-Chassis Mounting Screws, 4 each 3 – Pedestal Mounting Bracket Figure 7-8. A102 and A107 Modules – Bracket Mounting Detail 7-18 PN: 10410-00306 Rev. F VectorStar ME7838 Series MM... -
Page 133: A103 Rf Amplifier Module - Nd73158
3-71907 soldered-on cable harness – Connects to A1 4 – Bracket-to-Chassis Mounting Screws, 4 each PCB Connector P3. 2 – Pedestal Mounting Bracket Figure 7-9. A103 Module and Bracket Mounting Detail VectorStar ME7838 Series MM PN: 10410-00306 Rev. F 7-19...And Bracket Assembly -
Page 134: A104 Spdt Switch Module - 70242
2 – Module-to-Bracket Mounting Screws, 4 each 7 – PCB Mounting Screws – 3 each 3 – Mounting Bracket 4 – Bracket-to-Chassis Mounting Screws, 4 each Figure 7-10. A104 Module and Bracket Mounting Detail 7-20 PN: 10410-00306 Rev. F VectorStar ME7838 Series MM...And Bracket Assembly -
Page 135: Module Replacement Sequence
Separate A101 Module from two RF right-angle elbow connectors. • Note elbow orientation. Attach elbow connectors to replacement A101 Module. Replace A101 in chassis. Replace A102 in chassis. Cable harness connects to A1 PCB Connector P10. VectorStar ME7838 Series MM PN: 10410-00306 Rev. F 7-21... - Page 136 Replace SPDT PCB on top of A104 Module. • Three screws hold SPDT PCB to A104 Module. Replace A104 Module Assembly into chassis. SPDT cable harness connects to A1 PCB Connector P5. 7-22 PN: 10410-00306 Rev. F VectorStar ME7838 Series MM...
- Page 137 Four screws hold bracket to chassis. Turn assembly upside down to access two screws holding bracket to module. Separate A107 Module from bracket. Assemble replacement A107 Module and bracket. Replace A107 in chassis. No cable harness. VectorStar ME7838 Series MM PN: 10410-00306 Rev. F 7-23...
-
Page 138: Rear Panel Fan Assembly - Nd73164
3 – Finger Guard and Fan Mounting Nuts, 4 each 7 – Rear Panel Fan Assembly Cable Connector – Connects to A1 PCB Connector P9 4 – External Finger Guard Figure 7-11. Rear Panel Fan Assembly – ND73164 – 3-71919 7-24 PN: 10410-00306 Rev. F VectorStar ME7838 Series MM... -
Page 139: Replacement Procedure
10. Connect the fan power cable to the A1 PCB Connector P9. Common Reassembly Procedures 11. If no other interior replacement procedures are required, follow the common reassembly procedures described above. • “Reassembly Procedure – Power, Disconnect, and Covers” on page 7-4 VectorStar ME7838 Series MM PN: 10410-00306 Rev. F 7-25... -
Page 140: Front Panel Assembly - Nd73169 - 71894
Front Panel viewed from inside the chassis where Port 1 is on the right with the supplied cable harnesses and the cables that must be disconnected. Figure 7-12. Front Panel Assembly – ND73168 – View from inside chassis (1 of 2) 7-26 PN: 10410-00306 Rev. F VectorStar ME7838 Series MM... -
Page 141: Replacement Part
4. Disconnect the three semi-rigid coaxial connectors from the Front Panel top connector row. Once loose, bend the cables slightly out of the way. a. RF connector. b. LO1 connector. c. LO2 connector. VectorStar ME7838 Series MM PN: 10410-00306 Rev. F 7-27... - Page 142 Insert the two screws but do not tighten. 14. Insert the two screws on each side holding the Front Panel assembly to the side panels, but do not tighten. 7-28 PN: 10410-00306 Rev. F VectorStar ME7838 Series MM...
- Page 143 Port 2 Power / Control – Connect to A1 PCB Connector J3. Common Reassembly Procedures 25. If no other interior replacement procedures are required, follow the common reassembly procedures described above. • “Reassembly Procedure – Power, Disconnect, and Covers” on page 7-4 VectorStar ME7838 Series MM PN: 10410-00306 Rev. F 7-29...
- Page 144 7-10 Front Panel Assembly – ND73169 – 71894 Removal and Replacement Procedures For 3739A 7-30 PN: 10410-00306 Rev. F VectorStar ME7838 Series MM...
-
Page 145: Chapter 8 - Removal And Replacement Procedures For 3739B And 3739C
Make sure that any equipment carts can safely carry the instrument weight. 10. Set the VNA aside in a secure, clean, and anti-static environment. 11. Move the Test Set to the repair area. VectorStar ME7838 Series MM PN: 10410-00306 Rev. F... - Page 146 13. Remove the six Philip screws that secure the stiffener plate to the chassis. 14. Remove the stiffener plate. 15. Reattach the rear feet to the chassis. PN: 10410-00306 Rev. F VectorStar ME7838 Series MM...
- Page 147 5 – Front Right Side Handle, Feet, and Hardware 11 – Top Cover – Lift from rear 6 – Front Left Side Handle, Feet, and Hardware Figure 8-2. 3739B/C Test Set – Initial Disassembly and Removing Top Cover VectorStar ME7838 Series MM PN: 10410-00306 Rev. F...
-
Page 148: Reassembly Procedure - Power, Disconnect, And Covers
Connect VNA RF to Test Set RF. When correctly threaded, and tightened, torque to 0.9 N·m (8 lbf·in). b. Connect the VNA LO1 to Test Set LO1. Tighten and torque as above. c. Connect the VNA LO2 to Test Set LO2. Tighten and torque as above. PN: 10410-00306 Rev. F VectorStar ME7838 Series MM... - Page 149 26. Connect the TEST cable to the Port 1 Module. Thread and tighten the SSMC connector as above. 27. Carefully, observing the connector polarity, match up the markings on the Power/Signal plug with the power/signal connector. The connector snaps into place. VectorStar ME7838 Series MM PN: 10410-00306 Rev. F...
- Page 150 Front Panel orange Standby LED is illuminated. b. On the VNA Front Panel, press the Standby/Operate key for at least one second. The green Operate LED illuminates. The splash screen appears, and the instrument starts. PN: 10410-00306 Rev. F VectorStar ME7838 Series MM...
-
Page 151: Replaceable Part Chassis Locations
A1 PCB Power Supply P2 P3 A103 A104 A101 A100 A105 A106 1010-47 6 dB Attenuator Figure 8-3. 3739B/C Test Set – Chassis Top Side – Major Component Locations (1 of 2) VectorStar ME7838 Series MM PN: 10410-00306 Rev. F... - Page 152 ND75886<R> or 3-ND75886<R> – With soldered-on cable harness. 1010-47 or 3-1010-47 – 6 dB Fixed Attenuator Figure 8-3. 3739B/C Test Set – Chassis Top Side – Major Component Locations (2 of 2) PN: 10410-00306 Rev. F VectorStar ME7838 Series MM...
-
Page 153: Replacement Parts
A representative Power Supply module is shown below in Figure 8-4. The installed version may differ slightly in appearance and color. The mounting hold and connector locations will be the same. Figure 8-4. Power Supply Module – 3-40-183 VectorStar ME7838 Series MM PN: 10410-00306 Rev. F... -
Page 154: Replacement Procedure
• The other end of the harness should be connected to the A1 PCB connector P4. Common Reassembly Procedures 10. If no other interior replacement procedures are required, follow the common reassembly procedures described above in “Reassembly Procedure – Power, Disconnect, and Covers” on page 8-4. 8-10 PN: 10410-00306 Rev. F VectorStar ME7838 Series MM... -
Page 155: A1 Bias Control Pcb Assembly
9. Loosely insert the ten pan head screws and make sure the PCB is correctly positioned, and then tighten the screws. 10. Reconnect the cable harnesses to the A1 PCB as listed in Table 8-1 for 3739B or in Table 8-2 for 3739C. VectorStar ME7838 Series MM PN: 10410-00306 Rev. F 8-11... - Page 156 To Front Panel – Port 2 LED To Front Panel – Port 1 LED To Power Supply Load Resistors To A100 Doubler Module, Port 1 To A101 Doubler Module, Port 2 8-12 PN: 10410-00306 Rev. F VectorStar ME7838 Series MM...
- Page 157 To Rear Panel – Normal/Boost Switch Common Reassembly Procedures 11. If no other interior replacement procedures are required, follow the common reassembly procedures described above in “Reassembly Procedure – Power, Disconnect, and Covers” on page 8-4. VectorStar ME7838 Series MM PN: 10410-00306 Rev. F 8-13...
-
Page 158: Module Replacement
6. If equipped, connect the soldered-on module cable to the appropriate A1 PCB connector. 7. If a semi rigid coaxial cable was undone to access the module, reconnect it by aligning carefully, threading, and then torque as described above. 8-14 PN: 10410-00306 Rev. F VectorStar ME7838 Series MM... -
Page 159: A100 And A101 - Nd75883
Figure 8-5. A100 and A101 Doubler Module Replacement Detail VectorStar ME7838 Series MM PN: 10410-00306 Rev. F 8-15...Or 3-Nd75883 Doubler Modules -
Page 160: A103 - Nd75884
6 – Transfer the semi-rigid cables to J1 and J2 of the new A1 PCB. A103 module but do not tighten the coupling nuts. Figure 8-6. A103 RF Amplifier Module Replacement Detail 8-16 PN: 10410-00306 Rev. F VectorStar ME7838 Series MM...Or 3-Nd75884 Rf Amplifier Module -
Page 161: A105 - Nd75885
11 – Connect the module power cable to connector mounting screws. P2 (A105) or P3 (A106). 5 – Remove the module. Figure 8-7. A105 and A106 RF Amplifier Module Replacement Detail VectorStar ME7838 Series MM PN: 10410-00306 Rev. F 8-17...Or 3-Nd75885 And A106 - Nd75886 Or 3-Nd75886 Amplifier Modules -
Page 162: A104 Spdt Switch Module - 70242
The A104 Switch Module Assembly connects between the A103 RF Amplifier output, and A105 and A106 amplifier inputs. For replacement detail, see Figure 8-8 Figure 8-9. A106 A104 A105 A104 Figure 8-8. A104 Module and Bracket Replacement Detail (1 of 2) 8-18 PN: 10410-00306 Rev. F VectorStar ME7838 Series MM...Or 3-70742 And Bracket Assembly -
Page 163: A104 Assembly Detail
Figure 8-8. A104 Module and Bracket Replacement Detail (2 of 2) A104 Assembly Detail A104 Figure 8-9. A104 Module, PCB, and Bracket Mounting Detail (1 of 2) VectorStar ME7838 Series MM PN: 10410-00306 Rev. F 8-19... - Page 164 7 – PCB Mounting Screws – 3 each 3 – Mounting Bracket 4 – Bracket-to-Chassis Mounting Screws, 4 each Figure 8-9. A104 Module, PCB, and Bracket Mounting Detail (2 of 2) 8-20 PN: 10410-00306 Rev. F VectorStar ME7838 Series MM...
-
Page 165: Rear Panel Fan Assembly - Nd73164 Or 3-Nd73164
Figure 8-3 on page 8-7 above for the location of the Rear Panel Fan Assembly. See Figure 8-10 below for assembly details. Figure 8-10. Rear Panel Fan Assembly (1 of 2) VectorStar ME7838 Series MM PN: 10410-00306 Rev. F 8-21... -
Page 166: Replacement Procedure
10. Connect the fan power cable to the A1 PCB Connector P9. Common Reassembly Procedures 11. If no other interior replacement procedures are required, follow the common reassembly procedures described above. • “Reassembly Procedure – Power, Disconnect, and Covers” on page 8-4 8-22 PN: 10410-00306 Rev. F VectorStar ME7838 Series MM... -
Page 167: Front Panel Assembly
Front Panel viewed from inside the chassis where Port 1 is on the right with the supplied cable harnesses and the cables that must be disconnected. Figure 8-11. Front Panel Assembly – View from inside chassis (1 of 2) VectorStar ME7838 Series MM PN: 10410-00306 Rev. F 8-23... -
Page 168: Replacement Procedure
Port 2 LED – Disconnect at A1 PCB Connector P12. d. Port 1 Power / Control – Disconnect at A1 PCB Connector J2. e. Port 2 Power / Control – Disconnect at A1 PCB Connector J3. 8-24 PN: 10410-00306 Rev. F VectorStar ME7838 Series MM... - Page 169 Install the F-F Adapters on the Replacement Front Panel 11. At the replacement Front Panel, install the two (2) V232 F-F adapters to: • Port 1 RF • Port 2 RF VectorStar ME7838 Series MM PN: 10410-00306 Rev. F 8-25...
- Page 170 24. Connect the front panel cable harnesses to these locations: a. LED Power – Connect to A1 PCB Connector P7. b. Port 1 LED – Connect to A1 PCB Connector P13. 8-26 PN: 10410-00306 Rev. F VectorStar ME7838 Series MM...
- Page 171 Port 2 Power / Control – Connect to A1 PCB Connector J3. Common Reassembly Procedures 25. If no other interior replacement procedures are required, follow the common reassembly procedures described above. • “Reassembly Procedure – Power, Disconnect, and Covers” on page 8-4 VectorStar ME7838 Series MM PN: 10410-00306 Rev. F 8-27...
- Page 172 8-9 Front Panel Assembly Removal and Replacement Procedures For 3739B and 3739C 8-28 PN: 10410-00306 Rev. F VectorStar ME7838 Series MM...
-
Page 173: Appendix A - Test Records
Make a copy of the following Test Record pages and document the measured values each time performance verification is performed. Continuing to document this process each performance verification session provides a detailed history of the instrument’s performance. VectorStar ME7838 Series MM PN: 10410-00306 Rev. F... -
Page 174: Me7838A Millimeter-Wave Configuration Vna System Test Record
3744E-EE 3744E-EE dB >33 dB 65 to 110 GHz SM6527 SM6527 dB >30 dB 65 to 110 GHz 3744A-EW 3744A-EW dB >30 dB 65 to 110 GHz 3744E-EW 3744E-EW dB >30 dB PN: 10410-00306 Rev. F VectorStar ME7838 Series MM... -
Page 175: Me7838G Wr05 S-Parameter Measurements Test Record
Port 2 Millimeter-Wave Module Module Serial Number: Model: MA25400A S-Parameter Measurements Table A-3. S-Parameter Measurements Results S-Parameters Measured Test Limits -10 dB max -2 dB max -2 dB max -10 dB max VectorStar ME7838 Series MM PN: 10410-00306 Rev. F... - Page 176 A-3 ME7838G WR05 S-Parameter Measurements Test Record Test Records PN: 10410-00306 Rev. F VectorStar ME7838 Series MM...
- Page 178 Anritsu Company Anritsu utilizes recycled paper and environmentally conscious inks and toner. 490 Jarvis Drive Morgan Hill, CA 95037-2809...
Need help?
Do you have a question about the VectorStar ME7838 Series and is the answer not in the manual?
Questions and answers