Table of Contents
Advertisement
Quick Links
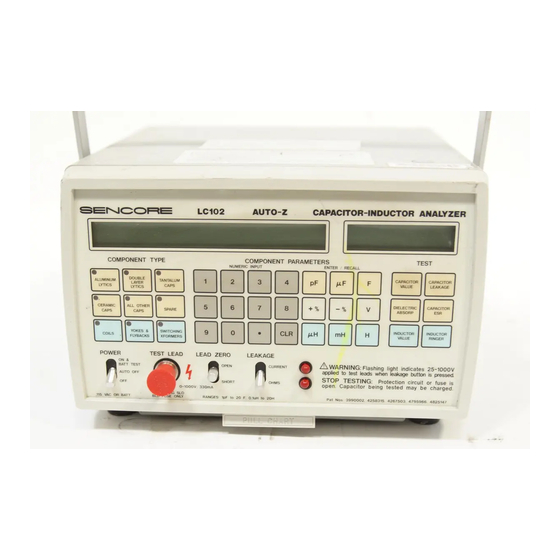
(This unit is mainly calibrated using an automated test.)
1. Connect the PA251 power adapter to the back of the UUT.
2. Connect the RS232 cable from the back of the computer to the RS232 port on back of
the UUT.
3. Connect the 39G219-test lead cable from the front of the UUT to the final test box.
Hook up the IEEE cable to the RS232 Interface Port located on the back left side of
the UUT.
4. Power UUT on. Watch for the software rev. number. (It will read 1.47 or 1.50).
Double click on "Sencore Tests". Insert the cal disk.
5. Boot up the LC103 Final Cal Test program on the computer by double clicking on the
"LC103 F_Cal " icon.
6. Use the "F1" key to apply the correct file information for the inductance and
capacitance calibrations. Click on "P071_03.Cal" to set the capacitance cal data.
Click on "OK". Click on "P072_10.Cal" to set the inductance cal data. Click on
"OK".
7. Make sure the "Software Rev." matches what the unit displays (may have to power
off/on again to recheck).
8. Highlight "ALL (NOT RINGERS)" by using the left side click button on the mouse.
9. Highlight "PRESS TO START" by using the left side click button on the mouse.
10. Follow the prompt on the computer for calibration instructions, making sure to use
either the "ENTER" or left side click of the mouse for advancing through the
program.
11. When the program is done, disconnect the RS232 port cable from the back of the unit
and power the unit off/on again.
12. Remove the 39G219 test lead from the final test box to the ringer test box and
connect to the ringer cal box.
13. Set the switch for "YOLKS AND FLYBACKS".
14. Press the "YOLKS AND FLYBACKS button on the UUT. Press and hold the
"Inductor Ringer Button". Watch for the same number that is noted on the ringer test
box. If not the same, adjust R1144 for the same number.
15. Set the ringer test box to the "SWITCHING TRANSFORMERS" position.
16. Press the "SWITCHING TRANSFORMERS" button on the UUT. Press and hold the
"Inductor Ringer Button". Watch for the same number. If not the same, adjust R1005
for the same number. Disconnect the test lead from the ringer box and reconnect to
the final test box.
17. Power UUT off.
18. Disconnect the PA251 power adapter from the back of the UUT.
19. Disconnect the 39G219-test lead from the front of the UUT.
20. Carry the unit over to the z-meter bench in Service. Open up the back of the unit.
Check the battery supply by hooking up to the DC Regulated Power Supply using the
lead hanging on the bench under the supply. Make sure the power supply is set to
approximately 12.65V. (Use the voltage coarse knob on the power supply to set.)
Check and make sure that the unit reads 90% - 100%.
LC103 CALIBRATION PROCEDURE
Advertisement
Table of Contents

Related Manuals for Sencore LC102


Summary of Contents for Sencore LC102
- Page 1 4. Power UUT on. Watch for the software rev. number. (It will read 1.47 or 1.50). Double click on “Sencore Tests”. Insert the cal disk. 5. Boot up the LC103 Final Cal Test program on the computer by double clicking on the “LC103 F_Cal “...
- Page 2 21. Turn the voltage fine tune knob all the way CCW (counter clock wise) to approximately 11V. Make sure unit reads 0% - 10%. Disconnect the DC power supply and close the back of the unit and connect the power adapter. Turn unit on by pressing POWER.
Need help?
Do you have a question about the LC102 and is the answer not in the manual?
Questions and answers