Table of Contents
Advertisement
Advertisement
Table of Contents

Related Manuals for Seca 286


Summary of Contents for Seca 286
- Page 1 286...
-
Page 2: Table Of Contents
4. Before you really get started ....69 seca wireless groups ....94 4.1 Scope of delivery . -
Page 3: Device Description
Height is transmitted to the multifunctional display. This allows body mass index (BMI) and body fat rate (BFR) to be calculated automatically. Measured results can be transmitted wirelessly to a seca wireless printer or to a PC equipped with a seca USB wireless adapter and compatible seca PC software via the network. -
Page 4: Basic Safety Precautions
Only have servicing and repairs performed by an authorized seca service partner. ► Only use original seca accessories and spare parts, otherwise seca will not grant any warranty. CAUTION! Patient hazard, malfunction ►... -
Page 5: Preventing Electric Shock
Preventing electric shock WARNING! Electric shock ► Set up the device so that the power supply socket is easy to reach and the device can be disconnected from the power supply quickly. ► Ensure that your local power supply matches the information on the power supply unit. -
Page 6: Preventing Device Damage
English Preventing device damage NOTICE! Damage to device ► Ensure that fluids and dust never get inside the device and the sen- sors. They can damage the electronics. ► Switch off the device before disconnecting the power supply unit from the mains socket. ►... -
Page 7: Handling The Packing Material
NOTICE! Inconsistent measuring results ► Before you electronically save measurement values determined us- ing this device and use them further (e.g. in seca PC software or in a hospital information system), make sure that the measurement values are plausible. ►... -
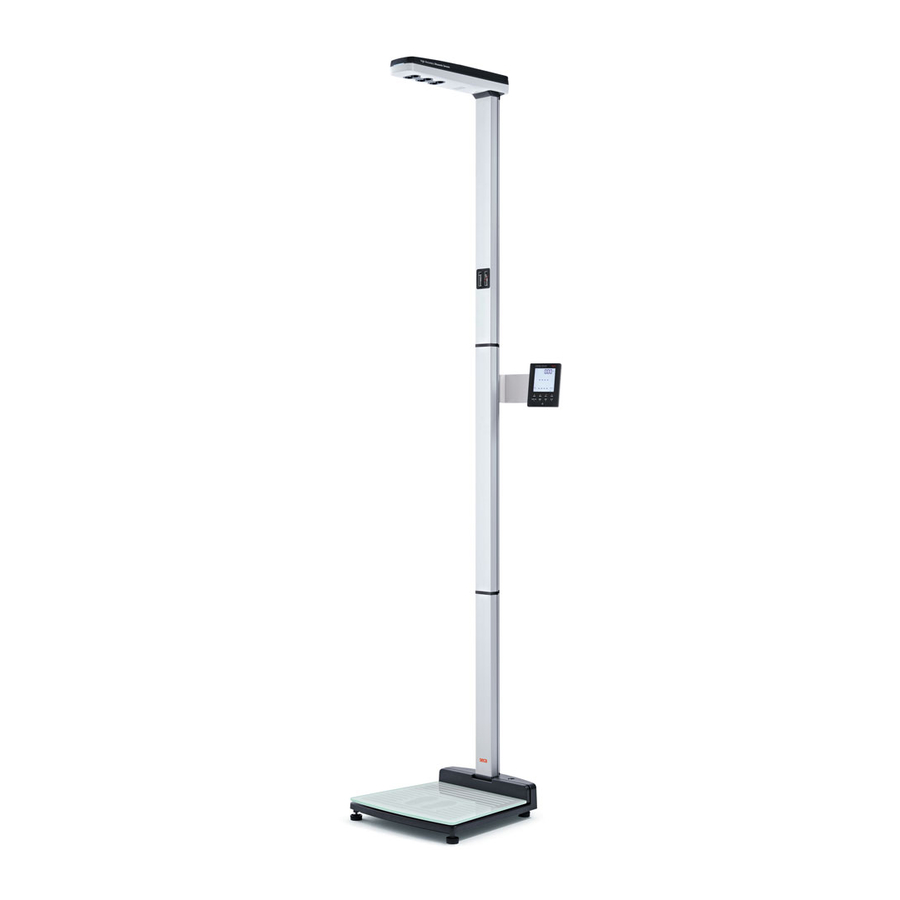
Page 8: Overview
For voice output For connecting the modular cable (transmission of data to the Modular socket multifunctional display) Service interface For use by seca Service Cable brackets For stowing the modular cable Notice Refers to assembly notes in the operating instructions... -
Page 9: Controls
Device component Function Multifunctional Central control and display element display Casters 2 pcs, for transporting short distances Spirit level Indicates whether the device is horizontal Power supply For connecting the device connection Foot screw 4 pcs, for precise alignment Weighing platform Acts as weighing element Column For measuring height... - Page 10 English Control Function menu key: • During weighing: - call up control unit menu. • In the menu: - press briefly: go back one menu level - press and hold: exit menu Start key, multifunctional display: switch multifunctional display and scale on and off clear key: for deleting data (patient data, height, BMI, BFR) entered manually or received wirelessly gender key:...
-
Page 11: Symbols In The Display
3.3 Symbols in the display HOLD NET PT ft:in YEARS HOLD MONTH ZERO ² kg/m Symbol Meaning Weight value in kilograms/grams Weight value in pounds (on non-verified models) Mother-and child symbol ( 2 in 1 function active) to weigh babies and toddlers Pre-tare function active Tare function active Height in centimeters... -
Page 12: Menu Structure For Multifunctional Display
*Funknetzwerk seca 360° wireless: • On Sytem • Off Group (ID): Group (ID): Max. three seca wireless groups: 0, 1, 2 Max. drei seca Funkgruppen: 0, 1, 2 Maximum configuration per wireless • HI_MA Autoprint • Off Maximal-Konfiguration pro Funkgruppe:... -
Page 13: Device Signals And Voice Output
3.5 Device signals and voice output The automatic weight and height detection of the device allows the patient to perform a measurement independently. During the measuring operation, the device supports measurement by means of acoustic and visual signals, as well as voice output. NOTE The acoustic signals and voice output of the device can be configu- red. - Page 14 • max xx A: maximum current consumption x-y V max. xxx mA • : note polarity of device plug use compatible seca adapter only • : operate device with direct current Do not dispose of device with household waste Overview • 67...
-
Page 15: Identification On The Packaging
3.7 Identification on the packaging Protect from moisture Arrows indicate top of product. Transport and store in an upright position. Fragile Do not throw or drop. Permitted min. and max. temperature for transport and storage Permitted min. and max. moisture for transport and storage Open packaging here Packaging material can be disposed of through recycling programs 68 •... -
Page 16: Before You Really Get Started
English 4. BEFORE YOU REALLY GET STARTED ... 4.1 Scope of delivery High Accuracy Ultrasonic Sensors How to Use 5-19 5-19 (Completed Years) (Completed Years) (kg/m²) (kg/m²) (kg/m²) 97th* 97th* 85th* 85th* 50th* 50th* 15th* 18.5 15th* 3rd* 3rd* * BMI-for-age percentiles. WHO, 1995, WHO, 2000 and WHO, 2004. -
Page 17: Assembling The Device
Component Pcs. Cylinder bolt for ultrasound head cover Hex socket bolts for multifunctional display Plain washer Connecting nut Optional cover for the multifunctional display Operating instructions, not shown 4.2 Assembling the device The first column element is fitted to the lower part of the device at the factory. Use an assistant to perform the rest of the assembly. -
Page 18: Fitting The Multifunctional Display
English 2. Push the column element over the threaded rod onto the first column element. 3. Place the column connector on the second column element in such a way that the threaded rod protrudes out of the bore in the column connector. 4. -
Page 19: Fitting The Third Column Element
3. Tighten up the two hex socket bolts to fix the multifunctional display in the desired position. 4. Route the power supply connection cable of the multifunctional display in the groove of the column elements as far as the lower part of the device. 5. -
Page 20: Fitting The Ultrasound Head
English 1. Screw the long threaded rod hand-tight into the connecting nut of the second column element. 2. Push the third column element over the threaded rod onto the column connector of the second column element. Fitting the ultrasound head The ultrasound head is fitted to the third column element and connected to the modular cable of the multifunctional display. -
Page 21: Setting Up The Device
6. Push the modular cable of the multifunctional display through the cable duct in the ultrasound head. ATTENTION! Damage to device and malfunction as a result of trapped modular cable ► Before closing the cover, route the modular cable in the cable compartment in such a way that it cannot be trapped between the cover and the cable compartment. - Page 22 English 3. Affix the "Correct posture" label to the third column element. NOTICE! Malfunction caused by other ultrasonic emitters If there are other ultrasonic emitters in the immediate vicinity of the device - automatic door openers, for example - faulty measurements or wireless transmission interference will occur.
-
Page 23: Quick Guide
Quick guide The quick guide poster shows the patient the sequence of the measuring operation. ► Place the "Quick guide to measuring" poster in a clearly visible location High Accuracy close to the device. Ultrasonic Sensors How to Use 5-19 5-19 (Completed Years) (Completed Years) -
Page 24: Establishing Power Supply
The scale may overheat, catch fire, melt or short-circuit. ► Use only original seca plug-in power supply units with controlled 12 V output voltage. 2. Insert the device connector of the power supply unit into the power supply connecting socket of the scale. -
Page 25: Operation
5. OPERATION 5.1 Calibrating height measurement Before performing a measurement with the device for the first time, you need to calibrate height measurement. You do this by "teaching" the device a refer- ence measurement. NOTE: Perform calibration at least once a year to achieve perfect measured results. -
Page 26: Measuring
1. Ensure that there is no load on the scale. 2. Press the Start key of the multifunctional display. All the elements of the display are shown briefly, then seca appears in the display. The scale is operational when 0.00 appears in the display. -
Page 27: Activating/Deactivating Key Lock
2. Press the Start key of the multifunctional display. 3. Wait until the display appears. seca 4. Press the menu key of the multifunctional display. Key lock is switched on. 5. To cancel key lock again, restart the device by pressing the key of the multifunctional display. -
Page 28: Keep The Weight Permanently In The Display (Hold)
The patient data are sent with the measured results when you transmit the latter to a wireless printer from the seca 360° wireless system. The wireless printer evaluates the measured results on the basis of the patient data. -
Page 29: Enter Patient's Gender
(see "Activating the Autohold (AHOLd) function" on page 91). 5. Ask the patient to step off the measuring station. 6. Read off the measured results. If a seca wireless printer is connected, take the printed ticket. 7. Press the clear key. -
Page 30: Sending Measured Results To Wireless Receivers
(see "Activating automatic transmission (ASEnd)" on page 96). The measured results are sent to reception-ready devices. Printing measured results If the measuring station is connected to a seca wireless printer, you can print out the measured results directly. ► Press the print arrow key. -
Page 31: Switching Off The Device
Switching off the device ► Press the Start key of the multifunctional display. 5.3 Navigating in the menu 1. Switch on the device (see "Switching on the device" on page 79). 2. Press the menu key. The last menu item selected (in this case, Autohold "AHOLd") appears in the display. -
Page 32: Configuring Voice Output (Menu)
English 5.4 Configuring voice output (menu) In the menu you can configure voice output and the beeps if required. NOTE The languages available on the device depend on the model in question... • PT • • • • • DE •... -
Page 33: Activating/Deactivating Announcement Of Measured Results (Resul)
5. Confirm your selection. You exit the menu automatically. Activating/deactivating the If you have connected a seca wireless printer to the device, you can set the device so that following the measurement, there is an announcement telling announcement “Take your printed you to take the printed ticket with the results. -
Page 34: Other Functions (Menu)
English 5.5 Other functions (menu) Other functions are available to you in the device menu. This enables you to configure the device perfectly to suit your needs..• 0 Filter • 1 • 2 • On Press • Off Beep •... -
Page 35: Deleting Values Automatically (Aclr)
Deleting values automatically Out-of-date measured results and patient data lead to incorrect calculation of (ACLr) BMI or BFR. You can set the device so that the measured results and patient data below are automatically deleted after 5 minutes: • gender •... -
Page 36: Setting Display Backlighting (Lcd)
English 2. Confirm your selection. The current setting is displayed. 3. Press the arrow key send or print to switch between BMI and BFR. 4. Confirm your selection. You exit the menu automatically. The amended setting is displayed permanently in the multifunctional display. -
Page 37: Permanently Saving Additional Weight (Pt)
The set additional height (in this case: 4 cm) is displayed. 4. Ask the patient to step onto the scale. The patient's height is displayed. The saved additional height has been deducted automatically. 5. To deactivate the function, select the item "ZEro" from the menu again. 6. -
Page 38: Activating The Autohold (Ahold) Function
English Activating the Autohold (AHOLd) When you activate the Autohold function, the measured result for every mea- function suring operation continues to be displayed after the load has been removed from the scale. It is then no longer necessary to activate the Hold function manually for each individual measuring operation. -
Page 39: Switching Unit Of Weight (Unit)
3. Select a filtering level. Weight display Hold Sensitive Slow Medium Medium Slow Fast NOTE: • If "0" is set, then if you are weighing patients who are not very steady on their feet, it is possible that despite the"Hold" function being acti- vated, no weight value will be permanently displayed. -
Page 40: Restoring Factory Settings (Reset)
English Restoring factory settings (rESEt) You can restore the factory settings for the functions below. Function Factory setting Autohold (AHOLd") Beep (PrESS) Beep (HOLd) Beep (MEASr) Filtering (FIL) Autoclear (ACLr) Pre-tare (Pt) 0 kg Display backlighting brightness 50 % Display backlighting duration Permanent BMI/BFR Physical activity level (PAL) -
Page 41: The Seca 360° Wireless Network
• 1 baby scale • 1 personal scale • 1 length measuring device • 1 seca wireless printer • 1 PC with seca USB wireless adapter Channels Within a wireless group, devices communicate with each other on three channels (C1, C2, C3). -
Page 42: Device Registration
• 5, 6 and 8-12: reserved for system expansion 6.2 Operating the measuring station in a wireless group (menu) All the functions you need to operate the device in a seca wireless group can be found in the "rF" submenu. -
Page 43: Activating Automatic Transmission (Asend)
NOTE: Double-digit channel numbers are displayed without a space. The display "C230" therefore means: channel "2", channel number "30". 9. Confirm your selection for Channel 2. The device suggests a channel number for Channel 3 (in this case: "C360"). You can adopt the proposed channel number or use the arrow keys to set a different channel number. -
Page 44: Selecting Print Option (Aprt)
NOTE: This function is only accessible if a seca wireless printer has been integrated in the wireless group via the "Learn" function. 1. Switch on the multifunctional display. -
Page 45: Hygiene Treatment
7. HYGIENE TREATMENT WARNING! Electric shock The device is not de-energized when the on/off key is pressed and the display goes out. Use of fluids on the device may cause electric shock. ► Ensure that the device is switched off before performing any hygiene treatment. -
Page 46: Function Check
“What do I do if ...” in this document, you may not use the device. ► Have the device repaired by seca service or by an authorized service partner. ►... - Page 47 ... no beeps can be heard? • Volume set to zero - Increase volume • Loudspeaker is faulty - Inform seca Service • Announcement of measured results is not activated - Activate function (see "Activating/deactivating announcement of measured results (reSUL)" on page 86) •...
- Page 48 Cause/solution • The device was unable to send measured results to the wireless receiver (seca wireless printer or PC with seca USB wireless adapter). - Check whether the device is integrated in the wireless network - Check whether the receiver is switched on •...
-
Page 49: Maintenance
3 to 5 years. NOTICE! Incorrect measurements as a result of poor servicing ► Have servicing and repairs carried out exclusively by seca service or by an authorized service partner. ► You can find service partners in your area or by sending an e-mail 11.TECHNICAL DATA... -
Page 50: Weighing Data
< 10 mW • Standards applied EN 300 328 EN 301 489-1: EN 301 489-17: Minimum weight (to trigger measuring operation) 0.5 kg 11.2 Weighing data seca 286 Maximum load 300 kg Minimum load 1 kg Increments 50 g Tare range... -
Page 51: Spare Parts
The warranty shall become null and void where the device is opened by per- sons not expressly authorised to do so by seca. In the event of a warranty issue, please contact your local seca office or the dealer from whom you ordered the product.
Need help?
Do you have a question about the 286 and is the answer not in the manual?
Questions and answers