Table of Contents
Advertisement
Quick Links
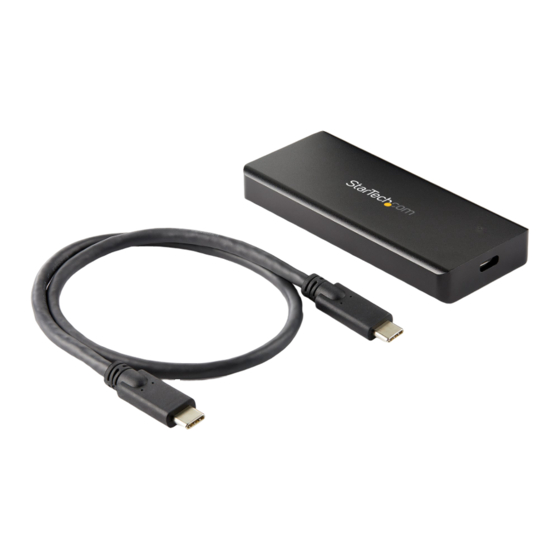
USB 3.2 Gen 2 Type C IP67 Rugged NVMe Enclosure
Product Diagram (M2E1BRU31C)
Exterior
Component
• Solid: Indicates that the Enclosure is receiving
1
power.
Power LED
• Flashing: Indicates that the Drive activity.
• Used to connect the Enclosure to the Host
2
USB-C Port
Computer.
Interior
4
3
Component
• Used to secure the Drive Bay Cover in the
3
Drive-Bay Screws x 4
Enclosure.
4
• Used to connect the Drive to the Enclosure.
Drive Connector
To view manuals, FAQs, videos, drivers, downloads, technical drawings, and more, visit www.startech.com/support.
1
2
Function
6
5
Function
Adjustable Drive
5
• Used to accommodate different drive lengths.
Length Holes
Drive-Mount Screw/
6
• Used to secure the Drive to the Enclosure.
Nut
Requirements
For the latest requirements and full manual, please visit
M2E1BRU31C
Installation
Warning! Drives should be handled carefully, especially when they're transported. If
you're not careful with your drives, you may lose data as a result.
Installing an 80 mm Drive
1. Using the Torx Screwdriver (included), remove the Drive-Cover Screws (x 4) from
the bottom of the Enclosure and remove the Cover Plate.
2. Place the Drive next to the Drive Tray and align the screw groove on the Drive with
the Adjustable Drive Length Holes on the Drive Tray.
3. Use the Torx Screwdriver and to remove the Drive-Mount Screw from the
Enclosure.
4. Gently slide the connector on the Drive (on a 30-degree angle) into the Drive
Connector on the Enclosure.
Note: The connector on your drive is keyed so that it only fits one way.
5. Lightly push the Drive down into position on the circuit board.
6. Insert the Drive-Mount Screw through the screw groove on the Drive and into the
Drive-Mount Screw Hole on the Enclosure.
7. Using the Torx Screwdriver tighten the Drive-Mount Screw, being careful not to
over-tighten.
8. Place the Cover Plate back onto the bottom on the Enclosure. Make sure that the
Cover Plate is properly aligned with the top of the Enculosure creating a tight seal
and that nothing is obstructing the Cover Plate, in order to provide a water and
dust resistance seal.
9. Insert the Drive-Cover Screws back into the four corner on the bottom of the
Enclosure.
Quick-Start Guide
www.startech.com/
Manual Revision: December 18, 2019 6:37 PM
Advertisement
Table of Contents

Related Manuals for StarTech.com M2E1BRU31C


Summary of Contents for StarTech.com M2E1BRU31C
- Page 1 9. Insert the Drive-Cover Screws back into the four corner on the bottom of the Enclosure. • Used to connect the Drive to the Enclosure. Drive Connector To view manuals, FAQs, videos, drivers, downloads, technical drawings, and more, visit www.startech.com/support. Manual Revision: December 18, 2019 6:37 PM...
- Page 2 StarTech.com. Where they occur these references are for illustrative purposes only NL: nl.startech.com Brackmills N5V 5E9 Lockbourne, Ohio and do not represent an endorsement of a product or service by StarTech.com, or an endorsement of the product(s) to which IT: it.startech.com Northampton Canada 43137 this manual applies by the third-party company in question.
Need help?
Do you have a question about the M2E1BRU31C and is the answer not in the manual?
Questions and answers